This is the multi-page printable view of this section. Click here to print.
General
- 1: Profiles
- 2: Import / Export
- 2.1: Sequence Export
- 2.2: Sequence Import
- 2.3: Falcon Pi Player
- 3: Zip Wizard
1 - Profiles
Vixen supports creating multiple profiles so that you can have different setups. One example of this is to allow for a Halloween setup in addition to a Christmas setup, where your elements and display setup are different. I also use it to manage multiple sites so they can be configured independently and keep this size of a profile to a reasonable size.
The Profile setup can be accessed from the main administration page under System -> Profiles.
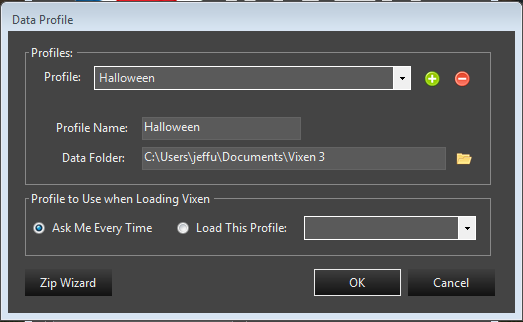
Here you can add or delete profiles. Using the green plus button will add a new profile. The default folder is placed in your My Documents folder and is based on the name you give the profile. If you want to delete a profile you can select it in the drop down and click the red minus button. This will remove the profile from showing up in Vixen, but it will not actually delete the contents on your hard drive. You will need to manually remove it if you want to. This helps prevent accidental removal of a profile.
You can also map to an existing profile that someone has shared with you. Copy or extract their profile under your My Documents folder being careful not to overwrite any of your other profiles. Many people share their default profile which is named Vixen 3. But you will want to extract that to a temp location and rename it before copying to your My Documents so you do not overwrite your main profile. Once you have it copied in, you can create a new profile and navigate the data folder to point to it.
At the bottom of the form are options to manage how profiles are loaded. You can select a default profile to always load when Vixen starts up, or have it prompt you to pick one every time. Keep in mind that if you want to switch profiles often, the “ask me every time” option is the best choice. To change profiles, you need to exit Vixen and restart it with the option to ask you so you can select the profile you want to load.
Lastly at the bottom is a link to the Profile Zip Wizard where you can create a zip copy of your profile for sharing or backup. See the section on the Zip Wizard for more details.
2 - Import / Export
2.1 - Sequence Export
Overview
New in 3.6u1 is the ability to import/export a sequence package. This packages up all the necessary items to share sequence(s) from a profile with someone else, or another profile of your own with different elements. See the section on Importing.
Exporting
From the main admin window, select Tools -> Export Sequence Package menu. A wizard workflow will walk you through making an export package of the sequence(s) you want to share.
Step one is selecting the sequences you want to package. There is a file browser to choose individual sequences, or you can select the middle icon which will add all sequences in the sequence folder. The last icon is used to delete selected sequences from the list. The list supports multiple selection with the normal Shift/Ctrl click or drag select.
Step two allows you to choose the package name and location to save it. The extension for packages is .vpkg. The wizard will suggest a file and path name based on the profile name. The default location to save the package is in the Export folder of the current profile. You can choose the path that makes sense for you. The other option is whether to include the audio files that are used in the sequence. In some cases you may not want to share the audio files and they can be specifically excluded. The default is to include them.
The last step is a Summary confirmation window to validate what will occur. If the summary is correct you can click next and the export will occur. Progress bars will show the status of the export as it proceeds. If there are many sequences, it may take a while to export all of them.
Once finished you have a package file that can be shared. It is fully standalone and has all the information necessary for the import process to use.
Tutorial
2.2 - Sequence Import
Overview
New in 3.6u1 is the ability to import/export a sequence package. This packages up all the necessary items to share sequence(s) from a profile with someone else, or another profile of your own with different elements. See the section on Exporting.
Importing
From the main admin window, select Tools -> Import Sequence Package from the menu. A wizard workflow will walk you through importing the sequence(s) from the package.
Step one is selecting the package file to import. This is generated from the Export process described above and has a .vpkg extension. Use the file browser to browse to and select the file to use. The next section is about the mapping file to map the profile elements for the imported sequences to the current profile. If this is the first time importing from the package or profile, you will need to create the map file. If you have previously imported sequences from this package or the same profile the package came from, you can use the file browser to select an existing saved mapping.
Creating a mapping file
You must have a package file selected before you can create a mapping. When you choose to create a mapping file, you will be presented with a screen that has the two element trees. One from the incoming package showing the source tree the sequence(s) are based on. The other tree is the destination tree of the current profile. These are presented in two columns and drag drop is used to drag the element from the destination tree to element on the source tree you want effects to map to. Once you drag it across to map it, the source tree will reflect the mapping. To replace a mapping, drag another item to it. To delete a mapping, select the mapped item and use the delete key. You do not need to map every item if you do not plan to use the effects from that source item. You only need to map what you want or what fits to your display. Once you are happy with all the items you want to map, then you can click Ok. Once clicking ok, you will be prompted to save the map file. Choose an appropriate name and location and save it. Once saved, the wizard will autofill the path you saved the map to in the map file entry box.
Selecting Sequences
Step 2 is selecting the sequences you wish to import. The screen will show you the sequences included in the package file and you can check the ones you wish to import. Multi-select can be used to select the items to change. Pressing space will toggle the state of any selected items.
Summary
Step 3 is a summary of what will be done. If the summary looks correct, then press next.
Final step is the actual import with progress showing the steps. This will take each sequence selected and map the effects in it to the current profile using the mapping file. It will copy in any audio and media files used in the sequences that are imported. When it is complete the newly imported sequences will be in the sequence folder and can be opened in the editor to play or further edit.
Hints and Tips
The import can map most everything including mark collections, layers, and media files like video and pictures that the effects use. One thing it cannot handle is Face mapping. If you map the Face elements from the imported sequences to Face elements in the destination that already have Face mappings created, they should generally just work. If the imported sequences used image mapping for faces, those will not be included. You may need to map those effects to your existing image maps, or create maps that are appropriate.
Tutorial
2.3 - Falcon Pi Player
Overview
The Falcon Player (FPP) is a lightweight, optimized, feature-rich sequence player designed to run on low-cost Single Board Computers (SBC). It was originally created to run on the $35 Raspberry Pi, hence the middle ‘P’ in the short name but now the FPP supports many more systems. It is still mostly commonly used on a Raspberry Pi (Zero, 2, 3, 4) or a Beagle Bone (Black, Green, Pocket).
The FPP shorthand is still used but it is now just called Falcon Player.
FPP aims to be controller agnostic, it can talk E1.31, DDP, DMX, Pixelnet, and Renard to hardware from multiple hardware vendors. Using various capes, FPP can also be a controller on P5 and P10 Matrixes, or strings of ws2811 pixels.
Useful Links:
Vixen Support
Vixen can export FSEQ files to be played on the FPP player or FPP based controller. There are two ways to export. Sequence at a time from within the Sequencer and via an Export Wizard that can export multiple sequences at a time.
Export Wizard
The Export Wizard is the recommended way to export your sequences. It was added on to help automate the exporting of an entire show’s worth of sequences instead of having to do them one at a time in the Sequencer. It can be started from the main Admin window under Tools -> Export Wizard.
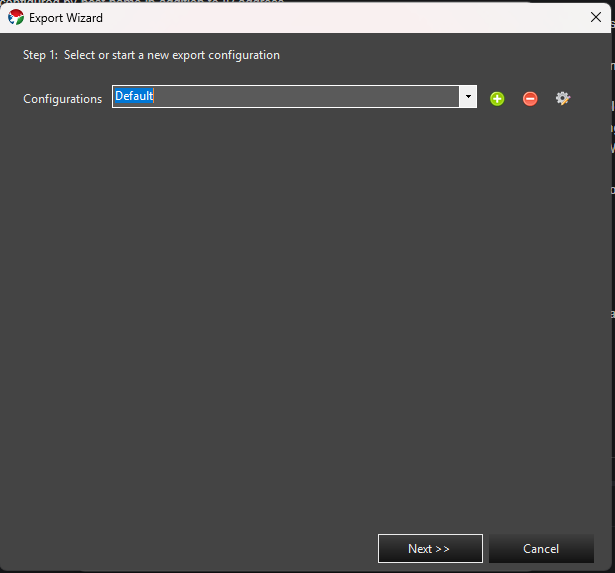
Step 1: Select or Start a New Export Configuration
Every setting you configure in the wizard - the sequence list, controller order, output format, and destination - is stored together as a named configuration (profile) so you can re-run the same export again later without reconfiguring it.
This screen shows a Configurations drop-down. The first time you run the wizard it will contain a single Default profile. Use the + button to create a new named profile, the pencil/gear button to rename the currently selected one, or the - button to delete it. Choose the profile you want to use (or edit) from the drop-down and select next.
Step 2: Select Sequences to Export
The next screen will allow you to select or review the sequences to be exported. If you used a saved configuration, this will be pre-populated with the sequences used before. You can edit to add or remove to get the list of sequences you need.
- The folder icon opens a file picker (restricted to your profile’s sequence folder) so you can browse and select the sequences you want to add.
- The second icon automatically adds every sequence found in the sequence folder for the current profile, excluding backup files.
- The delete icon removes any selected sequences from the list. You can also select rows and press Delete.
Once you have the sequences you need in the list, choose next.
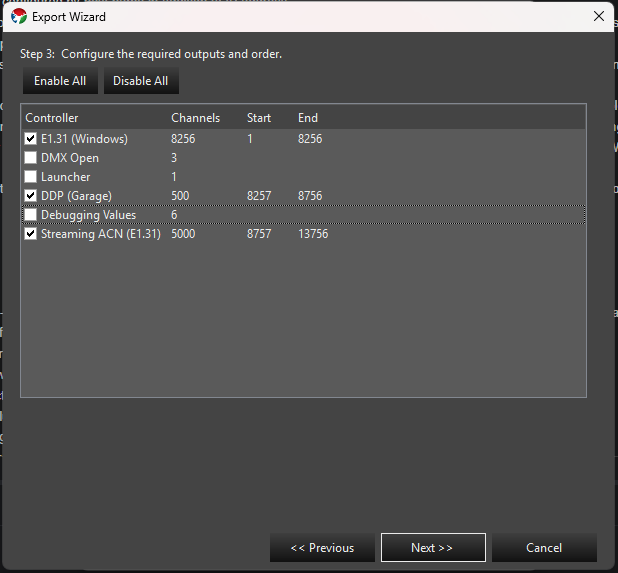
Step 3: Configure the Required Outputs and Order
The next screen allows you to choose the controller blocks and the order they should be exported in. The check boxes on each controller determine if it is included in the export; Enable All / Disable All buttons let you toggle every controller at once, and Ctrl+A selects every row so you can drag a block of them together. You can drag and drop the controllers into any order desired. The channel ranges will be adjusted to match the new order.
This will need to directly match the intended setup in FPP. Vixen can export the controller config for use in FPP, so that can be automated - in that case the controller order is not really important, all that matters is that they match. If you are exporting from other sequencers, then you need to ensure they are configured the same. Once you have the proper controllers and order set, choose next.
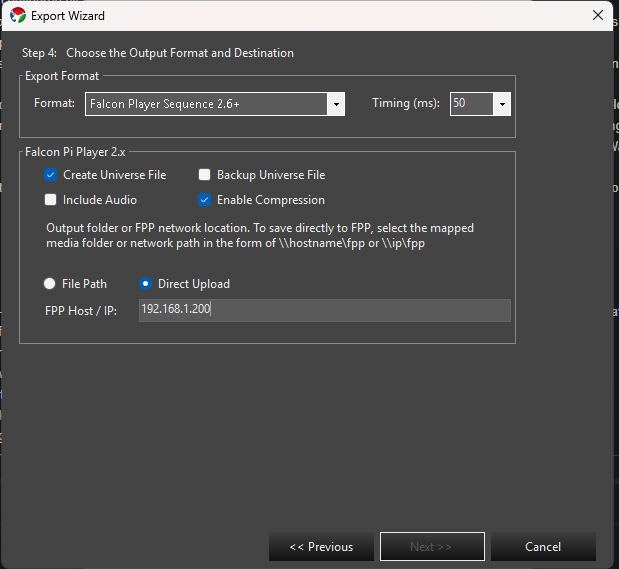
Step 4: Choose the Output Format and Destination
The next screen is used to set up how the export is done.
- Format - Choose the output format. The default of Falcon Player Sequence 2.6+ should be used for modern versions of FPP. There are other options to support legacy versions as well as exporting to older Vixen 2 formats and CSV.
- Timing (ms) - The update interval (frame step time) baked into the exported file, in milliseconds. 25, 50, and 100 ms are offered by default, though a custom value can be typed in. This should match the update interval your controllers/sequence were designed around; a smaller value gives finer timing resolution at the cost of a larger file.
Once you have chosen a format, the section below it adapts to match. Formats other than Falcon Player Sequence 2.6+ show separate Sequence and Audio panels where you independently browse to an output folder for each (and, if the audio doesn’t already sit alongside your sequences, optionally rename the audio file to match the sequence name). For Falcon Player Sequence 2.6+, a single Falcon Pi Player 2.x panel replaces both, with the following options:
- Create Universe File - Generates the universe configuration file that reflects the controller and channel mapping, in the exact format FPP uses.
- Backup Universe File - If the destination already has a universe file, it is renamed to a timestamped backup before the new one is written.
- Include Audio - Includes the audio file as part of the export, named to match the sequence file so FPP can locate it automatically.
- Enable Compression - Compresses the FSEQ file. This is enabled by default and recommended.
Below those options, choose how the files reach FPP - File Path or Direct Upload:
File Path
This is the original method, and works with any FPP version. Choose an output folder - it can be a plain local/network folder, or a mapped path directly into FPP’s own storage in the form \\hostname\fpp or \\ip\fpp, using FPP’s Samba/CIFS file sharing. Vixen creates the sequences, music, and config subfolders it needs underneath whichever folder you choose.
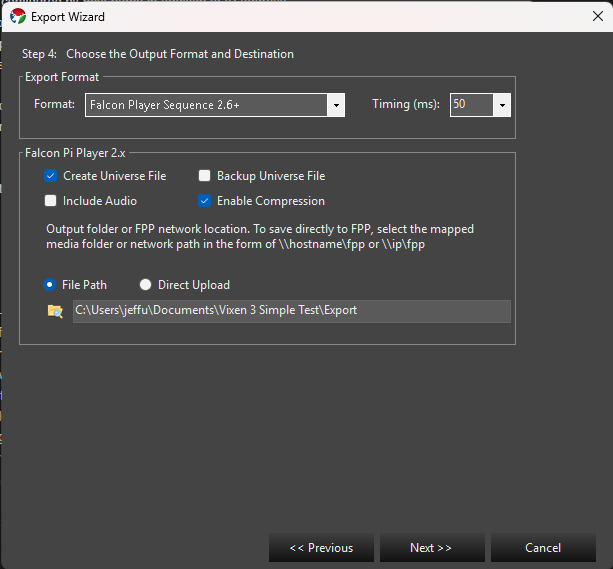
If you point this at FPP over the network, the export wizard can place all the files where they belong, including the universe file, sequences, and audio, in one pass. If you export to a local folder instead, the folder structure will mirror FPP’s layout so you can upload the files yourself afterward.
Samba/CIFS sharing was enabled by default on FPP versions 5 and older, but on FPP 6+ it has to be turned on under FPP Settings -> System. You’ll need advanced settings enabled under FPP Settings -> UI -> User Interface Level to see it; then under OS Settings, select Enable Samba/CIFS.
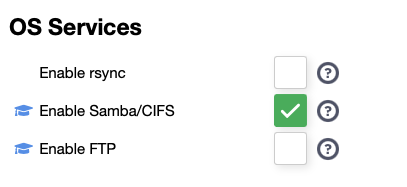
Note: Windows 11 has changed some security settings and will not allow you to mount an anonymous Samba share. The following has worked for several users. See SMB Protocol Changes for more info.
This can either be deactivated via group policy by activating Computer Configuration > Administrative Templates > Network > Lanman Workstation > Enable insecure guest logons
Or via Registry Editor by adding the following Key
HKEY_LOCAL_MACHINE\SOFTWARE\Policies\Microsoft\Windows\LanmanWorkstation with DWORD property AllowInsecureGuestAuth and the value 1
If you export via File Path directly to FPP, you will need to manually restart the FPPD daemon afterward to pick up any universe configuration changes.
Direct Upload
Direct Upload sends sequences, audio, and the universe file straight to FPP over its own web API, entirely avoiding Samba/CIFS and the Windows 11 issue above. Enter the FPP device’s hostname or IP address in the FPP Host / IP field. Vixen pings the host as you leave the field to confirm it’s reachable - you can’t move to the next step until it responds. If a universe file is generated, FPPD is restarted automatically after the upload, so no manual restart is needed.
Step 5: Summary
The last screen details what will be done: sequence count, timing, format, output folder, audio handling, and (for Falcon Player Sequence 2.6+ with universe file generation) the universe file destination. If not all of the selected controllers support universes, a warning is shown here, since those controllers will be left out of the universe file and will need to be configured manually in FPP.
If you’re using Direct Upload with the Falcon Player Sequence 2.6+ format, an FPP Device Info panel queries the device and displays its host name, description, platform, and variant - a quick way to confirm you’re pointed at the right box before exporting.
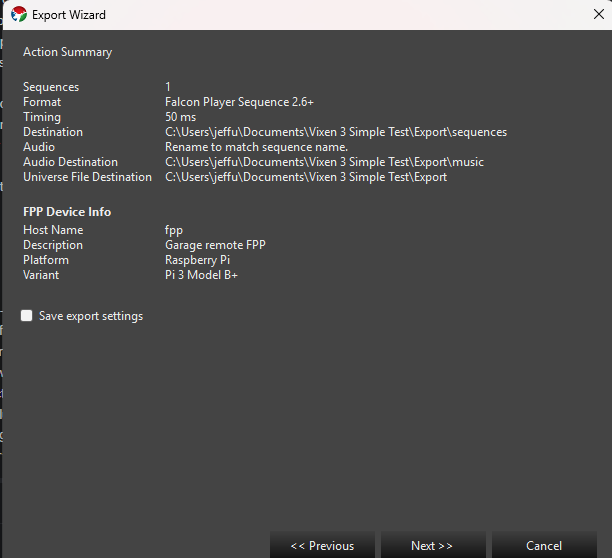
Check Save export settings and enter (or choose an existing) configuration name to save these settings as a profile for future use. After you hit next, it will commence exporting, with progress bars showing progress through the process.
Sequence Editor Export
Under File -> Export in the sequencer is the legacy export. It is very similar to the wizard, but much simpler in that it can only export the sequence you have open in the editor. You cannot save any settings in it either. This is retained for legacy purposes, but may be removed in the future, so the recommendation is to use the wizard.
3 - Zip Wizard
Introduction
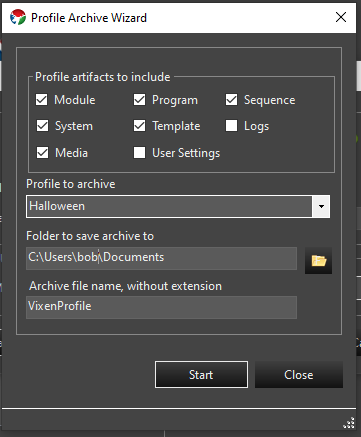
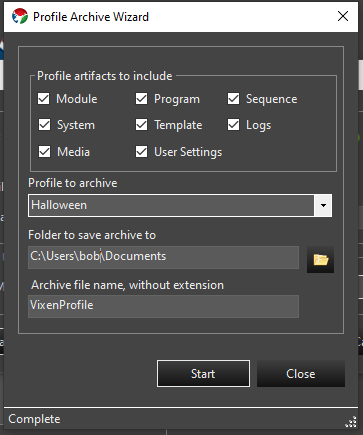
The zip wizard screen is accessed from the profile System => Profiles menu on the main admin form. It can be used to create backups, copy a profile to another PC, provide a copy to developers to help debug, or share with others. It has several options to configure it. Profiles are stored in the My Documents folder by default. This PC\Documents or c:\Users\bob\Documents where bob is the current logged in user. This shows up in various forms depending on the version of windows, but it is the traditional My Documents folder. Profiles generally start with Vixen 3 in the folder name if the defaults are used, but that is not mandatory.
Backups
The primary use of the zip wizard is to make a backup of your profile to restore in case something goes wrong, move it to another machine, or share with others. The settings above are the most common for this use. This will recreate the profile structure into a zip file and save it in the name and location specified. It will cover any changes to the Display Setup / Preview as well as sequences and audio files. The files in the zip archive will be relative to the profile location which is normally in the user’s My Documents folder.
Restoring Backup
If you need to restore a backup, it can be extracted into the user’s My Documents folder. This is typically in the form of c:\Users\bob\Documents where bob is the logged in user on the PC. If you are restoring on the same PC where the backup was made, then extracting it is all you should need to do. Your unzip utility should prompt you to overwrite the existing files. If you do not get that prompt, you are likely not extracting it to the same location it was backed up from.
Transfer to another PC
Copying a profile to another PC. In order to transfer the backup to another Vixen instance on another PC, you will extract the files to the user’s My Documents folder as described above. If you are not using multiple profiles in the source or destination, then that will likely just be the Vixen 3 folder inside My Documents and nothing further will be required. If you have multiple profiles, then the profile may need to be configured in the destination instance of Vixen if it is the first time you are copying it over.
Extracting a Foreign Profile
If you are using a Profile from another user, additional care should be taken to ensure the location of the profile they provided. If they are using a default profile, it may have a folder name of Vixen 3 which is the same as your default profile folder. You do not want to overwrite your default profile which is in My Documents Vixen 3, so when extracting make sure to change the name of the folder it is being extracted to under My Documents.
Profile Management
If this is the first time the profile has been copied to a PC you will need to establish the new profile for Vixen to find it. After extracting the profile, start Vixen up. To do this we want to open the Profile Editor. Depending on how you have it setup, you may see the profile selection screen at startup or not. If you see the profile selection screen at startup, the Profile Editor can be opened from there. Otherwise, it can be opened from the System => Profiles menu on the main screen.
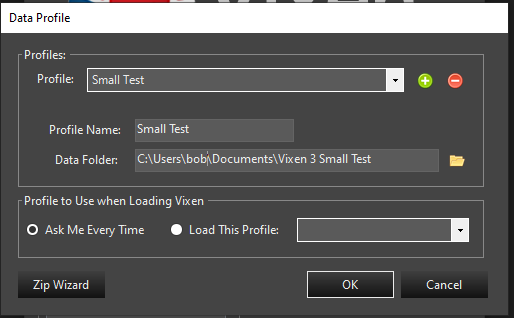
In this screen (shown above) you need to add a new profile and give it a name. Ideally this would be the same name as you used in the source Vixen PC. Then you need to set the Data Folder to the path of where you extracted the profile you copied. This should be in your My Documents folder. In the example above, the path is C:\users\bob\Documents and the profile folder is Small Test. If you used the default path for the profile name on the source machine and named the profile the same on the destination, this may already be correct. Otherwise you can use the file explore to navigate to it. Choose the options to ask you which profile to load, or default to a specific profile and click ok. If you do not choose to ask, then you should select the new profile if you want it to load by default. Vixen will validate that the path entered is correct. If it asks you if you want to create the folder, you have misconfigured the path and should cancel and check the path. You will then need to restart Vixen once the path is correct. Once you restart, then you will either be prompted to choose the profile, or it will load the default profile you chose. You should only need to setup the profile the first time you copy a profile over to establish it. After that, just extracting the backup over the existing profile should work without any changes to the profile setup.
Diagnostics
The use shown above is for capturing the entire profile to provide when creating a bug ticket for someone who has requested the profile to help debug the issue. This provides everything a developer will need to recreate the profile, including the logs, which may not be in the affected profile if you are using multiple profiles.