This is the multi-page printable view of this section.
Click here to print.
Return to the regular view of this page.
Layers
This section covers the layering features when creating effects.
The 3.3 release brings support for layers. Layers are defined at the sequence level and effects belong to a layer. By default a new sequence has one layer called Default and this serves to act the same as things have been in previous releases. Older sequences opening in the 3.3 release will have the default layer and all effects will belong to that layer.
Layers are combined from the highest to the lowest by definable mixers. Each layer you create can have its own mixer chosen from the available mixers. Each mixer defines how colors will combine between layers.
To assign an effect to a layer, right click on it in the timeline and navigate to the Layer menu. From there a list of the layer names will appear and you can select the layer to associate the effect to. The menu also will have a check next tot he layer the effect is currently associated with. Hovering over the effect will show a tooltip with effect information. In this tooltip will show the layer the effect is currently associated with.
New effects added to the timeline will be in the Default layer automatically. Copy and pasting effects will retain the layer of the original effect.
1 - Layer Types
This section covers the Layer Types.
Overview
Layers are a method of controlling how separate Effects on the same element interact with each other. It can be very powerful to create variations on the existing effects. Each layer (other than Default) has a mixer assigned to it in the Layer Editor, and that mixer defines how the effects in the layer combine with whatever is in the layer immediately below it.
Throughout this page, “higher layer” refers to the layer the mixer is assigned to, and “lower layer” refers to the result of everything beneath it. If you stack more than two layers, mixing happens one pair at a time from the top down, so the “lower layer” a mixer sees may already be a blend of several layers below it.
Some mixers require a mixing partner — they only make sense when there is an effect in the layer below to combine with. If a layer’s mixer requires a partner and there is no effect on a lower layer at that moment in time, the higher layer’s effect will not be visible either, rather than showing on its own.
Highest Value (Default)
Highest Value is the mixer every new layer starts with, and it’s also the same behavior the old Default layer has always used. For each color channel, it simply keeps whichever of the two layers is brighter. There’s no configuration, and it doesn’t require a mixing partner — an effect in a layer using Highest Value will show normally even if nothing is on the layer below.
Intensity Overlay
The Intensity Overlay Layer takes the brightness of the higher layer’s effect and uses it to scale the brightness of the lower layer, without changing the lower layer’s color. This is useful for fading or pulsing effects that don’t already have a level curve applied — for example, placing a white pulse effect in an Intensity Overlay layer will cause whatever is beneath it to dim and brighten along with the pulse. Intensity Overlay requires a mixing partner, so it has no effect on its own without something in a lower layer.
Mask
The Mask Layer uses the higher layer’s effect to cut out, or mask, parts of the effect(s) beneath it. Anywhere the higher layer’s effect is lit, the lower layer is fully blacked out at that point; anywhere the higher layer is unlit, the lower layer passes through unchanged. The color of the masking effect doesn’t matter — only whether it is lit or not.
Mask and Fill
Mask and Fill works like Mask, but instead of leaving unlit gaps where the masking effect is, it fills those areas with the masking effect’s own color. The result is the higher layer’s effect drawn directly on top of the lower layer, using the higher layer’s exact colors rather than a blend. This mixer has a Configuration dialog with two options:
- Exclude zero values (on by default) — areas where the higher layer’s effect has zero brightness show the lower layer instead of black. Turning this off makes the higher layer fully replace the lower layer everywhere, including its unlit gaps.
- Require Mixing Partner (off by default) — when enabled, the higher layer’s effect will only display where a lower layer effect also exists at that time.
Color Change
Color Change replaces the color of the lower layer with the color of the higher layer’s effect, while preserving the lower layer’s brightness/intensity. This lets you recolor an existing effect by placing a differently-colored effect above it, without affecting its timing or brightness pattern. Color Change requires a mixing partner.
Proportional Mix
Proportional Mix blends the two layers based on the higher layer’s brightness: as the higher layer’s effect gets brighter, it proportionally overtakes the lower layer at that point, and as it dims, more of the lower layer shows through. Unlike Mask, which is an all-or-nothing cutout, Proportional Mix produces a smooth cross-fade between the two effects.
Multiply Color
Multiply Color uses the higher layer’s channel values to darken the corresponding channels of the lower layer — the brighter the higher layer’s color in a channel, the more that channel is darkened on the lower layer. It’s useful for tinting or dimming an effect using another effect as a control input, rather than for a hard replacement of color like Color Change.
Luma Key
The Luma Key Mixer matches areas of the lower layer whose brightness falls within a configured range, and replaces just those areas with the higher layer’s effect color. Areas outside the range are left untouched. The Configuration dialog lets you set the Brightness Range (lower and upper limits) used for the match.
Chroma Key
The Chroma Key Mixer works like Luma Key, but matches on a specific color (hue and saturation) instead of only brightness, replacing matching areas of the lower layer with the higher layer’s effect color. The Configuration dialog provides:
- Color — the key color to match against the lower layer.
- Brightness Range — lower and upper brightness limits the lower layer must fall within to be considered for a match.
- Hue Tolerance and Saturation Tolerance — how far a pixel’s hue and saturation can differ from the key color and still be considered a match.
- Treat Zero Brightness as Transparent — when enabled, if the higher layer’s effect is completely unlit, the lower layer is passed through unchanged instead of being evaluated for a match.
Chroma Key requires a mixing partner.
2 - Layer Editor
This section covers the Layer Editor.
Overview
Layers are a method of controlling how separate Effects on the same element interact with each other. It can be very powerful to create variations on the existing effects. The Layer Editor is the docking window in the Sequencer that controls how the layers are configured. The layer editor is a docking window like most of the other editor type windows. It can be positioned in any fashion typical of a docking style window. If it is not visible it can be enabled under the View menu in the sequence editor. The menu name is Layer Editor Window.
Layers are stacked in the editor by their order of precedence. Layers on top will be processed first, working down to the default layer at the bottom. The Default layer is fixed and will always be at the bottom. No mixing occurs in this layer.
Editor
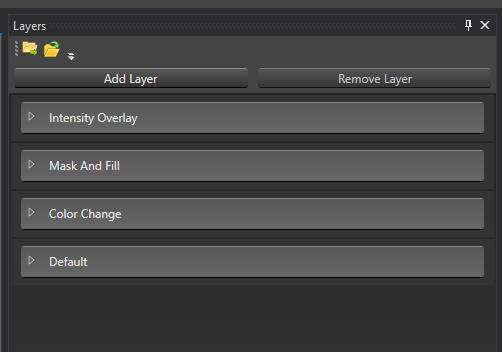
At the very top of the editor are two buttons for importing and exporting layers:
- Import Layers — loads a previously exported
.v3l layer file and adds its layers to the current sequence.
- Export Layers — saves all non-default layers in the current sequence to a
.v3l file. This button is disabled when only the default layer exists.
Below the import/export buttons, the Add Layer and Remove Layer buttons allow new layers to be created or selected layers to be deleted. If any effects are associated with a layer when it is deleted, all those effects will be automatically moved to the default layer.
Layers can be reordered by dragging them in the list to the position you want them to be in. In order to drag the layer, you need to click in the blue area surrounding the Layer expander. It will highlight in blue as you hover over it.
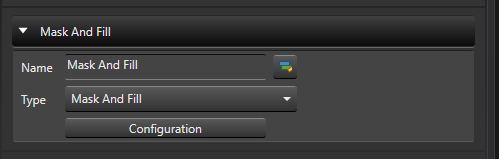
Expanding the layer provides a way to name the layer as desired as well as change its configuration if it has options. The drop down box allows you to choose the type of mixer used to combine color between this layer and the layer below it. If the type of mixer has configuration options, there will be a Configuration button once it is expanded. Clicking on that will bring up the configuration dialog for that type.
Next to the layer name text box there is a Quick Rename button. Clicking it renames the layer to the display name of its currently selected mixing filter type. For example, if the layer uses a filter named Mask and Fill, clicking Quick Rename sets the layer name to Mask and Fill. If another layer already uses that name, a numeric suffix is automatically appended (Name - 2, Name - 3, and so on).
As you work on your sequence, you may find that you need multiple sets of layers in different orders to accomplish what you need. Keep in mind that layers and their order are applied across the entire sequence.
Exporting Layers
Clicking Export Layers opens a save-file dialog. The default file extension is .v3l (Vixen 3 Layers). All non-default layers are saved to the chosen file as human-readable JSON, preserving each layer’s name, order, mixing filter type, and mixing filter configuration. The default layer is never included in the export.
The Export Layers button is disabled when the sequence has no non-default layers, so an empty layer file cannot be created through the normal workflow.
Importing Layers
Clicking Import Layers opens an open-file dialog filtered to .v3l files. After you choose a file, Vixen validates its contents and adds any valid layers to the current sequence above the existing layers, in the same relative order they had when exported. For example, if the sequence already has Layer A and Layer B, and the imported file contains Imported 1 and Imported 2, the resulting order will be Imported 1, Imported 2, Layer A, Layer B, Default.
If an imported layer name already exists in the current sequence, the imported layer is automatically renamed using a numeric suffix (Name - 2, Name - 3, and so on).
If any layers in the file reference a mixing filter that is not installed, Vixen displays a warning dialog summarizing how many layers will be imported and how many will be skipped. You can choose to proceed (importing only the valid layers) or cancel (importing nothing). If all layers are valid, import proceeds immediately without a confirmation dialog. If all layers are invalid, Vixen shows an error and nothing is imported.
Import Layers, Export Layers, and Quick Rename were added in build 1442.
3 - Layer Mixing
This section covers examples of using Layers.
Intensity Overlay
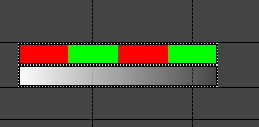
Layers can be used to dim effects that do not currently have a level curve over the entire effect by using the Intensity Overlay mixer in a defined layer. As shown below the white pulse is in the Intensity Overlay layer and the Alternating is in the Default layer. The alternating effect will fade out in relation to the ramp on the pulse effect. The color of the pulse is not important on full color elements.
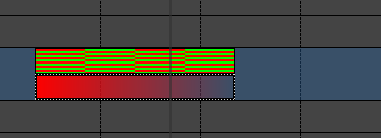
On discrete items that have color defined, the same principle applies with a bit of a spin. Here I am placing this on some led string lights with defined color. There are multiple strings of Red, Green, and Blue. Here I am alternating from red to green. I have added a red pulse to the intensity overlay layer. Here the red lights will dim as they match the red of the pulse. The green will stay at full intensity.
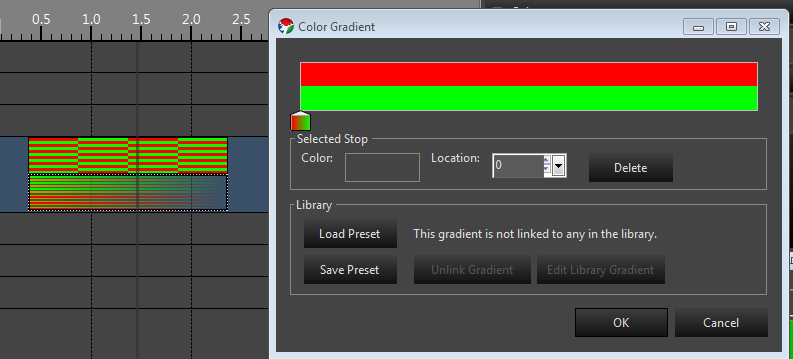
To dim both colors I add green to the pulse.
Mask
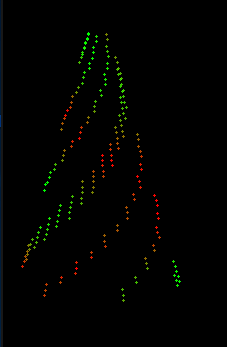
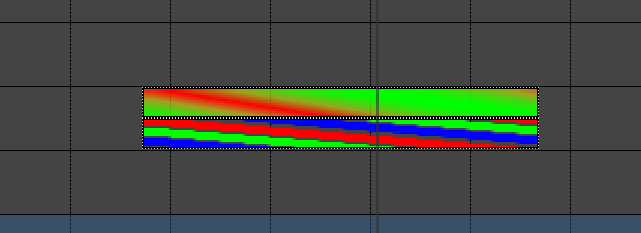
The Mask mixing method allows you to mask out areas of an effect with another effect. You can accomplish this in a similar manner as depicted above. Areas that are lit in the layer that has a the Mask mixer will turn off areas in the effect in the layer beneath it. One example of this is a spiraling butterfly effect. By placing a Spiral effect in the Mask layer and a Butterfly effect in the default layer, the lit spirals in the Spiral effect will create spiral cut outs in the Butterfly. This gives the effect of Spirals where the spokes have the Butterfly pattern on them. The colors of the spirals themselves are irrelevant for using it as a mask. You really only need one color and you configure the spirals to the look you want. The example below was created by just dropping the two effects with defaults, mining them up and setting the spiral to the layer that has a Mask mixer setup.
Mask and Fill
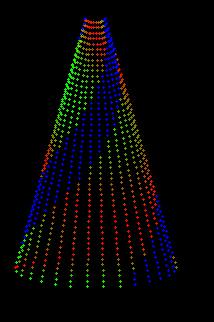
Mask and fill is very similar to the Mask mixing, except instead of leaving unlit areas where the masking effect is, it will replace those areas with the effect in the Mask and Fill layer. In the spiral example above, the colored spirals in the Spiral effect will be visible and replace those areas of the Butterfly. Thus you end up with a spiral overlaid on the Butterfly. Without layering, these would mix and give mixed results. Here you get the exact colors of the Spiral on top of the Butterfly effect so in this case the colors are relevant and you can configure them as needed to obtain the effect you want. Here is how this looks in the preview. I used one color of blue and I reduced the thickness of the spiral by about half to get this look.
Conclusion
These are just simple examples of the power of layers. There are other mixers that allow for combining in many different ways. Layers are also cumulative, so you can mix multiple effects in higher layers to affect lower layers. We will be adding more in the future as need arise.
Tutorials
Videos