Vixen’s support for intelligent fixtures (DMX moving heads) is based on giving Vixen detailed knowledge about your hardware.
To perform this data entry you are going to need the User manual for your fixture that lists the functions your fixture supports and what channel(s) are associated with those functions.
Time Commitment
Expect to spend ~20 minutes defining your fixture profile.
Background
The Intelligent Fixture Wizard has two purposes:
It creates fixture profiles. The fixture profile contains what functions the fixture supports and what channels are used for those functions.
It creates Intelligent Fixture display elements and adds them to the display.
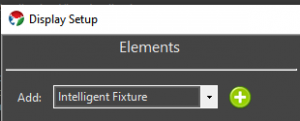
How to Start
The Intelligent Fixture Wizard can be activated from the Display Setup. Select Intelligent Fixture from the Elements drop down and then select the Plus button.
Video Tutorials
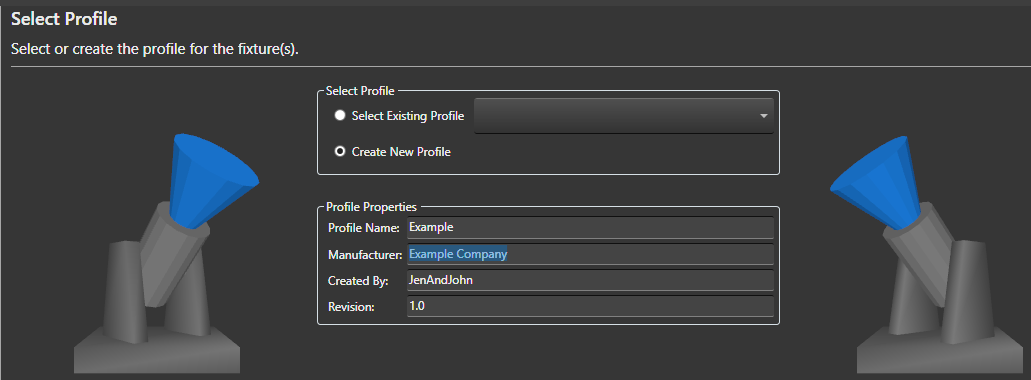
1 - Select Profile
Information about selecting or creating a DMX intelligent fixture profile.
Select Profile Options
Select Existing Profile - If you have already created a Profile for your fixture you could select it here. The drop down shows all fixtures installed into the active Vixen profile. The fixture profiles are stored within the Vixen profile.
Note in the future users may be able to download fixture profiles from the Vixen website that other users have submitted.
Create New Profile - The default is to create a new fixture profile. The fixture profiles are stored within your overall Vixen profile.
Profile Properties
Profile Name - Name of the intelligent fixture profile. For new fixture enter a unique name. This name is used as the fixture profile filename.
Manufacturer - Optional name of the manufacturer of the fixture hardware.
Created By - This read-only field is determined by the Windows login name.
Revision - Field for keeping track of updates to the profile definition. Refer to Persistance Note below for implications of updating a profile.
If the profile is being updated consider incrementing the Revision number.
Persistance Note
If the Profile Name is changed it is effectively as ‘Save As’’ like operation as the existing profile is not modified.
If anything is changed in a profile, only newly created fixtures will receive the changes.
Existing fixtures are NOT impacted by the changes and if desired will need to be updated via their Intelligent Fixture property.
Select the Next button to continue to configure your intelligent fixture.
Video Tutorials
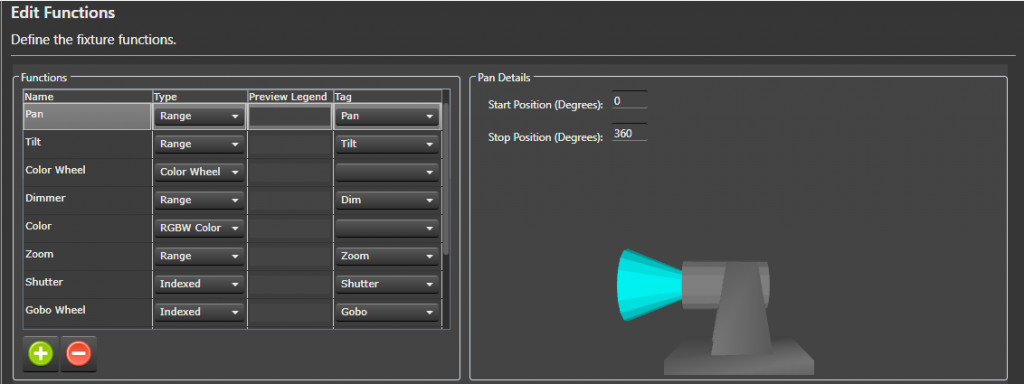
2 - Edit Functions
Information about editing intelligent fixture functions.
Background
This wizard page (Edit Functions) and the Edit Channels wizard page define the majority of the fixture.
Vixen comes with a number of built in functions to make this data entry task easier.
This page defines the functions that will be assigned to channels on the next wizard page (Edit Channels).
The name of each function needs to be unique.
Note the names of the predefined functions can be changed to better match your fixture’s user manual.
What is a Tag?
The Vixen Intelligent Fixture support was designed to allow users to input their fixture channel map information in verbatim.
There are areas of the Vixen Intelligent Fixture support where Vixen needs to know what certain fixture function do.
These areas include the Preview, Effects and automating the handling of certain functions like shutter.
The Fixture Profile uses a tag to give the software the necessary knowledge about the functions.
There is tagging at the function level but there is also tagging for index values.
Many of the built in functions are already assigned a tag.
What Do I Do On This Wizard Page?
Look over your fixture user manual and make sure all your fixture functions are defined on this page.
Note is possible to navigate back and forth between the Edit Functions and Edit Channels wizard pages if you find you need to add an additional function.
Select the Plus button to add additional fixture functions.
Some of the functions require additional details which appear in the details pane to the right.
Create New Function
Select the Plus button to add a new function.
Give the function a unique name.
Assign the function a type (Range, Indexed, Color Wheel, RGB Color, RGBW Color, None).
(Optionally) assign a Preview Legend.
The preview legend is displayed below the fixture with corresponding DMX value assigned to the channel.
This feature can be useful for debugging problems.
Optionally assign a Tag to the function.
See ‘What is a Tag’’ section above for more information.
Assigning Function Details
There are twelve built in functions.
The following sections describe each built in function and what configuration is still required.
The functions in the fixture profile are NOT ordered. If your fixture does not support one of these
built in functions there is no harm in leaving them in the profile. If there is any doubt if a function might
be applicable to your fixture leave it in the list to save data entry. These built-in functions are properly tagged
to maximize support with the Vixen Intelligent Fixture sequencing effects.
Pan Function - Input the range of motion the fixture supports when panning.
This value helps ensure the Preview matches the movement of the actual hardware.
The Start position defines the resting position of the fixture.
The stop position defines the maximum range of movement.
Tilt Function - Input the range of motion the fixture supports when tilting.
This value helps ensure the Preview matches the movement of the actual hardware.
The Start position defines the resting position of the fixture.
The stop position defines the maximum range of movement.
Color Wheel - Defines the colors that the fixture supports.
This function may not be applicable to color mixing fixtures.
Select the Plus button to add a new color wheel entry.
Enter a unique name for the color wheel entry.
Enter the DMX start value for the color.
Enter the DMX stop value for the color.
(Optionally) select if the entry should be controlled via a curve.
Example: select Use Curve when the manual shows a range of DMX values that spin the color wheel.
(Optionally) select the Half Stop option if the entry is half way between two colors on the color wheel.
Note the colors will automatically populated for this entry.
Select the … button to assign the color.
Select the Exclude Color Property option to exclude the color entry from the color property associated with the element.
This option should be selected for colors like CTB and UV.
Zoom Function - Indicate whether the fixture zooms from a narrow beam to a wide beam or vice-versa.
Shutter Function - Defines a function for controlling the fixture’s shutter position.
Select the Plus button to add a new index entry.
Enter a unique name for the index entry.
Optionally select Use Curve for entries that define a strobing rate.
Enter the DMX start value for the index entry.
Enter the DMX stop value for the index entry.
Tag the entry if the entry open or closes the shutter.
This tagging allows Vixen to automatically control the shutter when color is applied to the fixture.
Gobo Function - Defines a function for selecting gobos.
Select the Plus button to add a new gobo entry.
Enter a unique name for the gobo entry.
Optionally select the Use Curve for entries that spin the gobo wheel or define a range where the user should select a specific value.
Enter the DMX start value for the gobo entry.
Enter the DMX stop value for the gobo entry.
Optionally select an Image for the gobo entry.
The image is displayed on the timeline for Gobo effect.
Gobo images are stored in the Vixen profile at \Fixtures\Images.
Select the Import Gobo Images button to copy images to this folder.
Open Close Prism Function - This fixture function may not be mainstream but is similar to a shutter function in that it applies a prism or removes the prism.
For fixtures that support this function it is typical to have one index entry that applies the prism and another entry to remove the prism.
If the entries are tagged Vixen will automatically apply the prism if a prism is selected via another function.
The entry that applies the prism should be tagged Prism Open.
The entry that remove the prism should be tagged Prism Close.
Associated Prism Function - This drop down allows the user to select the associated Prism function that is being opened and closed.
This field is critical when the fixture contains more than one prism function that can be opened and closed.
Prism Function - Defines a function for placing a prism into the beam of light.
Select the Plus button to add a new prism entry.
Optionally select the Use Curve for entries define a range where the user should select a specific value within that range.
This entry will be edited using a curve in effects.
Enter the DMX start value for the prism entry.
Enter the DMX stop value for the prism entry.
Set the Tag to Prism for prism entries that should be available in the Prism effect.
Entries like a Stop can be omitted.
Frost Function - Defines a function that places a frost lens in the beam of light.
This function is a range function and does require any further configuration.
Select the Next button to continue to configure your intelligent fixture.
Video Tutorials
3 - Edit Channels
Information about editing channels associated with the intelligent fixture.
Background
The Edit Channels wizard page defines the channels on the fixture.
The channels in this grid are order dependent.
When complete the channels in this grid should match your fixture’s user manual.
The number of channels in this grid should match your fixture’s user manual.
Often intelligent fixtures define channels for the convenience of controlling the fixture from a lighting controller with sliders.
If there are channels that are not needed when controlling the fixture from Vixen they can be skipped by placing an Ignore row and a function of None.
A channel with a function of None will be ignored by Vixen. Including these ignore rows are important to keep patching to a controller easy and straightforward.
What Do I Do On This Wizard Page?
This wizard page defines the channels that make up the fixture.
This table should match your user manual precisely.
Channels should not skipped or omitted.
Order is important and should match your fixture’s manual.
Select the Plus button to add a new channel.
Give the channel a unique name.
Select the fixture Function for the channel.
You can use the Wizard Back button to add or edit the functions.
Select the Next button to continue to configure your intelligent fixture.
Video Tutorials
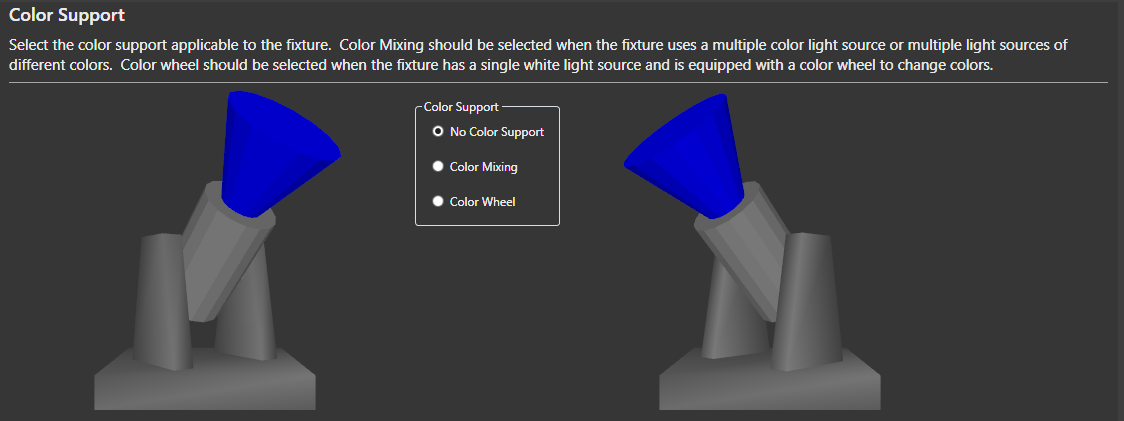
4 - Color Support
Information about selecting color support for the intelligent fixture.
Background
Vixen will examine fixture channels and functions and default the color support.
This selection is hardware dependent.
The Color Wheel option requires that the fixture has a Color Wheel function.
Vixen will extract all the colors from the color wheel and create a color property for the fixture element with a discrete color for each color on the color wheel.
No Color Support - This option can be selected if you want to manually control the color through separate display elements.
This option is not recommended.
Color Mixing - This option should be selected when the fixture uses multiple color sources or multiple light sources of different colors.
Examples are RGB and RGBW.
Color Wheel - This option should be selected when the fixture has a single white light source and is equipped with a color wheel to change colors.
Select the Next button to continue to configure your intelligent fixture.
Video Tutorials
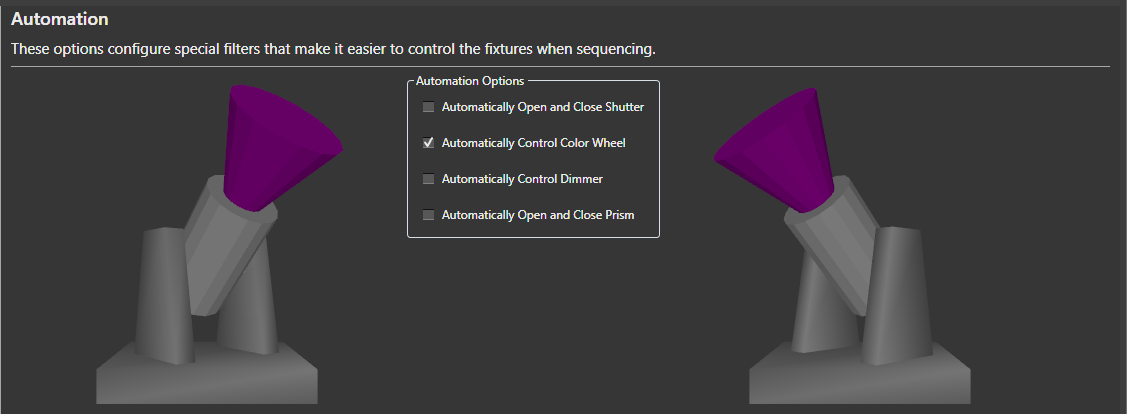
5 - Automation
Information about configuring intelligent fixture automation options.
Background
This wizard page configures Vixen Intelligent Fixture automation. The goal of the automation is to make it as easy as possible to sequence the intelligent fixture.
Vixen will examine the fixture’s channels and functions and default these options accordingly.
Automatically Open and Close Shutter - This option will automatically control the shutter channel based on the color channels. Whenever an effect is generating color, the shutter will open. Whenever there is no effect, or the effect is dark, the shutter will be closed.
Automatically Control Color Wheel -This option will automatically control the color wheel by matching colors generated in the effects to colors supported on the color wheel.
Automatically Control Dimmer - This option is usually selected for fixtures with a color wheel and fixed white light source. It will automatically control the fixture’s dimmer channel based on the intensity of the colors in the effects.
Automatically Open and Close Prism - This option is usually selected for fixtures that have both a channel for enabling the prism and another channel for selecting the position or movement of the prism.
Select the Next button to continue to configure your intelligent fixture.
Video Tutorials
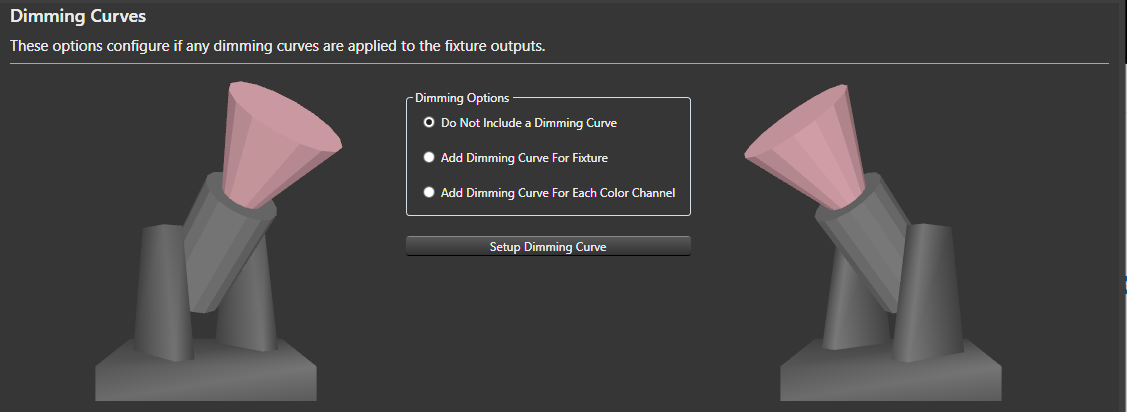
6 - Dimming Curves
Information about optionally configuring dimming curves for the intelligent fixture light outputs.
Background
This wizard page configures optional dimming curves for the fixture outputs.
From this wizard one dimming curve can be configured via the Setup Dimming Curve button.
A dimming curve can be useful if you want to ensure you drive the fixture at less than maximum intensity.
Typically used on fixtures with a LED light source.
Do Not Include a Dimming Curve - The default option is not not include any dimming curves.
Add Dimming Curve For Fixture - This option adds a single dimming curve for all color channels.
Add Dimming Curve for Each Color Channel - This option configures a separate dimming curve for each color channel.
With this option all the dimming curves are initially identical.
The curves can be further adjusted via the Patching Graphical View.
Select the Next button to continue to configure your intelligent fixture.
Video Tutorials
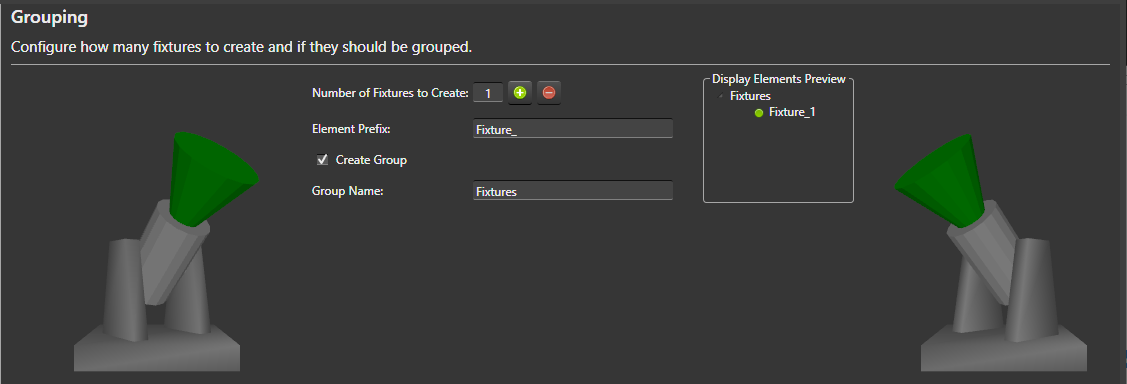
7 - Grouping
Information about controlling how many fixtures are created and if they are grouped.
Background
This wizard page determines how many fixture display elements to create and if to group them.
This wizard page also determines the naming convention for the fixtures.
The Display Elements Preview to the right gives an indication of how the fixtures will be displayed in the Elements tree.
Note Vixen will modify the element names as necessary to avoid duplicates as all display elements must have unique names.
Number of Fixtures to Create - Number of fixture display elements to create.
Select the Plus button to have the wizard create additional fixtures.
Element Prefix - Name prefix for the fixture display elements.
Create Group - Determines if the fixtures are nested under a group in the display element tree.
Group Name - Name of the fixture group.
Select the Next button to continue to configure your intelligent fixture.
Video Tutorials
8 - Summary
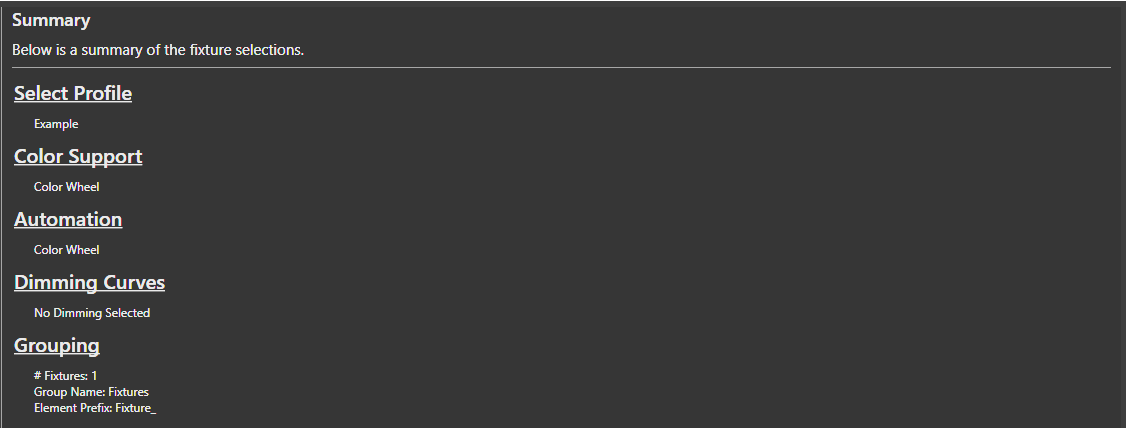
Summary information about the intelligent fixtures about to be created.
Background
The Summary wizard page summarizes the selections made on the previous pages for review.
Select the Finish button for the wizard to actually create the fixture display elements and save the fixture profile to the file system.
 button to add additional fixture functions.