This is the multi-page printable view of this section. Click here to print.
Controller setup
- 1: Launcher
- 2: SanDevices 682
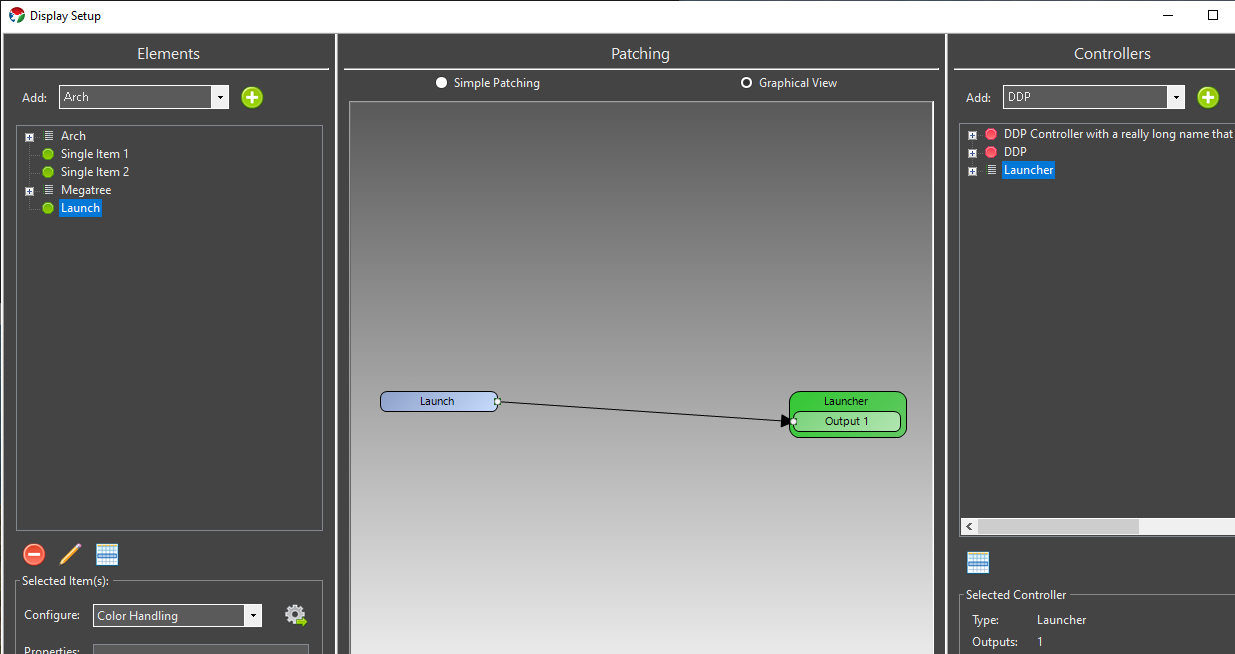
1 - Launcher
Description
The Launcher Controller is used for triggering an external command from within Vixen. It is used in combination with the Launcher Effect that passes the command line executable and any arguments through to this controller at a specified time.
Setup
There is minimal setup for this controller. Just add it to your controller list and ensure it is enabled. You typically only need one ouput which is the default.
Patching
A single Element is normally directly patched to this controller. There should be no color breakdown or dimming handlers in the path. It should resemble the following.
2 - SanDevices 682

**NOTE some of the screenshots in this tutorial are slightly outdated. The underlying concepts however are sound and this article will remain available until we are able to update it.
If you only have a few strands that you would like to set up in Vixen, or want to get started quickly, setting up one strand per Universe will be the simplest way to achieve this.
In this example I will set up 3 strands of 54 RGB pixels each, running over WS2811.
Since we need 3 channels to drive each of the Red, Green and Blue channels, this means we need:
54 pixels x 3 colors = 162 channels per strand.
162 channels x 3 strands = 486 channels overall.
This example sets it up so that strand 1 is on Universe 1, strand 2 is on Universe 2 and strand 3 on Universe 3.
NOTE: One Universe-per-strand is not a good layout to deal with large displays like Megatrees, and in fact it’s not possible to set up a E682 with 1 Universe per strand and still use all 16 outputs. However, it’s a good way to learn initially, and fine for small displays.
Caveat: This assumes you have nothing else set up. If you do - you will have to change your numbering accordingly.
Configuration Steps
a) Start by opening your web browser and connect to the SanDevices IP address. It will display the SanDevices configuration page (in this case for a E682):
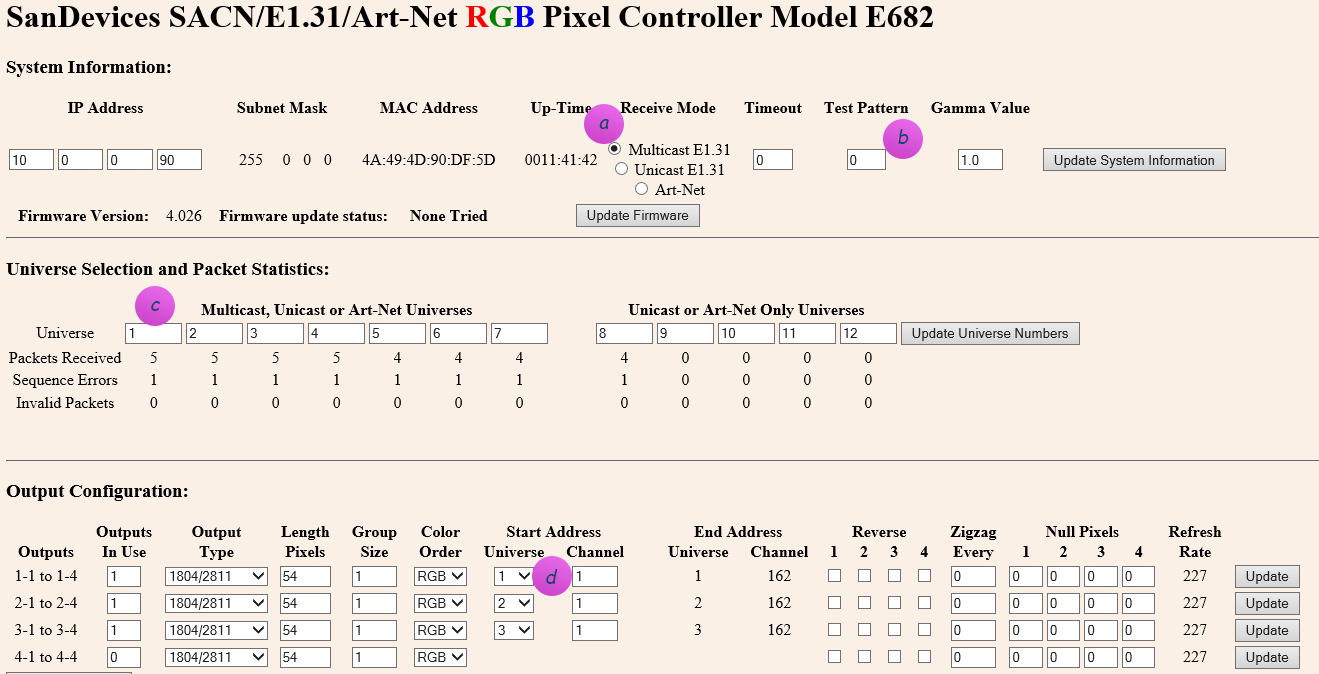
Set the page up as above.
a) Make sure you’ve specified Multicast, and no test pattern (b). If you change either of those, click Update System Information before proceeding.
c) Make sure your Universe selection contains universe 1 to 12. These are the universes that will appear in the dropdown at (d)
TIP: After you change any one line on the page, you have to first click the button on the right of the line to apply. Don’t fill it all out and then click one of the buttons, you’ll lose all of your other changes!
Connecting to Vixen 3
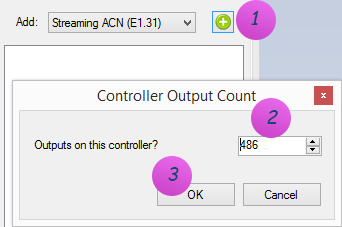
b) To connect the SanDevices controller, in Vixen 3, click on Setup Display and add a new Streaming ACN (E1.31) controller. Specify 486 outputs in order to match the 486 channels (53 pixels x 3 colors x 3 strands).
c) Right-click on the newly added controller, and click on Configure. Add 3 Universes and use Multicast Ethernet, since your Sandevices controller (above) is set up as Multicast E1.31:
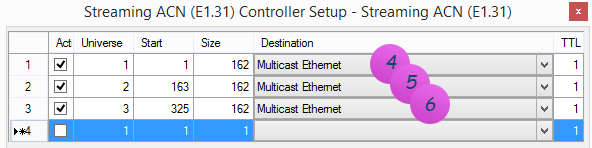
NOTE 1: The name Multicast Ethernet may be called something else. This is the default name on Windows 8. On earlier operating systems it may be called: Multicast Local Area Connection.
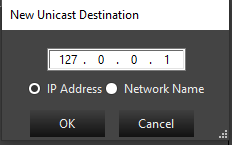
To instead enter a Unicast address, right-click the destination field to bring up the IP address form and enter the ip address, or the host name if you have DNS:
NOTE 3: The Start column above is the Vixen 3 start address of the channel inside its logical E1.31 controller view, and only comes into play if you need to individually map pixels to specific channels. It has nothing to do with the SanDevices controller, and likely will not map to any number you will see on the SanDevices configuration page.
Typically you would just set this up as a contiguous sequence throughout by setting line 1 to start at 1, and for all other lines use the formula of:
Start = Previous line Start + Previous line Size
d) Now create 3 elements to map to the 3 strings. These are the items that appear in the Sequence editor that you will use later to choreograph against.
On the left hand side, add a Generic Numbered Group for String 1. See Setup Display Elements for more information.
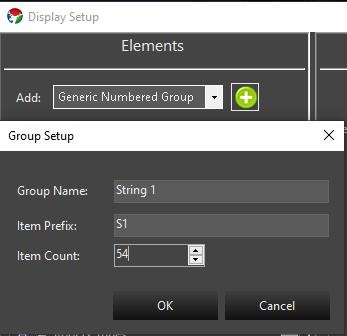
Repeat the same steps for String 2 (item prefix: S2), and String 3 (item prefix: S3).
e) After this you should see 3 strings. Select them all.
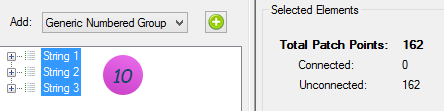
f) Notice above how it says: 162 patch points. At this point Vixen thinks you want 1 channel per item on the string. This is not quite right yet - you instead want 3 channels per item (RGB). So we need to tell that to Vixen. At the bottom on Configure, select Color Handling, and add the RGB filter.
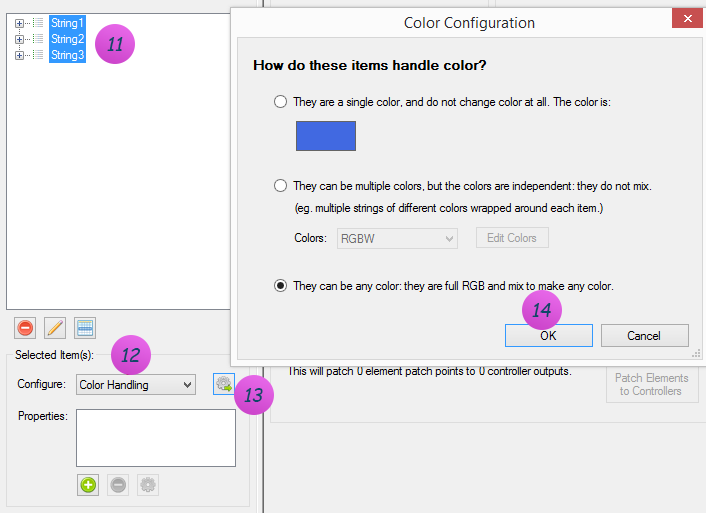
g) If all went well, you should now see 486 patch points on the left, and 486 outputs on the right to path it to:

h) Click Patch Elements in the bottom center section, and you’re off to the races! See Patching Controllers for more information on patching.
