Setup Display Elements
Concepts
Elements are the main building blocks of your display. Every display item you want to use in your show will need either an element, or an element group defined for it.
Adding Single-Element Items
An item such as a single string of lights is defined as a single item in the Element Tree. So, if you have a string of lights that is a single color, or even a single multi-colored standard string, it is defined as a single element. Think of if this way. If you plug it in and can only control the entire string at once, it is a single display item. Conversely, if you can set each light to any number of colors or there are is more than one controllable item in the string, it is not defined this way.
Right-click somewhere in the white-space of the Element Tree and select Add.

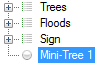
Give your element a name. We’ll call ours Mini-Tree 1. The new element will be added to the list as a single node.

Click on the newly created element to select it.
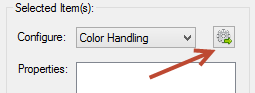
Make sure Color Handling is selected in the Selected Item(s)/Configure section and press the Configure button

When the Color Configuration dialog box appears, click on the first radio button (They are a single color…).
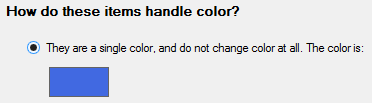
Click the color box (blue in the above graphic) to define the color of this element.
Click OK when you’re done and you’ll get a dialog box telling you what you just did – hit OK on this dialog to close it.
That’s it. You’ve successfully defined a single element for your display.
There is no need yet to link anything in the Element Tree to output controllers. With these elements defined, you can sequence your display and setup a preview. Only when you are ready to physically connect your output controllers do you need to come back and mess with the controllers.
Single-Element Shortcuts
Let’s say you have 16 mini-trees that are a single color (mine are white). These are standard 120V light strings and each is separately controlled by a channel on a Renard controller (so, 16 strings, 16 outputs on a controller)
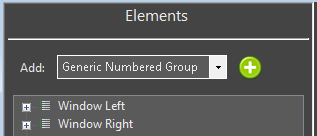
Select Generic Numbered Group from the Add combo-box under Element Setup.
Click on the  to the right of Generic Numbered Group drop down box.
A dialog box will appear that lets you name your new element group and each item within the group. We’re going to fill ours out with a group name of Mini-Trees, an item prefix of Mini-Tree and an item count of 16.
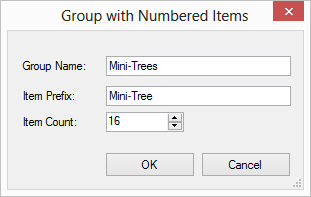
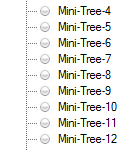
When you press OK a new group will be created at the bottom of the Element Tree named Mini-Trees with 16 individual trees named Mini-Tree-X where X is the number of the item.
Now, we need to define the color-handling for these items. For versions 3.6 and above the following steps will be invoked automatically for you when you create an item with the prop shortcuts. In addition, you will be prompted to ask if you need a dimming curve to control the brightness of your prop. Click on the Mini-Trees group so it is selected.
Make sure Color Handling is selected in the Selected Item(s)/Configure section and press the .
When the Color Configuration dialog box appears, click on the first radio button (They are a single color).
Click the color box (blue in the above graphic) to define the color of this element.
Click OK when you’re done and you’ll get a dialog box telling you what you just did — hit OK on this dialog to close it.
That’s it. You’ve successfully defined a group of single 16 elements for your display.
Multiple-Element Shortcuts
Feedback
Was this page helpful?
Glad to hear it!
Sorry to hear that. Please tell us how we can improve.