Star
Overview
A Star can be either Pixel based or Standard string based. A pixel Star has individually addressable pixels across the entire Star and a standard Star has a number of segments that span the Star.
Adding an Star in Vixen 3.6+
Start in the Preview instead of in Display Setup as you may have done in the past.
You can add an Star using the wizard buy clicking the Star icon in the Smart Objects toolbar and then with the mouse, click a point in your preview to start the Star and drag from upper left to lower right. This will create a basic Star shape and launch the wizard. Next a dialog will appear to setup the basic attributes of the Star.
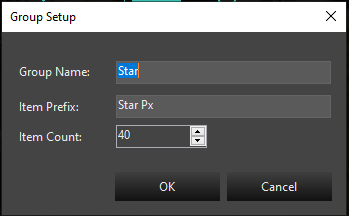
In this dialog, you will provide the group name for your Star. It defaults to Star, but if you are adding multiples, you will want to name them Star-1, Star-2, etc. The next entry is the name the segments will be called. This defaults to Star Px. If you are adding multiple Stars, you would name this Star-1 Px or Star-2 Px. The Px is just a shortcut for pixel, you can use anything you like for the segments. Each segment will have a number appended to this name. Example Star-1 Px-1, Star-1 Px-2.
Last is the number of segments. If this is a Pixel Star it would be the number of pixels. If it is a Standard* Star wrapped with segments of light strings, it will be the number of light segments. It defaults to 25.
Once you select Ok, the next step will be whether to add a Dimming Curve or not. See the section on Dimming Curves
After the Dimming Curve, is a dialog to set up the color type of the prop. Depending on the type of lights you are using, the choice here will vary depending on the type of lights used in your Star. See the section on Color Handling.
After setting the Color Handling, the Star will be completed and the elements will show up in the tree. All the linking will be done and you are ready to use it. You can resize or move it around using the preview tools.
Settings
See Common Settings
Position
A star is defined by two points. If you imagine a rectangle around the star, you have the ability to adjust the top left and bottom right corner of the rectangle to size the star to whatever you need.
Both have an X and Y position. X is horizontal and Y is vertical. You can precisely position the star using the Bottom Right and Top Left configuration options.
Inside Size
A star is defined by two ellipses. The outer ellipse is sizing the star on the screen. The inside size is a percentage of the outer size of the star. For example, if the star is 200 pixels tall and 100 pixels wide and the inside size is set to 40, the inside size will be 80 pixels tall and 40 pixels wide.
This may sound confusing. Just mess around with the setting to get what you want.
Light Count
The number of lights around the perimeter of the star. This will be automatically adjusted DOWN so that each point will have the same number of lights.
Light Size
From one pixel up, the size of the lights in the star.
Linked Elements
See the Linking Elements section for more information.
Star Points
The number of points in the star. It must be three or more… or else it isn’t a star.
String Type
See the String Type section for more information.
Notes
- Holding Ctrl when re-sizing using the bottom right corner will force the star to a fit a perfect square.
- Star pixels start at the right tip of the right-most point (the one pointing to the right) and move clockwise.
- You can nudge any object on the preview screen by selecting it and using the arrow keys. This will move it one pixel at at time.
Video Tutorial
Feedback
Was this page helpful?
Glad to hear it!
Sorry to hear that. Please tell us how we can improve.