Arch
Overview
An arch can be either Pixel based or Standard string based. A pixel arch has individually addressable pixels across the entire arch and a standard arch has a number of segments that span the arch.
Adding an Arch in Vixen 3.6+
Start in the Preview instead of in Display Setup as you may have done in the past.
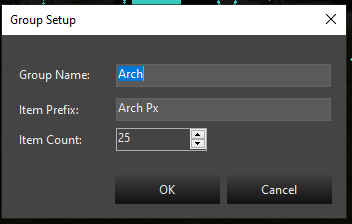
You can add an Arch using the wizard buy clicking the Rainbow icon in the Smart Objects toolbar and then with the mouse, click a point in your preview to start the Arch and drag from upper left to lower right. This will create a basic ARch shape and launch the wizard. Next a dialog will appear to setup the basic attributes of the Arch.

In this dialog, you will provide the group name for your Arch. It defaults to Arch, but if you are adding multiples, you will want to name them Arch-1, Arch-2, etc. The next entry is the name the segments will be called. This defaults to Arch Px. If you are adding multiple Arches, you would name this Arch-1 Px or Arch-2 Px. The Px is just a shortcut for pixel, you can use anything you like for the segments. Each segment will have a number appended to this name. Example Arch-1 Px-1, Arch-1 Px-2.
Last is the number of segments. If this is a Pixel Arch it would be the number of pixels. If it is a Standard* Arch wrapped with segments of light strings, it will be the number of light segments. It defaults to 25.
Once you select Ok, the next step will be whether to add a Dimming Curve or not. See the section on Dimming Curves
After the Dimming Curve, is a dialog to set up the color type of the prop. Depending on the type of lights you are using, the choice here will vary depending on the type of lights used in your Arch. See the section on Color Handling.
After setting the Color Handling, the Arch will be completed and the elements will show up in the tree. All the linking will be done and you are ready to use it. You can resize or move it around using the preview tools.
Linking a Standard Arch to existing Elements
An arch is configured differently than all the other items in the display preview. To define a standard arch, you will be setting the string type to Pixel. Doesn’t make much sense, but stick with me and I’ll explain.
You can assign the same element to multiple lights on a string. That’s what we’re going to do in the case of an arch with multiple segments. We’re going to assign the same element to groups of pixels so that a group of lights turn on when a single element is lit.
Steps:
- Do NOT click on the elements or groups you want to add.
- Click on the Arch smart object.
- Draw the arch on the screen.
- Change the string type to Pixel
- Change the Light Count to a multiple of the number of segments you have. So, if you have 9 segments, I’d suggest 36 (9 X 4) lights.
- Click on the … next to Linked Elements
- Assign your first arch element to the first item multiple (in our example, the first 4 pixels).
- Assign each successive multiple (in our example above, 4 pixels) to the same element.
- That’s it, your done.
Linking a Pixel Arch to existing Elements
This is much easier than adding a standard arch. Just click on your arch group in the element tree, click the arch icon in the toolbar and draw your arch. Your done. Your arch is drawn and is linked to your elements.
Linking Elements
Properties
Position
See Position in Common Settings
Light Count
For an Arch, this is commonly the number of segments in the arch. If your Arch has 25 pixel segments, it will be 25. If you have 9 segments of analog lights, the number will be 9. See Light Count in Common Settings
Light Size
See Light Size in Common Settings
Linked Elements
See Linking Elements
String Type
The string type of an arch will probably be Pixel for nearly everyone. Please see the Adding a Standard Arch above for more information on properly setting the string type.
Feedback
Was this page helpful?
Glad to hear it!
Sorry to hear that. Please tell us how we can improve.