Patch Elements to Controllers
Introduction
In order for your controllers to output data, the elements need to be connected to them. This is a process we call Patching Think of the old telephone switchboards where an incoming call needs to be connected by an operator to a destination. The operator plugged in a cable from one jack to another to connect the calls. They called this patching the call. The same concept applies here. This allows your elements to be connected to your controllers in any order providing great flexibility.
The graphical view in the center pane of the Display setup screen shows what’s going on.
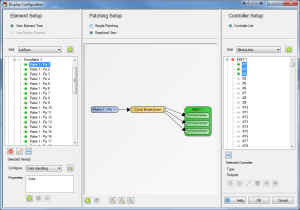
In this screenshot you can see that one element is patched to a color breakdown filter which in turn has 3 outputs that route to the controller output channels.
So what’s going on in that color breakdown filter? If we were to double click on it, you’d see the setup screen.
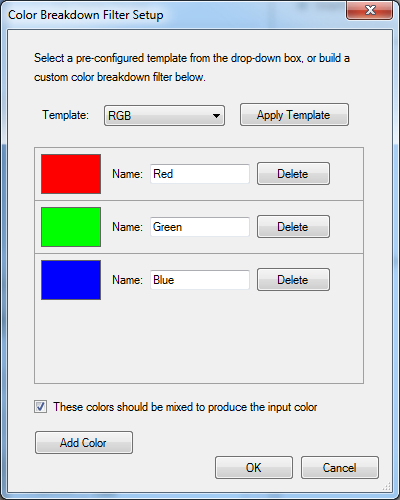
What this is doing is taking the element information, and breaking down the colors to 3 separate paths, one for the red, one for the green, and a 3rd for the blue. Most RGB lights in common use need to get the data for each color on separate control channels. This breaks it up so the controllers can understand it.
From this filter, the data is patched to the appropriate controller channels. Note that should your RGB lights be in a different RGB order, you can change the order of the colors in the color breakdown filter, or you could repatch the outputs of the filter with patching lines that cross. Either way is equally valid.
Filters vs Properties
This can be confusing. Properties are information about the element that are used by various parts of the software. Currently an element can support Color, Grid, or Location properties. The element color properties are used in the sequence editor so that you are only presented the color options for colors that this element supports. Editing the color property does not alter the color breakdown filter. Editing the color breakdown filter (in graphical view) does not alter the color property. The easiest way to change them both, is to unpatch the element, and start over.
Filters affect how the data flows from elements to controllers. They do not “belong to” an element, but rather are independent objects that are connected to elements, other filters, and controller channels.
When you use the configure button to add color handling. This invokes a wizard which sets up both the element’s color property, as well as a color breakdown filter.
Conversely, when you add a dimming curve, the wizard only adds the dimming curve filter, and no properties.
It’s important to note that the list box below the configure button is a list of the properties assigned to an element. Only some configure wizards will produce a property in this list. And even if it has a similar name, the property is not at all linked to a filter.
Patching Process
- First you need to make sure your filter chain is the way you want it. Select the element(s) you want to patch from the element setup pane on the right.
- Decide if you want to include dimming curves, and if so, how much control you wish to have over it. If you want to add a dimming curve and have the same curve apply all of the colors add it at this point. (this gives it a dimming curve, but no ability to color balance)
- One Dimming curve will be added for each element. Hint: Use a library curve. See Dimming Curves below.
- Then go to the configure box below and select color handling.
- Choose the appropriate color handling scenario for these elements.
- One color breakdown filter will be added for each element.
- If you want to add dimming curves to this element that you can adjust with different curves for each color, add the dimming curve at this point. (You would do this if you want to color balance your elements to each other)
- One dimming curve will be added for each output of the color breakdown filters (for RGB, number of elements x 3). Hint: Use a library curve. See Dimming Curves below.
- Double check the graphical view to make sure this is the signal flow you are trying to achieve. If you’re satisfied, go back to the simple patching view.
- Now take note of the number of patch points in the selected elements section of the simple patching view. This is the number of controller channels you’ll need.
- Select the controller channels you want to connect these elements to. Note: You can select more channels than needed, and only the necessary channels will be used. It’s faster to select more outputs than necessary than it is to actually count out how many you need.
- In the bottom area of the center pane, it will tell you how many element patch points will be connected to how many channels. If the number doesn’t match, that may be ok (see note above) but ideally these numbers should match. If they don’t match, there will be a message below that explains what will happen.
- Once you’re satisfied that it’s good, go ahead and hit the Patch Elements to Controllers button.
There may be cases where your physical lights are backwards from how you have your elements set up. You can account for this in the patching process by using the Reverse Element Order option in the Selected Elements column.
There is a similarly worded option in the Selected Controllers column as well. The difference here is that the output channels will be reversed. If this is an element with a multi-output color breakdown filter (such as RGB) not only will the elements be patched in reverse, but the color order will also be reversed. You probably don’t want to use this option to reverse multicolor elements.
Unpatching
If you want to preserve the filter chain, you’ll want to unpatch from the controllers. Select the controller channels to be unpatched, and press the Unpatch Controllers button
If you want to discard the filter chain and recreate it, you can unpatch from the elements. Select the elements to be unpatched, and click the Unpatch Elements button. It will then ask you if you want to remove the filters as well. The answer is almost always yes. (there’s some legacy reasons why you wouldn’t want to remove filters, but you can no longer get to them from the display setup screen, so you might as well delete them)
Dimming Curves
It was mentioned above, but to additionally call it out. The best practice when adding dimming curves to your elements is to use a library curve for the curve when setting it up. This allows you to go into the curve library and edit the library curve to change any instance of the dimming on the elements it was used to patch. We recommend giving it some thought and setting up a library curve for each prop that you may want to adjust or even all items that use the same type of lights so you can easily balance them. Adjusting the library curve values once patched in makes an immediate change to the output. Alternatively, you can choose to just replace the existing curve with a new one in the display setup. You do not have to unpatch to replace an existing curve with a new value, however you will need to restart Vixen to see the results. Thus the library curve has an advantage of being able to change without a restart.
The best place to position the curve in the filter chain is between the element and the color break down in most cases. This allows you to adjust the overall brightness of the light evenly across whichever colors are on the breakdown filter. If you need to adjust color balance, then the place for the curve is after the breakdown on each individual output of the breakdown. In the case of RGB pixels, you most likely want to have a red curve, a blue curve and a green curve in your library for that prop or type of lights. You can then adjust each color in the library to adjust for color balance.
Feedback
Was this page helpful?
Glad to hear it!
Sorry to hear that. Please tell us how we can improve.