Edit Functions
Background
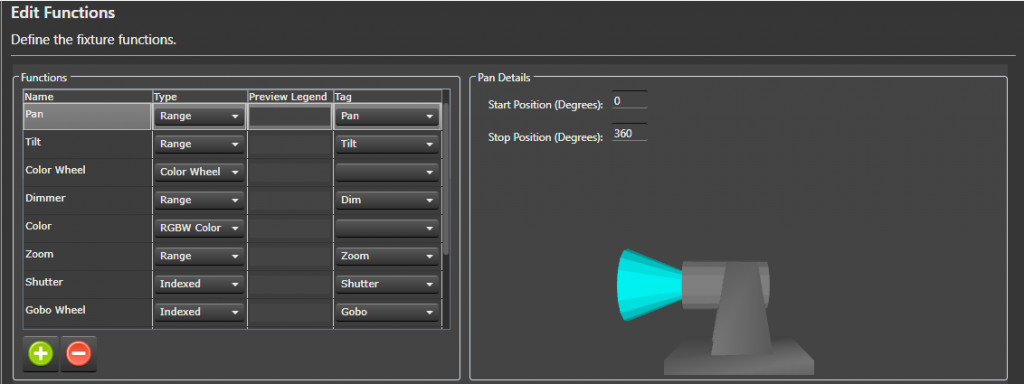
This wizard page (Edit Functions) and the Edit Channels wizard page define the majority of the fixture. Vixen comes with a number of built in functions to make this data entry task easier. This page defines the functions that will be assigned to channels on the next wizard page (Edit Channels). The name of each function needs to be unique. Note the names of the predefined functions can be changed to better match your fixture’s user manual.
What is a Tag?
The Vixen Intelligent Fixture support was designed to allow users to input their fixture channel map information in verbatim. There are areas of the Vixen Intelligent Fixture support where Vixen needs to know what certain fixture function do. These areas include the Preview, Effects and automating the handling of certain functions like shutter. The Fixture Profile uses a tag to give the software the necessary knowledge about the functions. There is tagging at the function level but there is also tagging for index values. Many of the built in functions are already assigned a tag.
What Do I Do On This Wizard Page?
Look over your fixture user manual and make sure all your fixture functions are defined on this page.
Note is possible to navigate back and forth between the Edit Functions and Edit Channels wizard pages if you find you need to add an additional function.
Select the Plus  button to add additional fixture functions.
Some of the functions require additional details which appear in the details pane to the right.
Create New Function
- Select the Plus button to add a new function.
- Give the function a unique name.
- Assign the function a type (Range, Indexed, Color Wheel, RGB Color, RGBW Color, None).
- (Optionally) assign a Preview Legend. The preview legend is displayed below the fixture with corresponding DMX value assigned to the channel. This feature can be useful for debugging problems.
- Optionally assign a Tag to the function. See ‘What is a Tag’’ section above for more information.
Assigning Function Details
There are twelve built in functions. The following sections describe each built in function and what configuration is still required. The functions in the fixture profile are NOT ordered. If your fixture does not support one of these built in functions there is no harm in leaving them in the profile. If there is any doubt if a function might be applicable to your fixture leave it in the list to save data entry. These built-in functions are properly tagged to maximize support with the Vixen Intelligent Fixture sequencing effects.
- Pan Function - Input the range of motion the fixture supports when panning. This value helps ensure the Preview matches the movement of the actual hardware. The Start position defines the resting position of the fixture. The stop position defines the maximum range of movement.
- Tilt Function - Input the range of motion the fixture supports when tilting. This value helps ensure the Preview matches the movement of the actual hardware. The Start position defines the resting position of the fixture. The stop position defines the maximum range of movement.
-
Color Wheel - Defines the colors that the fixture supports. This function may not be applicable to color mixing fixtures.
- Select the Plus button to add a new color wheel entry.
- Enter a unique name for the color wheel entry.
- Enter the DMX start value for the color.
- Enter the DMX stop value for the color.
- (Optionally) select if the entry should be controlled via a curve. Example: select Use Curve when the manual shows a range of DMX values that spin the color wheel.
- (Optionally) select the Half Stop option if the entry is half way between two colors on the color wheel. Note the colors will automatically populated for this entry.
- Select the … button to assign the color.
- Select the Exclude Color Property option to exclude the color entry from the color property associated with the element. This option should be selected for colors like CTB and UV.
- Select the Plus
- Zoom Function - Indicate whether the fixture zooms from a narrow beam to a wide beam or vice-versa.
-
Shutter Function - Defines a function for controlling the fixture’s shutter position.
- Select the Plus button to add a new index entry.
- Enter a unique name for the index entry.
- Optionally select Use Curve for entries that define a strobing rate.
- Enter the DMX start value for the index entry.
- Enter the DMX stop value for the index entry.
- Tag the entry if the entry open or closes the shutter. This tagging allows Vixen to automatically control the shutter when color is applied to the fixture.
- Select the Plus
-
Gobo Function - Defines a function for selecting gobos.
- Select the Plus button to add a new gobo entry.
- Enter a unique name for the gobo entry.
- Optionally select the Use Curve for entries that spin the gobo wheel or define a range where the user should select a specific value.
- Enter the DMX start value for the gobo entry.
- Enter the DMX stop value for the gobo entry.
- Optionally select an Image for the gobo entry. The image is displayed on the timeline for Gobo effect. Gobo images are stored in the Vixen profile at \Fixtures\Images. Select the Import Gobo Images button to copy images to this folder.
- Select the Plus
-
Open Close Prism Function - This fixture function may not be mainstream but is similar to a shutter function in that it applies a prism or removes the prism. For fixtures that support this function it is typical to have one index entry that applies the prism and another entry to remove the prism. If the entries are tagged Vixen will automatically apply the prism if a prism is selected via another function.
- The entry that applies the prism should be tagged Prism Open.
- The entry that remove the prism should be tagged Prism Close.
Associated Prism Function - This drop down allows the user to select the associated Prism function that is being opened and closed. This field is critical when the fixture contains more than one prism function that can be opened and closed.
-
Prism Function - Defines a function for placing a prism into the beam of light.
- Select the Plus button to add a new prism entry.
- Optionally select the Use Curve for entries define a range where the user should select a specific value within that range. This entry will be edited using a curve in effects.
- Enter the DMX start value for the prism entry.
- Enter the DMX stop value for the prism entry.
- Set the Tag to Prism for prism entries that should be available in the Prism effect. Entries like a Stop can be omitted.
- Select the Plus
- Frost Function - Defines a function that places a frost lens in the beam of light. This function is a range function and does require any further configuration.
Select the Next button to continue to configure your intelligent fixture.
Video Tutorials
Feedback
Was this page helpful?
Glad to hear it!
Sorry to hear that. Please tell us how we can improve.