This is the multi-page printable view of this section. Click here to print.
Basic Lighting
- 1: Alternating
- 2: Candle Flicker
- 3: Chase
- 4: Dissolve
- 5: LipSync
- 6: Pulse
- 7: Set Level
- 8: Spin
- 9: Twinkle
- 10: Wipe
1 - Alternating
Overview
The Alternating effect does what it’s name implies. It automates the process of alternating elements between colors. A simple example is a row of mini trees alternating back and forth from red to green.
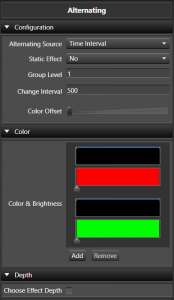

Configuration
- Timing Source This sets the source of how the alternating timing occurs.
- Time Interval This sets the timing of the alternates to be based on time.
- Change Interval This controls the interval that the alternates change on. The value is in milliseconds.
- Static Effect This option allows you to specify if the effect actually changes back and forth between colors over the duration of the effect or just sets up an alternating color pattern that is the same over the duration of the effect. This can be easily used to set alternating color patterns without having to use a pulse on all the individual elements. An example of this is the American flag that has red and white bars alternating, but are the same color for the length of the flag.
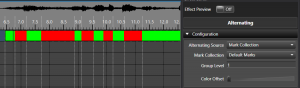
- Mark Collection Since Version 3.5. This sets the reference for the alteranates to be based on the Marks in a Mark Collection.
-
Mark Collection This allows you to choose the Mark Collection for the Marks to be used in aligning the alternates. The following is an example of being aligned to the Marks.
-
- Time Interval This sets the timing of the alternates to be based on time.
- Group Level Specifies how many elements are of the same color before switching to the next color in the list. In the case of pixels with color of red and white set, if you set it to 5, there will be 5 lights that are red and then 5 that are green and then 5 more red and back to green and so on. This works for non pixel elements as well. The default is 1.
- Change Interval Defines on a non static effect, how often the colors switch back and forth. It is specified in ms. So if you want the colors to switch back and forth every 500 ms, set it to 500.
- Color offset Specifies how many colors to jump when the alternating pattern starts over. This can create interesting marquee style effect.
Color
- Gradients This allows you to choose the color sets to be used. The alternating supports what we can a Color Gradient Level Pair. In this case the color and the brightness level work together. With this you can specify fading colors or any other combination. This works just like a pulse, only within that color portion of the alternating. Each Color Gradient has a Curve to control it. You can add or remove these pairs of colors. Both the Color Gradient and the Curve support drag and drop. See Inline Curve Editor and Inline Gradient Editor.
Depth
- Levels Deep When enabled it controls at what level the Alternating is applied inside a group of elements. So you can have 8 items and then have 4 of them grouped to the left and 4 grouped to the right. All of these are grouped under on group. By placing the Alternating at the top level group, you can Alternating all 8 of the items or the left and the right group as a pair.
Tutorials
2 - Candle Flicker
Overview
The Candle Flicker effect was designed to simulate the effect of a candle flickering. It has many settings to adjust how the flicker behaves.
Configuration
- Group Level Controls how many elements in the group have the same flicker applied to them. Defaults to 1 meaning each element gets it’s own unique flicker.
Color
- Color Sets the color of flicker.
Brightness
- Max Controls the maximum brightness that a flicker can be. This is a 0 - 100 percent range of the overall color brightness.
- Min Controls the minimum brightness that a flicker can be. This is a 0 - 100 percent range of the overall color brightness.
Flicker
- Change Percent Controls how much change the flicker will have. 0 - 100 percent range of intensity.
- Deviation Controls how much the flicker deviates over the span of the effect.
- Flicker
- Frequency Controls the frequency of the flicker.
3 - Chase
Overview
The Chase Effect allows you to have a series of Pulse effects spaced out across the duration of the effect. Instead of having to place and distribute individual pulses over time, this effect will do the math to distribute them evenly for you.
Behavior
Since Version 3.6u1
-
Across Elements/Groups is the default behavior and is equivalent to how the effect acted prior. When the effect is applied on an element that has multiple levels deep, then the Behavior section will appear.
-
Each Element/Group This is a new behavior that changes how the effect looks at the elements and targets them. Previously you could use the levels and chase across a group of Arches or similar props, but if you wanted to apply the same chase to each Arch in the group, you would need to put a Chase on each Arch specifically. Now you can choose the Each Element/Group behavior and the proper level to get an identical Chase on each arch. This also allows the possibility to Chase up/down a Pixel tree instead of just around it. Many combinations are possible using variations of the Behavior and Level options.
Color
- Color Handling This controls how the colors are applied on the effect. The simplest is a single color which will create a simple chase with only that color on it. The other three options allow for a Color Gradient to be applied in different ways on the effect. See Inline Gradient Editor
-
Single Color This sets the color to be a simple color.
-
Gradient Thru Effect This will transition the colors on the chase over time to match the colors in the gradient. This allows you to have a chase that goes from say red to blue over the duration.

-
Gradient Per Pulse Each individual pulse within the chase will have the gradient applied to it. Each pulse will have the same color. So the pulse can go from red to blue.

-
Gradient Across Items The gradient will be applied proportionately over group of items that the chase covers with each item receiving the color within the gradient that corresponds to it’s percentage of the entire group.

-
- Color Gradient / Color Depending on the Color Handling setting this will allow the simple color, or the Color Gradient to be set. See Inline Gradient Editor.
Brightness
-
Pulse Intensity This setting controls the shape of the pulse Curve. Much like the same setting in the pulse effect, you can control is each pulse ramps up or down or any shape you can design with the Curve. See Inline Curve Editor.
The default setting represents a ramping on motion where each portion of the chase ramps up to full brightness

The shows a pulse ramping up and then down just by altering the shape of the Curve into a ^ shape.

Direction
-
Direction This Curve controls the direction the chase moves across items. In it’s simple form it is right to left, or left or right. But you can design custom movements to have it move right and then back left in the same effect. See Inline Curve Editor
Normal Direction

Reversing Direction

Pulse
-
Extend Pulse To End Extends the pulses to the end of the effect to enable a chase to on type effect. Each pule will foloow the curve and then maintain the last intensity to the end of the effect. Pulse Intensity must be above zero on the curve at the end.

-
Extend Pulse To Start. This is the opposite of etendign to end. This allows the effect to be all on at the start, and then chase the elements off. Pulse Intensity must be > 0 at the beginning of the curve.

-
Pulse Overlap Controls how much the pulses of the chase overlap with each other. This can be used to create a more smooth flowing effect by adding more overlap.
Zero overlap
200 ms overlap

Depth
- Levels Deep Controls at what level the Chase is applied inside a group of elements. So you can have 8 items and then have 4 of them grouped to the left and 4 grouped to the right. All of these are grouped under on group. By placing the Chase at the top level group, you can Chase all 8 of the items or the left and the right group as a pair.
4 - Dissolve
Overview
TThe Dissolve effect simulates colors disolving from, or filling into a space. The effect name of Dissolve may seem to suggest that it can only dissolve, but it also supports the opposite with filling color into an element. It has many settings to adjust how the effect behaves.
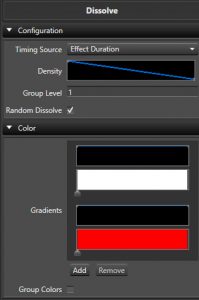
Configuration
- Timing Source Controls if the effect is driven by the time duration, or by Marks in a Mark Collection.
- Density A Curve that governs how dense the coverage of the elements and how the dissolve itself acts. See the Inline Curve Editor.
- Group Level Controls how many elements in the group have the same Dissolve applied to them. Defaults to 1 meaning each element gets it’s own unique Dissolve.
- Random Disolve Controls if the Disolve pattern is random (Checked) as to the order elements Disolve, or if the user can take more control.
- Starting Element Starting location where the Dissolve or Fill will commence from.
- Dissolve Flip Flips the direction of the sequential Dissolve.
- Both Directions Dissolves or Fills in both directions, one after the other.
Color
- Gradients Sets the Color Gradient and intensity Curve for the effect. You can have more than one Gradient and each Gradient will have its own intensity Curve. See the Inline Gradient Editor and Inline Curve Editor.
- Color Per Step When enabled, color will change for each step variation. When disabled, each step variation will have all colors.
- Random Color Order When enabled the colors will be chosen at random instead of in order.
- Group Color When enabled, each element will have all colors generated in parallel.
Depth
- Effect Depth Controls the depth level in groups that the effect should be applied to. If there are multiple levels of props in a group, the same Dissolve can be applied to each group instead of using multiple effects by using this setting.
5 - LipSync
Overview
The Lip-sync effect helps to facilitate sequencing singing faces. It is a multi purpose effect that has evolved over the years into a powerful tool for syncronizing lyrics to your face mapped props. This effect relies on the mapping of the face properies in your elements in order to work properly.
Configuration
- Phoneme/Marks This setting determine how the LipSync effect behaves.
- Mark Collections Since Version 3.5. This set the effect to get its phomeme information from the Marks in a Mark Collection. This is the default and the most common way to use the effect.
- Mark Collection This sets the Mark Collectin that contains the Marks with the Phonemes in it. There are typically 3 types of collections. Phrases, Words, and Phonemes. You select the Phonemes one here.
- Allow Mark Gaps When enabled, the effect does not fill gaps between the Marks with a REST.
- Phoneme This allows the effect to be used in manual mode where you configure the phoneme you want to use specifically.
- Mark Collections Since Version 3.5. This set the effect to get its phomeme information from the Marks in a Mark Collection. This is the default and the most common way to use the effect.
- Mapping Type This allows you to choose the mapping type. This controls how phonemes are mapped to the individual elements in your Prop.
- Face Mapping This option is used when you have a Prop that is usually a defiend shape and you have mapped specific elements to the mouth phonemes.
- Image Mapping This option is used for matrix type props that use an image for a mouth shape rather than mapping individual lights or elements.
- Eye Mode This sets how the eyes should be handled when the effect is active.
- Open This sets the eyes to open using the open eyes mapping.
- Closed This sets the eyes to be closed using the eyes closed mapping.
- Off This sets the effect to ignore turning on the eyes.
- Show Outline This sets the effect to turn on the outline using the outline mapping.
Lip-Sync Enhancements
Since Vixen 3.5
6 - Pulse
Overview
The Pulse effect is one step above a Set Level. In fact this effect can do everything the Set Level can plus more. The main differences here are the ability to use a color gradient over a single color and the ability to shape the brightness as a curve value to vary over the length of the effect. See the sections on Curves and Color Gradients for more details on how they work.
With the ability to control the brightness over the duration of the effect, the Pulse enables things like a fade on or fade off by adjusting the curve from a ramp up or ramp down. But the curve can take any shape and thus you can form your pulse to do about anything.
The pulse is also highly useful as a modifying effect when using layers. It can be used to fade other effects on or off, or control their brightness. See the sections on Layers for more details.
Color
- Gradients Sets the Color Gradient for the effect. See the Inline Gradient Editor.
Brightness
- Intensity Sets the intensity Curve for the effect. See the Inline Curve Editor.
7 - Set Level
Overview
The Set Level is the most basic off all effects. It allows you to turn on a element at a level for the specific duration. The level slider determines the brightness of the effect. It supports a single RGB color.
Color
- Color This allows you to set the color of the element. Double click the color box to bring up a color picker, or drag and drop colors from the library onto it.
Brightness
- Intensity This slider allows you to choose the intensity of the color. It is a 0 - 100 percent slider.
8 - Spin
The Spin is similar to the Chase effect. It can be thought of as repeating chases back to back which creates a spinning effect.
Behavior
Since Version 3.6u1
-
Across Elements/Groups is the default behavior and is equivalent to how the effect acted prior. When the effect is applied on an element that has multiple levels deep, then the Behavior section will appear.
-
Each Element/Group This is a new behavior that changes how the effect looks at the elements and targets them. Previously you could use the levels and spin across a group of Arches or similar props, but if you wanted to apply the same Spin to each Arch in the group, you would need to put a Spin on each Arch specifically. Now you can choose the Each Element/Group behavior and the proper level to get an identical Spin on each arch. This also allows the possibility to Spin up/down a Pixel tree instead of just around it. Many combinations are possible using variations of the Behavior and Level options.
Color
- Color Handling This controls how the colors are applied on the effect. The simplest is a single color which will create a simple Spin with only that color on it. The other three options allow for a Color Gradient to be applied in different ways on the effect. See Inline Gradient Editor
-
Single Color This sets the color to be a simple color.
-
Gradient Thru Effect This will transition the colors on the Spin over time to match the colors in the gradient. This allows you to have a Spin that goes from say red to blue over the duration.
-
Gradient Per Pulse Each individual pulse within the Spin will have the gradient applied to it. Each pulse will have the same color. So the pulse can go from red to blue.
-
Gradient Across Items The gradient will be applied proportionately over group of items that the Spin covers with each item receiving the color within the gradient that corresponds to it’s percentage of the entire group.
-
- Color Gradient / Color Depending on the Color Handling setting this will allow the simple color, or the Color Gradient to be set. See Inline Gradient Editor.
Brightness
-
Pulse Intensity This setting controls the shape of the pulse Curve. Much like the same setting in the pulse effect, you can control is each pulse ramps up or down or any shape you can design with the Curve. See Inline Curve Editor.
The default setting represents a ramping on motion where each portion of the chase ramps up to full brightness
The shows a pulse ramping up and then down just by altering the shape of the Curve into a ^ shape.
-
Minimum Brightness This allows you to set a minimum level of the color across areas that are not spinning. So you could have a green spin over a dim green background. The background will have the same color attibutes chosen above.
- Minimum Level Enabled when you choose minimum brightness and allows you to set the 0 - 100 percent intensity via a slider.
Direction
- Direction the direction the spin rotates can be choosen from this drop down. The possible values are Forward and Reverse.
Speed
- Speed Format This controls the way the speed of the spin is controlled.
- Revolution Count This sets the speed to be a number of revolutions over the span of the effect.
- Count The number of revolutions.
- Revolution Frequency This controls the speed as a factor of frequency over the span of the effect.
- Revolution The frequency of the revolutions.
- Fixed Time This controls the speed of the spin as a function of time.
- Revolution Time Time in milliseconds for a revolution to take.
- Revolution Count This sets the speed to be a number of revolutions over the span of the effect.
Pulse
- Pulse Type This controls the type of the pulse behavior.
- Distribute Evenly This distributes the pulses evenly over the timespan of the revolution. This is the default.
- Fixed Time This sets the duration of each pulse in milliseconds.
- Duration Duration of the pulse in milliseconds.
- Percent Revolution This sets the duration of the pulse to be a percent of the revolution time.
- Pulse Length A 0 - 100 percent value determining the percent of the revolution.
Depth
- Levels Deep Controls at what level the Spin is applied inside a group of elements. So you can have 8 items and then have 4 of them grouped to the left and 4 grouped to the right. All of these are grouped under on group. By placing the Spin at the top level group, you can Spin all 8 of the items or the left and the right group as a pair.
9 - Twinkle
Overview
The Twinkle effect was designed to simulate the effect of twinkling lights on a Prop.
Color
- Color Handling This controls how the colors are applied on the effect. The simplest is a single color which will create a simple Twinkle with only that color on it. The other three options allow for a Color Gradient to be applied in different ways on the effect. See Inline Gradient Editor.
- Single Color This sets the color to be a simple color.
- Gradient Thru Effect This will transition the colors on the Twinkle over time to match the colors in the gradient. This allows you to have a Twinkle that goes from say red to blue over the duration.
- Gradient Per Pulse Each individual pulse within the Twinkle will have the gradient applied to it. Each pulse will have the same color. So the pulse can go from red to blue.
- Gradient Across Items The gradient will be applied proportionately over group of items that the Twinkle covers with each item receiving the color within the gradient that corresponds to it’s percentage of the entire group.
- Color Gradient / Color Depending on the Color Handling setting this will allow the simple color, or the Color Gradient to be set. See Inline Gradient Editor.
Brightness
- Max Controls the maximum brightness of the twinkles.
- Min Controls the minimum brightness of the twinkles.
- Variation Controls the percent variation in the brightness of each twinkle.
Configuration
- Avg Pulse Time Controls how long the average pulse time of each twinkle is in milliseconds.
- Coverage Controls what percentage of the Prop is covered by twinkles.
- Variation Controls the percent variation in the time of each twinkle.
Depth
- Levels Deep When enabled it controls at what level the Twinkle is applied inside a group of elements. So you can have 8 items and then have 4 of them grouped to the left and 4 grouped to the right. All of these are grouped under on group. By placing the Twinkle at the top level group, you can Twinkle all 8 of the items or the left and the right group as a pair.
10 - Wipe
Overview
The Wipe was one of the first location aware effects in Vixen. The goal of this effect is somewhat similar to the Chase, however it is aware of the position of the elements as defined in the Preview. It uses this location awareness to simulate a chase across all of its elements in a Wiping fashion.
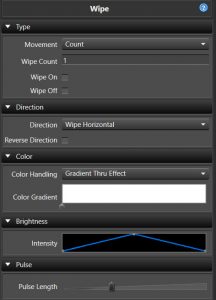
Type
- Movement
- Count This sets the number of wipe passes in the timespan of the effect.
- Wipe Count The number of wipes.
- Wipe On When enabled, the wipe will maintiain the elements in the on state as the wipe moves across.
- Wipe Off When enabled, the wipe will start out on and wipe off across the prop.
- Pulse Length This controls the wipe by a measure of the pulse length.
- Movement This controls the wipe by the movement curve.
- Count This sets the number of wipe passes in the timespan of the effect.
The Wipe on/off options are similar to the Chase extend to start/end options. These are most useful for wiping the stage on or off. The pulses have the same rules as the Chase and need to have a > zero end value for wiping on and a > zero start value for wiping off. The default pulse curve has a zero start and end value, so to use this you would need to adjust to a ramp on for the wipe on case or ramp off for wipe off as an example.
Direction
- Direction It can move in a number of directions, horizontal, vertical, diagonal up, diagonal down, burst, circle burst and diamond burst.
- Reverse Direction When enabled, the direction will be reversed.
Color
- Color Handling This controls how the colors are applied on the effect. The simplest is a single color which will create a simple Twinkle with only that color on it. The other three options allow for a Color Gradient to be applied in different ways on the effect. See Inline Gradient Editor.
- Gradient Thru Effect This will transition the colors on the Wipe over time to match the colors in the gradient. This allows you to have a Wipe that goes from say red to blue over the duration.
- Gradient Across Items The gradient will be applied proportionately over group of items that the Wipe covers with each item receiving the color within the gradient that corresponds to it’s percentage of the entire group.
- Color Gradient Sets the Color Gradient to be used. See Inline Gradient Editor.
Brightness
- Intensity This sets the Curve that controls the intensity of the color over the effect. See Inline Curve Editor.
Pulse
- Pulse Length The pulse length is also similar to the pulse overlap feature of the Chase and allows for the pulses to be adjusted to smooth out the Wipe or lengthen the amount of visible time any part of the lights are lit.