This is the multi-page printable view of this section.
Click here to print.
Return to the regular view of this page.
Effect Editor
This section covers the Effect Editor features.
The effect editor is a docking pane used to edit the features of the effects. There are various controls that are highly intuitive to control the values of the effects. The docking pane can be docked in any of the normal docking places or can float as an undocked window.
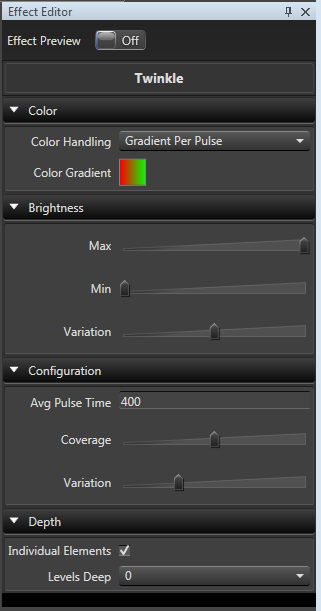
Properties of the effect are divided up into collapsable categories. Most of these categories are consistent across all the effects. This will help you find similar features across the multitude of effects as you become familiar with them.
The label for each property has some hover text that gives a better description of what the property changes or how it may act.
The editing is done in a live mode. All changes take effect once the adjustment settles for a short period of time. The effect will be rendered and the new representation will show in the timeline.
More than one effect can be edited at the same time. Each property will be applied to each effect edited. The effect do not even have to be the same kind. Some properties may not support multiple editing depending on their function, or if all effects do not have that property and will not be shown.
The sliders control items that have ranges.
Check boxes for on off type options.
Combo boxes for items that have specific selections.
Text boxes for other values that need text or have specific values that are beyond the resolution of a slider. The text boxes themselves have a bit of a slider function built in for numeric values. When you hover you mouse just below one the cursor will turn to a cross. At that point you can click and drag left and right below the text box to quickly alter the value up or down.
There are image representations for Colors, Curves and Gradients. When double clicked, these will open the appropriate editor for each type. These also serve as Drag Drop zones to drag that item out to somewhere else in the editor or another one dragged into to be used as the setting. They can be dragged onto other effects in the timeline or into their respective library to add them to the library. These same items can be dragged from the libraries onto the type in the editor to change them. See the drag/drop section for more details. They can even be dragged across two open sequences in two different editors.
In addition to double clicking the Color Gradients or Curve editor images to bring up the large full editors, both can be edited inline directly inline in a similar fashion as they can be edited in the larger editors. Most of the same actions work the same.
Many of these options will change based on selections you make. Options that are not relevant to a specific configuration will be hidden.
If you find yourself reconfiguring the same effect the same way every time, see Effect Defaults to save your own starting point for an effect type.
Lastly there is an option to turn on the live preview at the top. This will enable previewing of just the selected effects in the preview window if you have it running. This way you can preview the changes to specific effects without having to play the sequence.
1 - Effect Defaults
This section covers saving, reusing, and sharing your own default settings for each effect type.
Overview
Every effect (Pulse, Wave, Fireworks, Text, and so on) normally starts with Vixen’s built-in look — for example, Pulse starts with a plain white gradient and a ramp-up curve. If you like to reuse a particular color gradient, curve shape, or other setting every time you place a certain effect, you don’t have to reconfigure it by hand each time. Effect Defaults let you save your own starting point for each effect type.
In the effect editor header, next to the existing help (?) button, there are two buttons for this feature:
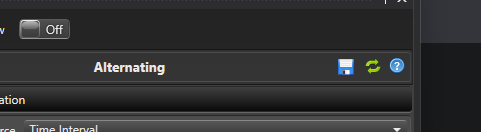
- Save as Default (floppy disk icon) — captures every setting currently shown for the effect you’re editing and saves it as the default for that effect type.
- Reset to Built-in (circular arrow icon) — deletes the saved default for that effect type, after asking you to confirm. Future new effects of that type go back to Vixen’s original built-in look.
Once you’ve saved a default for an effect type, every new instance of that effect type starts pre-filled with your saved settings instead of the built-in ones — no matter how you create it: drawing it on the timeline, using “Add Multiple Effects,” adding it at marks, dragging it from the toolbox, a hotkey, replacing another effect with it, or dropping a compatible media file onto the timeline.
Clicking Reset to Built-in never changes the effect you currently have open — it only affects effects you create afterward.
A quick example
- Add a Pulse effect to the timeline and open it in the effect editor. It starts out with the built-in ramp curve and white gradient.
- Change the curve shape and pick a different color gradient.
- Click Save as Default. The Reset to Built-in button becomes enabled, confirming the save worked.
- Add a brand-new Pulse effect anywhere on the timeline — it already shows your custom curve and gradient.
- Click Reset to Built-in on any Pulse effect, confirm the prompt, and the next new Pulse effect you add goes back to the original built-in look.
Where defaults are stored
Saved defaults belong to your current Vixen profile — the same profile that holds your controllers, sequences, and preferences. If you use more than one profile, each one has its own independent set of saved effect defaults.
What is and isn’t carried into a saved default
Saving a default captures every setting shown in the effect’s property grid — colors, curves, gradients, numeric settings, and so on.
A few things are deliberately not carried over, because they only make sense within the specific sequence you were working in when you saved the default:
- Mark Collection selections. If an effect (such as Alternating or LipSync) is set to follow a specific Mark Collection, that particular selection is not saved as part of the default, since a Mark Collection from one sequence has no meaning in another sequence. New effects created from the default simply start with no Mark Collection selected for that setting.
- Placement information, such as which elements the effect targets, its position and duration on the timeline, and any attached media file — these always come from wherever you actually place the new effect.
If the curve or color gradient you had selected when you saved the default came from the Curve or Color Gradient library, the saved default keeps that library link live. That means if you later edit the shared library curve or gradient, every new effect created from that saved default picks up your edit automatically — the same way any other effect linked to that library entry would. If you ever delete or rename that library entry instead, effects created from the default keep working using the gradient’s or curve’s last-known values rather than breaking.
Sharing defaults between profiles
Under Tools → Effect Defaults in the Timed Sequence Editor’s menu, you’ll find:
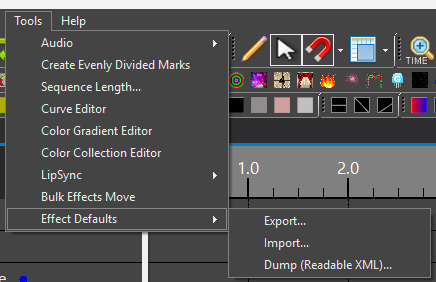
- Export… — opens a checklist of your currently saved effect defaults so you can pick which ones to save to a file. Use this to back them up or share a “look” with another Vixen installation or profile.
- Import… — reads a file previously created with Export and adds its saved defaults to your current profile. If a default for a given effect type already exists, the imported one replaces it; saved defaults for effect types not mentioned in the imported file are left alone.
- Dump (Readable XML)… — writes out everything currently saved as a plain, readable XML file. This isn’t meant for day-to-day use; it’s there so you (or someone helping you troubleshoot) can inspect exactly what’s stored if something isn’t behaving as expected.
2 - Full Curve Editor
This section covers the Full Curve Editor features.
Overview
The Full Curve Editor is a dedicated dialog for building and fine-tuning a curve with more precision than the Inline Curve Editor allows. It opens when you double click a curve control in the Effect Editor.
Editing Curves
- To add a point, hold the Control Key and click on the grid where you want the new point.
- To delete a point, hold the Alt Key and click the point you wish to delete. A curve must always keep at least two points, so the last two can’t be removed.
- To move a point, simply click and drag it to a new position.
- To move the entire curve up or down while keeping its shape, click and drag anywhere on the grid that isn’t on a point.
Shortcuts
- To flatten the curve into a horizontal line, hold the Shift key and click-drag anywhere on the grid. The flat line will follow your mouse up and down.
- To reverse the curve direction (flip left to right), use Alt+Shift while clicking the curve, or click the Reverse Curve button.
- To invert the curve (flip top to bottom), use Control+Shift while clicking the curve, or click the Invert Curve button.
Precise Point Entry
Clicking or dragging a point selects it and shows its coordinates in the X: and Y: boxes below the grid. You can type exact values into these boxes and click Update to move the selected point to that precise location, which is useful when you need an exact number instead of an approximate mouse position.
Draw and Generate
- Draw Curve lets you free-hand a brand new curve. Click the button, then click and drag the left mouse button from the left side of the grid to the right side to sketch the shape. The Draw Interval setting controls the minimum horizontal distance between the points that get recorded while you draw; a larger interval creates a smoother curve with fewer points.
- f(x) Curve opens a function generator where you can type a mathematical expression to generate the curve. The expression is evaluated for
x from 0 to 100 (at the Draw Interval step size) and the result becomes the curve’s Y value at that point. Pi is available as a constant. For example, Sin(2 * Pi * (x / 100)) * 50 + 50 produces one full sine wave across the curve.
Library
The Library section lets you save, load, and manage curves independently of any one effect:
- Save Curve saves the curve currently shown in the editor to the library under a name you choose.
- Load Curve opens the curve library so you can pick an existing curve and link the editor’s curve to it.
- When a curve is linked to a library curve, it’s shown in gray and can’t be edited directly in this dialog.
- Edit Library Curve opens the linked library curve itself for editing; changes apply everywhere that curve is used.
- Unlink Curve breaks the link to the library curve, leaving you with an independent copy you can edit freely.
3 - Inline Curve Editor
This section covers the Inline Curve Editor features.
Overview
The Inline Curve Editor is a powerful tool that allows many features of the larger Full Curve Editor editor dialog to be done inline in the effect editor. This improves efficency for the user since they do not have to keep opening and closing a bulky dialog box.

Editing Curves
- To add a node, hold the Control Key and Click the line where you want to add the node.
- To delete a node, hold the Alt Key and Click the node you wish to delete. A curve must always keep at least two nodes, so the last two can’t be deleted.
- To move a node, simply Click and Drag any node to the position you want. (The Full Curve Editor provides more precision if needed)
Shortcuts
- To flatten the curve into a horizontal line, hold the shift key and click anywhere in the curve control. Holding shift while dragging will allow you to position that horizontal flat line up and down. This function is intended to replace the functionality of the old simple sliders that have now been replaced with curves.
- To reverse the curve direction, (flip left to right) use Alt+Shift while clicking the curve.
- To invert the curve (flip top to bottom), use Control+Shift while clicking the curve.
Drag and Drop
- Using the curve library, you can drag curves and drop them onto the curve in the effect editor. This works from the full library panel, or the toolbar. The opposite also works. You can drag the curve from the effect editor pane to the preset library or toolbar to add them to the library.
- You can drag a curve from the effect editor onto any other effect or selected effects on the timeline. If the effect has more than one curve, you will be prompted to choose which curve to replace.
- To invoke the full curve editor, simply double click on the black area of the curve control.
- When a curve is linked to a library curve, the line will be gray and a link icon will appear over the control.
Full Curve Editor
- To invoke the full curve editor, simply double click on the curve in the effect editor.
A linked Curve denoted by the chain link in the upper left corner.

You will not be able to edit the linked curve in the effect editor pane. Double clicking the curve control will allow you to link or unlink library curve. Once it is unlinked, you can edit it in the inline editor or the larger Curve dialog.
See Full Curve Editor for details on the dialog’s drawing, function generator, and library tools.
4 - Inline Gradient Editor
This section covers the Inline Color Gradient Editor features.
Overview
The Inline Gradient Editor is a powerful tool that allows many features of the full Color Gradient editor dialog to be done inline in the effect editor. This improves efficency for the user since they do not have to keep opening and closing a bulky dialog box.

Editing Colors
- To add a color node, simply click in the empty space just below the gradient image.
- To delete a node, hold the Alt Key and Click on the node you want to delete.
- To change the color of a node, Double Click on the node.
- Nodes can be dragged to change the positon of the blend.
- Fine editing of the blend or the points between colors is still done with the full editor.
Drag Drop
Using the gradient library, you can drag colors or gradients from the preset library or toolbar and drop them onto the gradient in the effect editor. The opposite also works to add a gradient to the library. You can also drag the gradient from the effect editor to another effect on the timeline. If the effect on the timeline has multiple gradients, you will be prompted for which gradient to replace.
Shortcuts
Sometimes you may want the reverse of an existing gradient that is being used. You can use Alt+Shift and Click on the gradient in the effect editor and it will reverse the color order.
Full Gradient Editor
- To invoke the full gradient editor, simply double click on the gradient in the effect editor.
Library Gradients
- When a gradient is linked to a library gradient, a link icon will appear over the gradient control and no nodes will be shown.
A linked Color Gradient denoted by the chain link in the upper left corner.

You will not be able to edit the linked gradient in the effect editor pane. Double clicking the gradient control will allow you to link or unlink the library gradient. Once it is unlinked, you can edit it in the inline editor or the Full Gradient Editor.