Sequencing
Overview
This section will walk you through creating your first sequence. If you have not done the basic display setup, see the getting started section on Display Setup. Getting started with creating a simple sequence is very straight forward.
Sequencer
The sequencer is were you will spend the majority of your time. This is where your creative ideas can be applied to building a sequence. From the main screen, click the New Sequence button to open the sequencer window. The is window consists of a toolbar at the top to access many of the functions. Most commonly will be the play/stop/pause icons to control playing your sequence. This toolbar is customizable in many ways to suit your needs. The rest of the window is composed of dockable windows for the various functions. The main section is the Timeline were your props are listed in a tree structure that is identical to what is created in the setup. You should keep this docked in the main window. If you have created the Arch prop in the previous section, you will see the Arch in a column on the left part of the Timeline. The plus icon to the left of the prop allows you to expand and see the structure of it.
In addition to the Timeline, there are two other windows we will focus on while getting started. The Effect window and the Effect Editor window. The Effect window contains all the effects Vixen has to use on your props. It should be visible on the left side by default. If it is not, you can use the View -> Effects Window and ensure that is it checked. This window lists all the Effects and groups them by type. The most common types are Basic Lighting and Pixel Lighting. You can learn more about each type in the linked sections. There are two other types for controlling specialized Devices and Intelligent Fixtures. You will also want to ensure that the Effect Editor window is also visible. This defaults to being on the right side of the window.

The effects can also be accessed via an optional toolbar. Under View -> Toolbars, select Effects and ensure it is checked. It will look something like the following and can be customized to have labels or not.

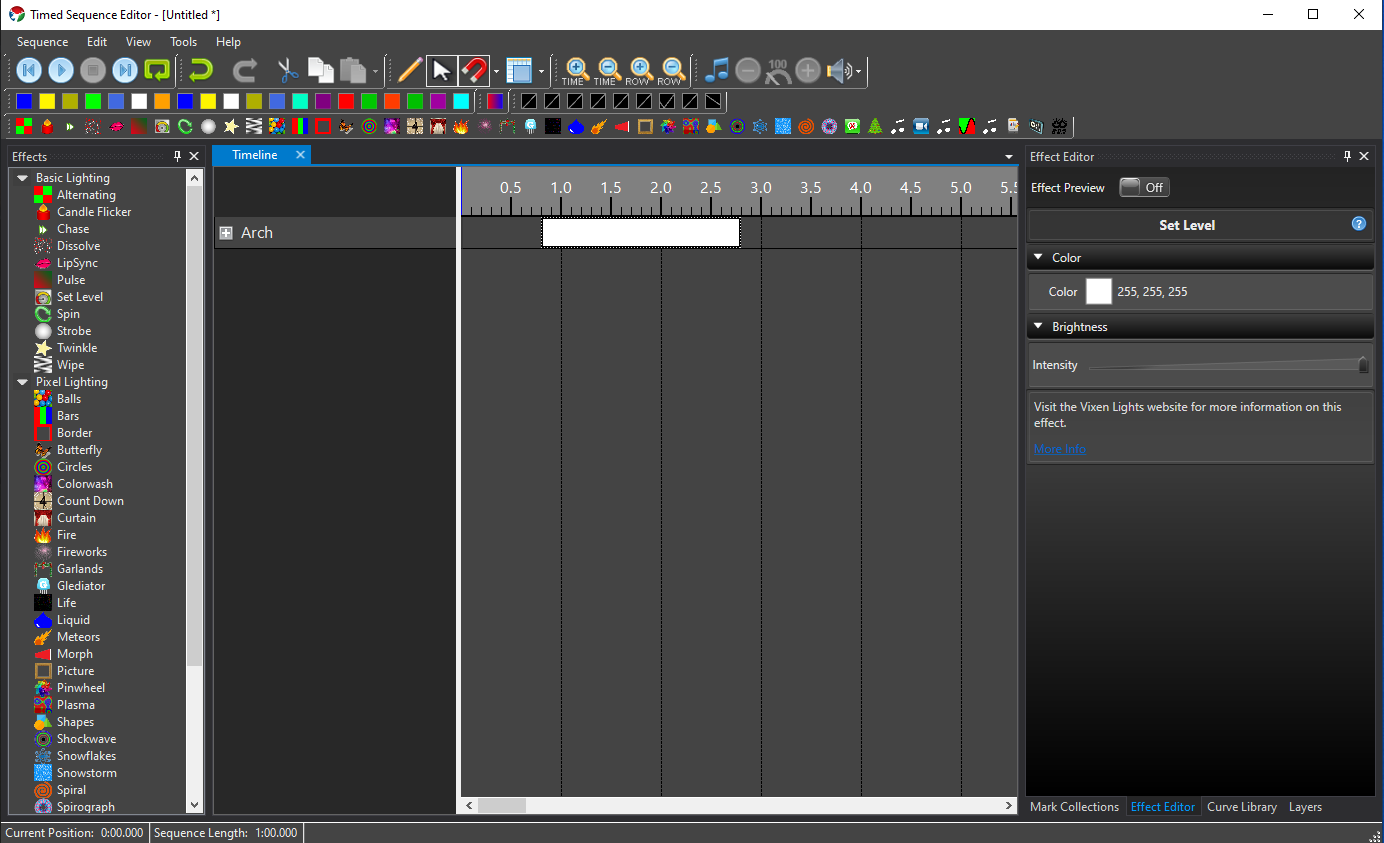
Now that you have some familiarity with how to access the effects, lets add a basic effect to our Arch. From either the Toolbar, or the Effect window, click and drage the Set Level effect onto the row for the Arch in the Timeline. You can place it anywhere in the visible space under the Time Ruler. It will create a 2 second long effect that sets the Arch to a white color. The effect should be selected by default as indicated by a dotted line around it. If it is not selected, there will be a solid black line around it. If it is not selected, just click on the effect and it will be selected.

After dropping the effect, your window should look something like the following.

The Effect Editor allows you to change the settings of how the effect behaves. It allows you to edit the selected effects behavior. The Set Level is the most basic of effects, so it only has two settings. The color and the intesity. Use the slider to change the intensity. It varies from 0 - 100 percent. If you set it to 50 percent, you will see the white bar for the effect change in brightness to reflect the lower intensity. As you drag the slider, a tooltip will indicate the value it is set to. To change the color, double click on the the white square in the Effect Editor. A color picker window will appear and allow you to select the color you want. Since this is a pixel prop, any color is available. There are presets for the common RGBW colors, or you can enter RGB or HSV values. You can also use the color box to select with your mouse. Once you select Ok, you new color will be reflected in the color square and the effect will render and show the new color as well. If you want more information on the effect, you can click the question mark icon or the More Info link in the Effect Editor. It will navigate you to the proper section in the online documentation.
Add a Pulse
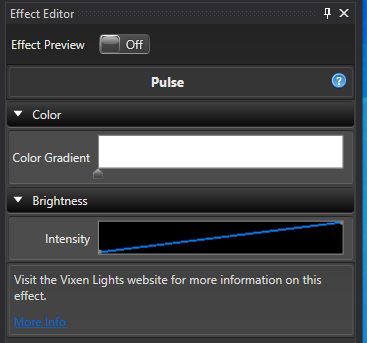
Lets add another effect. This time drag the Pulse effect onto the timeline somewhere after the Set Level. It looks similar to the Set Level, but this effect allows you to change the intensity and/or the color over the span of the effect. You will notice that the Effect Editor has some different controls for this effect. The editor adapts the controls based on the type of effect selected.

For this effect, the Intensity control is now a rectangle with a diagonal line on it. This indicates the effect will ramp up from 0 to 100 in intensity. You can see this reflected in the effect with the white color getting brigher along the time span of the effect. How the intensity behaves is controlled by what is called a Curve. There are two ways to edit the Curve. The most convienient is the Inline Curve Editor that you see in the Effect Editor. For this example, hover your mouse over the top right side of the diagonal line where it meets the edge. There is a dot there indicating the 100 percent point. When you hover over it, it will change to a cross cursor, and you can click and drag it down. Drag it down along the right edge to about half way. Again you will see a tooltip indicating the coordinates of the point. For this example you are looking for something near 100, 50. The 100 is the position in time, and the 50 is the intensity value. The diagonal line will follow your drag motions. Once you release the mouse the effect will render and you will see the the ending intensity of the effect is now lower. There can be many points across the curve to give it infinite shapes. Curves are very powerful for shaping the behaviors of effects. They are common across most of the effects. See the section on Curves for more information.
The color on this effect is more complex than the simple color of the Set Level. It can change color over time much like the Intensity can be varied with the Curve. Set the section on Color Gradients and the Inline Gradient Editor for more information on how it works.
Play Preview
Now that you have added an effect, you want to see what it looks like in the Preview window. If you created the Preview in the earlier part of getting started, you will have another window open that has your scene displayed. Click the Play icon in the sequencer toolbar and the sequence should begin playing. You will see a green caret and a vertical line moving across the Timeline showing the progress as it plays. Once the play position gets to the first effect, you should begin to see your Arch light up in the Preview window. You can visualize the differences in the behaviors of the two effects. Once you get past the two effects, you can click the Stop icon in the toolbar to stop the playback. You can also use the space bar to start and stop playback.
Adding Audio
You will likley want to set your sequence to some music. It is easy to add an Audio track to the sequence to align your effects to. Vixen can play most of the common audio formats. To add an audio track, click Tools -> Audio -> Associate Audio. A dialog will appear to navigate to the location of the audio track. Select the audio track you want to use and click Ok. The sequencer will copy the audio file into the Profile and load it in the sequence. You will see the Waveform of the audio track rendered above the Timeline Ruler. Now when you play your sequence you will hear the audio track play and the play indicator will follow the location in the music track. By default Vixen uses the default audio output device. If you need to switch it to another device you can by clicking the speaker icon in the toolbar. A drop down will present a list of devices to choose from.
Congratulations. You have created your first basic sequence and watched it play. See the section on the Sequencer for more info on how to use it. There are many powerful tools to enable your creative side to build great sequences.
Feedback
Was this page helpful?
Glad to hear it!
Sorry to hear that. Please tell us how we can improve.