This is the multi-page printable view of this section. Click here to print.
Getting Started
- 1: Introduction
- 2: Installing
- 3: Creating a Profile
- 4: Display Setup
- 5: Sequencing
- 6: Controller Setup
- 7: Support
1 - Introduction
Overview
The Vixen project is dedicated to creating a better creative experience in putting on your own animated lighting display. Whether that is a holiday display, theatrical, or some other project, Vixen can provide the tools to make that experience sucessful. It has a modern UI with an intuitive sequencing workflow that can facilitate the rapid creation of content. It supports all the mainstream hardware and protocols.
Getting started with Vixen
In order to get started with Vixen, you will need a Windows PC with the Vixen software installed along with some form of lighting control hardware. There are many options for hardware including Sandevices, Falcon, Kulp, ESPixelStick, Renard, DMX, and other Arduino or Beaglebone based devices. Vixen supports the mainstream protocols like Renard, Sacn / e1.31, DDP, DMX, and generic serial.
The documentation contained here will provide a good start to understanding how to use the software. There are written and video tutorials. In addition, there are help links throughout the software that link to these pages for help on the fly in the area you are working with. There are great forums, Facebook pages, and a You Tube channel to obtain further help. See the links in the footer of these pages to guide you to those locations.
Concepts
The Concepts section provides you with an overview of the key topics you should know in order to become proficient with the software.
Usage
The Usage section takes you on a deep dive into how to do things in Vixen. This covers all the key features in depth and should be your go to guide for help. Many of the help links in the software link directly to these pages.
Tutorials
The Tutorials section provides additional insight into how to use certain features of the software. Many of these are video tutorials that can provide a more hands on visual into how to accomplish things.
2 - Installing
Overview
All Windows 7/8 support ceased in 2020. Windows 8.1 will have limited support.
Windows 10 or 11 is the recommended OS for the best results.
Mobile type processors often found in laptops have often been found to perform poorly with Vixen 3 when they are in power saving mode. You should make sure you have the power saving in performance mode or disabled for optimal results.
Setting your computer’s power and performance settings to Maximum Performance is highly recommended. If using a laptop, plugging it into a power source can improve performance as well. (as opposed to running on batteries.) Additionally, if you intend to use the built in scheduler in V3, you may need to have a lot of RAM installed. The exact amount varies based on the total number of effects and their complexity for the entire scheduled show. 16 GB or more may be necessary for mid sized shows. The internal scheduler is not suitable for high channel count shows
Which Version Do I Install?
Vixen is available as either a 32 bit or a 64 bit application.
- If you’re running a 64 bit version of windows 8.1 or greater you should download and install the x64 package.
- If you’re running a 32 bit version of windows, download and install the x32 package. The 32 bit version will likely be phased out in 2023.
The benefit of the 64 bit version is that it is able to make use of more system memory. 32 bit applications are limited to less than 3GB of memory. If you are using a PC with more than 3GB of RAM, the 64 bit version will allow you use more of your available system memory to make the lights go blinky flashy. This results in a faster, smother sequencing experience with less lag time. The 32 bit version will in fact work on an x64 version of windows, but if you’ve got 64 bit windows, why not use it.
System Requirements
Display with less than 2000 hardware controller channels
- Windows 10 or greater.
- 64 bit version of Vixen 3 or 32 bit if your system does not support 64 bit.
- Dual Core processor. 2.0Ghz per core. Intel Core 2 Duo or newer.
- 4 GB RAM or more
- 1024 x 768 (XGA) or greater video monitor
Display with more than 2000 hardware controller channels
- Current Windows 10 or greater. 64 bit version.
- 64 bit version of Vixen 3.
- Multi Core processor. 2.8Ghz per core Intel Core i5 or greater.
- 8+ GB RAM.
- Ample hard drive space. Multiple profiles can take up several hundred megabytes.
Installation
- Uninstall any previous version you may already have installed. (or install the new version into a new folder.
- Download the installation program from the Release Builds page.
- Run the file you just downloaded and follow the prompts. You may need to whitelist the installer and application in your virus scanner to ensure a clean installation.
- Use the shortcut or menu item created to run the program.
3 - Creating a Profile
Overview
In Vixen we try to think of things in terms of a show or display. This tends to organize around something like a Christmas display or a Hallowen display, but can really be any logical project you want to define. The artifacts are stored in what we call a Profile. In the simplest terms, when you first launch Vixen, it will create a default profile for you. The files for the layout of your display, the sequences, the audio and media you use are all stored in this profile. By default the folder for the profile is under the users My Documents folder called Vixen 3. C:\Users{user}\Documents\Vixen 3.
Profiles
Beyond the basic getting started, you may create displays for mutiple events or even multiple different sites. In many cases you will want to keep these in seperate Profiles aligned to those specific events or sites. For example your Halloween display is in a seperate profile as your Christmas display since they have different display elements. Vixen has support for this and you can read more about that in the section on Profiles.
Profile Structure
A Profile has specific file structure that artifacts are kept in. For the most part you generally do not need to worry about the specific structure. Vixen will store things were they belong when you create content. If you ahve multiple profiles, then each profile will have it’s own folder and the structure will be similar. See the section on Profiles for more details of the file structure.
4 - Display Setup
Overview
The first step in creating a new display is tell Vixen about the elements in your display. There are two main areas that drive the setup of your display. The Preview Setup and the Display setup. In older versions of Vixen this would start in the Display Setup, but in the current versions, you should begin in the Preview Setup.
Preview Setup
From the main screen launch into the Preview Setup using the Setup Previews button. If this is your first time you will be presented with the preview setup screen.
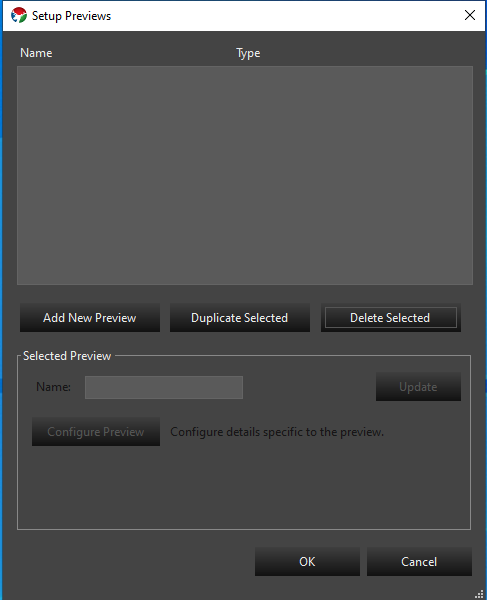
Create a new preview by clicking the Add New Preview button. Choose Vixen Display Preview from the list and click Ok. A new preview will be added. You will notice a window for the preview has now been created. In the list there is checkbox next to the preview. This controls if the preovew is visible or not. In the section for Selected Preview, you can give your preview a better name. Once you have chosen a name click the Update button. Vixen supports multiple previewss, but in most cases you will only use one.
Click the Configure Preview button to open the preview setup screen. This is where you will begin to build your display.
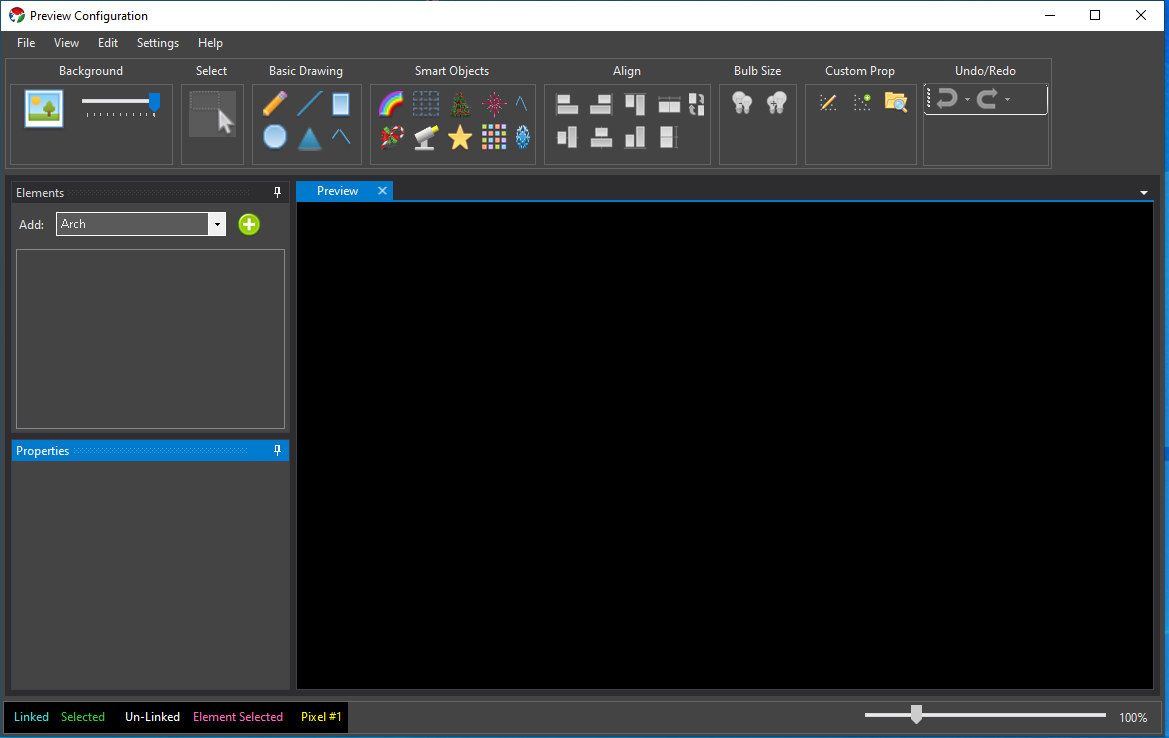
To build your display you will likley want to have a picture of your house or scene where the display will be presented. This will help you organize you props in the locations you intend to place them. A visual reference if you will. Take the image of your location and use your favorite editor to size it to something resonable for the resolution of your monitor. 1600 x 1200 is a a general ballpark unless you have a very large area or dense display. To add the picture, click the picture icon in the upper left in the Background section. Navigate and choose the image file and click ok. Your image should be presented in the Preview tab of the screen. If it is larger than the screen window, there will be scroll bars to navigate around. The slider next to the picture icon can be used to adjsut how bright it is. You will likley want to dim the image down to simulate darkness so you can see the props. Now you are ready to add your first Prop. See Background for more information.
Add a Prop
For the getting started example, we are going to add an Arch. It is a simple prop and easy to configure to get going. In the Smart Objects section of the toolbar there is a rainbow icon representing an Arch. There are other icons representing other common types of props used in displays. You can read more about them in Basic Drawing or Smart Objects. If you have Props other than the predefiend types, you can add custom designs. See the section on Custom Props for more details.
Click the rainbow icon to select the Arch. Then in the large preview area that has you background image you can draw the shape. The best approach is to visualize a rectangular box where you want the Arch to be. Then start in the upper left of that area and click and drag to the lower right. You will see an Arch appear that you can drag to an approximate size. Don’t worry if the placement is not perfect or the size is off. Just get the basic shape created and it can be adjusted later. After releasing the mouse button, you will be presented with the setup screen for the Arch.
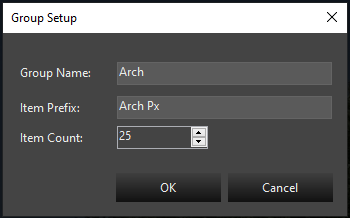
In this case we will define a pixel Arch. The default is typical and will have a name for the Prop called Arch. Each pixel node in the Arch will start with a name of Arch Px and they will be numbered using that pattern Arch Px-1, Arch Px-2, etc. Click Ok to select the defaults. The next screen will ask you if you want a dimming curve. For this example we are going to select No. You can read more about Dimming Curves later. The next screen will allow you to choose the color handling. The choices here will depend on if your lights are analog strings, dumb RGB, or full color RGB. In our case since we are setting up a pixel light arch, the default choice of any color and they are full mixing RGB is correct. The color order of RGB is generally correct for pixel lights. If the color order is different, that can be handled later in other ways.
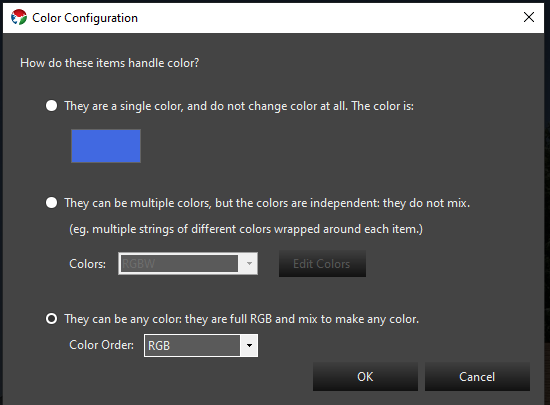
After clicking ok on the color handling entry, you will be complete with the Arch setup. You will want to hit the Esc key or click the large arrow icon in the Select box in the toolbar to leave drawing mode if you do not want to keep adding more Arches. In drawing mode you can create multiple props of te same type one after the other without needing to click the smaart object icon again. See the Preview section for more details on adding props. After hitting Esc to leave draw mode, you can click the Arch on or near one of the lights and it will be selected. The Arch properties pane will be enabled also once it is selected to view the configuration. If you expand the Arch in left column, you can see the individual lights represented. These are called elements. Your screen should look similar to the following.
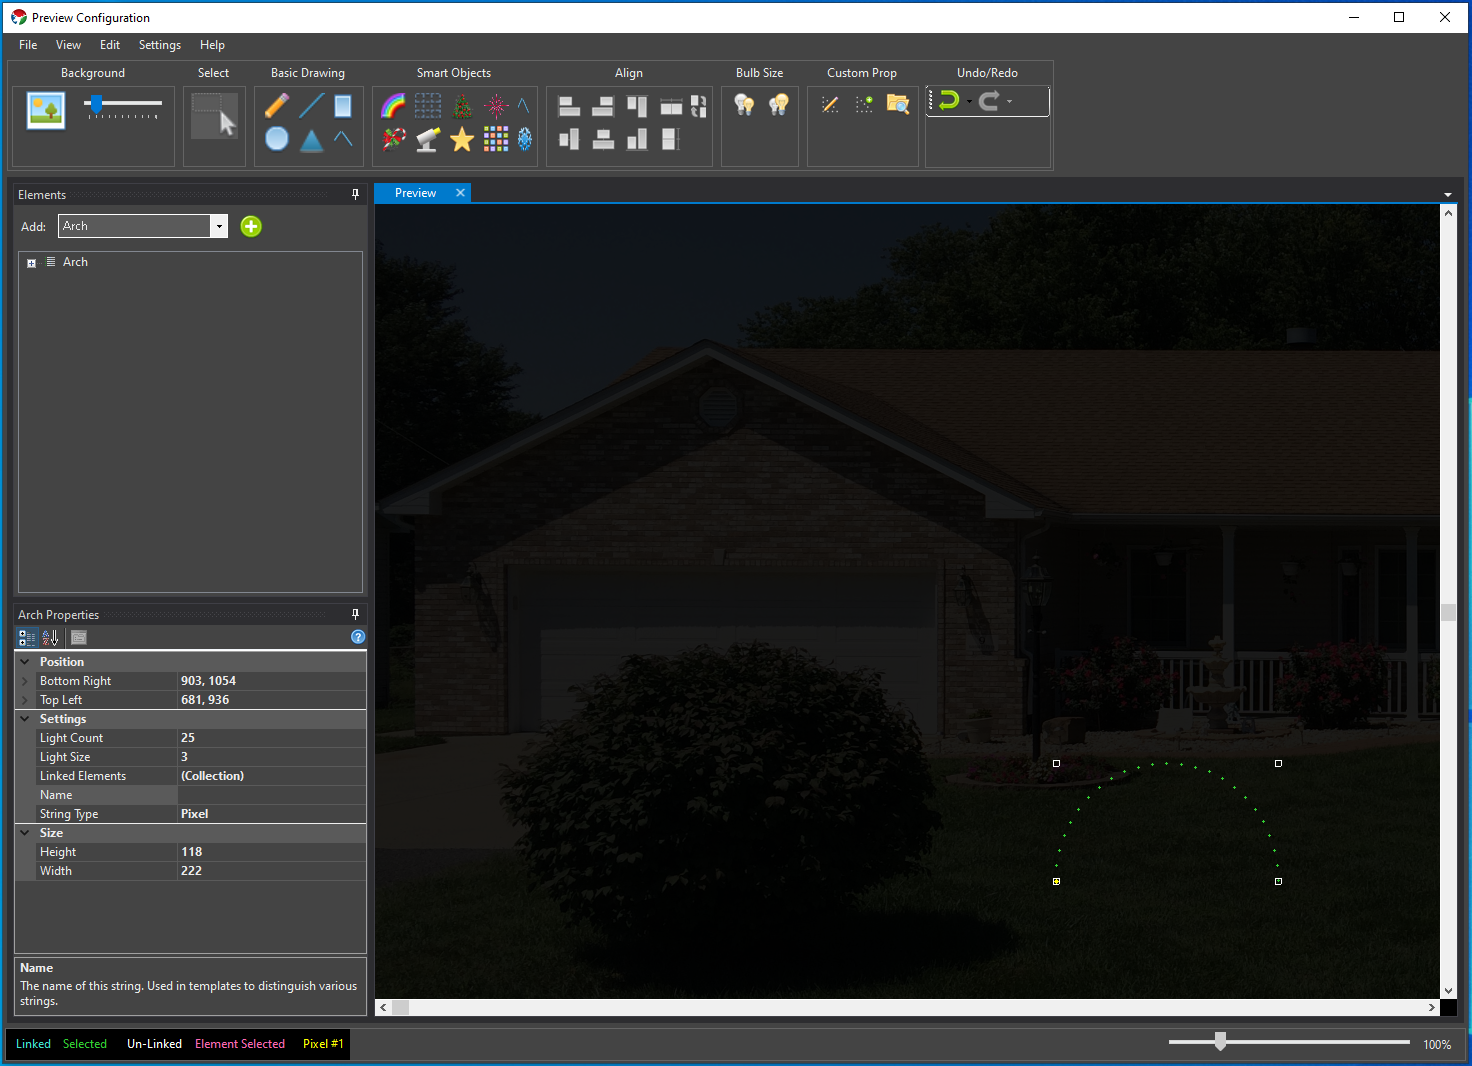
You can edit the location or size of your prop using basic drawing concepts. Click to drag it around. Use the handles when selected to resize it. There are also many other tools align props to each other. See the section on Align for more information.
For the purposes of this example you have an Arch that you can use for creating a sequence.
Further Reading
See the section on Element Setup for more information about how to create and manage your Props. The parts of a Prop are called an Element and many of these sections refer to editing elements specifically.
5 - Sequencing
Overview
This section will walk you through creating your first sequence. If you have not done the basic display setup, see the getting started section on Display Setup. Getting started with creating a simple sequence is very straight forward.
Sequencer
The sequencer is were you will spend the majority of your time. This is where your creative ideas can be applied to building a sequence. From the main screen, click the New Sequence button to open the sequencer window. The is window consists of a toolbar at the top to access many of the functions. Most commonly will be the play/stop/pause icons to control playing your sequence. This toolbar is customizable in many ways to suit your needs. The rest of the window is composed of dockable windows for the various functions. The main section is the Timeline were your props are listed in a tree structure that is identical to what is created in the setup. You should keep this docked in the main window. If you have created the Arch prop in the previous section, you will see the Arch in a column on the left part of the Timeline. The plus icon to the left of the prop allows you to expand and see the structure of it.
In addition to the Timeline, there are two other windows we will focus on while getting started. The Effect window and the Effect Editor window. The Effect window contains all the effects Vixen has to use on your props. It should be visible on the left side by default. If it is not, you can use the View -> Effects Window and ensure that is it checked. This window lists all the Effects and groups them by type. The most common types are Basic Lighting and Pixel Lighting. You can learn more about each type in the linked sections. There are two other types for controlling specialized Devices and Intelligent Fixtures. You will also want to ensure that the Effect Editor window is also visible. This defaults to being on the right side of the window.

The effects can also be accessed via an optional toolbar. Under View -> Toolbars, select Effects and ensure it is checked. It will look something like the following and can be customized to have labels or not.

Now that you have some familiarity with how to access the effects, lets add a basic effect to our Arch. From either the Toolbar, or the Effect window, click and drage the Set Level effect onto the row for the Arch in the Timeline. You can place it anywhere in the visible space under the Time Ruler. It will create a 2 second long effect that sets the Arch to a white color. The effect should be selected by default as indicated by a dotted line around it. If it is not selected, there will be a solid black line around it. If it is not selected, just click on the effect and it will be selected.

After dropping the effect, your window should look something like the following.
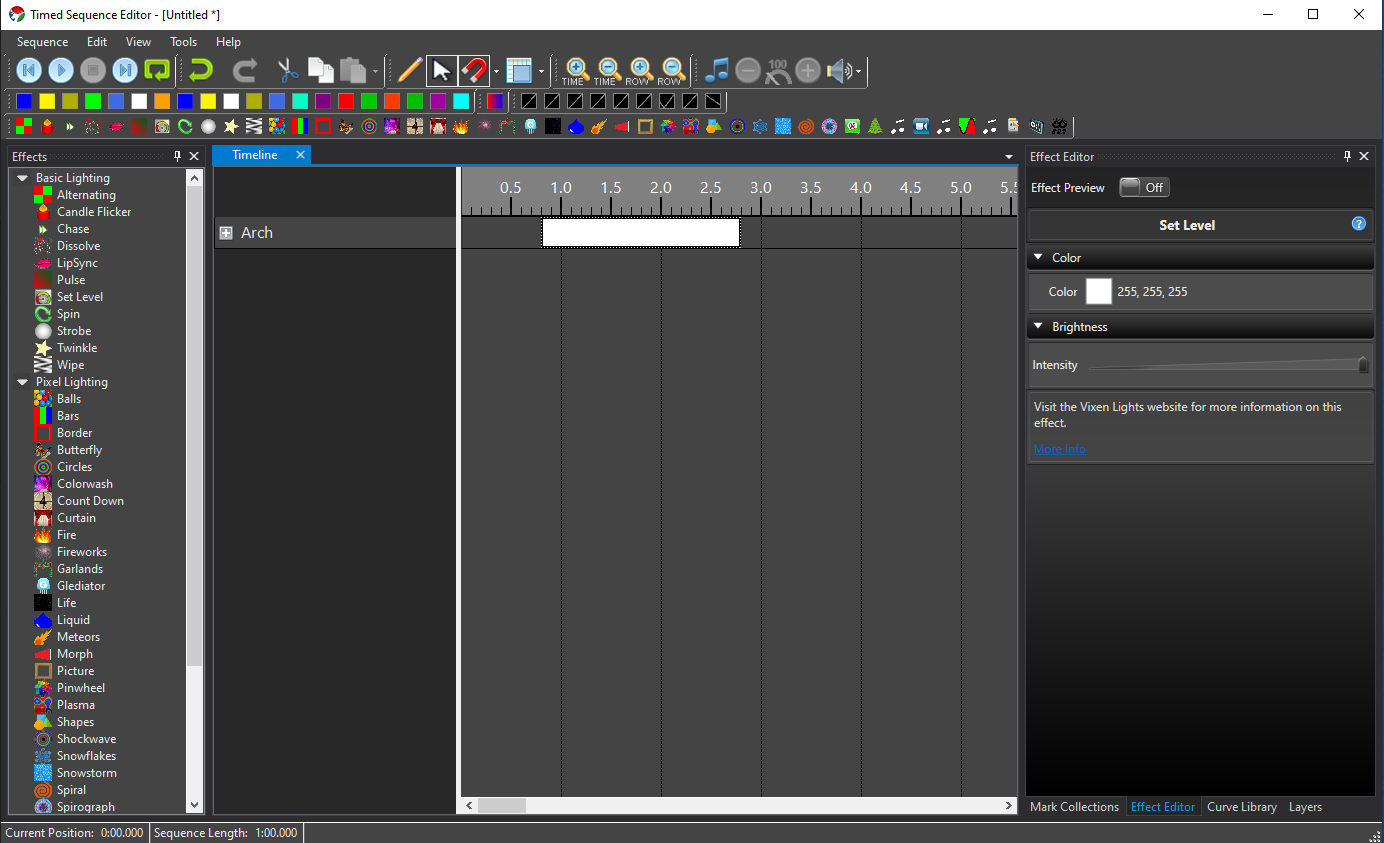
The Effect Editor allows you to change the settings of how the effect behaves. It allows you to edit the selected effects behavior. The Set Level is the most basic of effects, so it only has two settings. The color and the intesity. Use the slider to change the intensity. It varies from 0 - 100 percent. If you set it to 50 percent, you will see the white bar for the effect change in brightness to reflect the lower intensity. As you drag the slider, a tooltip will indicate the value it is set to. To change the color, double click on the the white square in the Effect Editor. A color picker window will appear and allow you to select the color you want. Since this is a pixel prop, any color is available. There are presets for the common RGBW colors, or you can enter RGB or HSV values. You can also use the color box to select with your mouse. Once you select Ok, you new color will be reflected in the color square and the effect will render and show the new color as well. If you want more information on the effect, you can click the question mark icon or the More Info link in the Effect Editor. It will navigate you to the proper section in the online documentation.
Add a Pulse
Lets add another effect. This time drag the Pulse effect onto the timeline somewhere after the Set Level. It looks similar to the Set Level, but this effect allows you to change the intensity and/or the color over the span of the effect. You will notice that the Effect Editor has some different controls for this effect. The editor adapts the controls based on the type of effect selected.
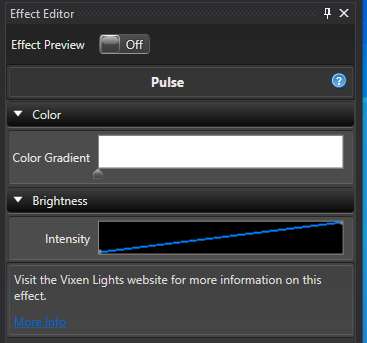
For this effect, the Intensity control is now a rectangle with a diagonal line on it. This indicates the effect will ramp up from 0 to 100 in intensity. You can see this reflected in the effect with the white color getting brigher along the time span of the effect. How the intensity behaves is controlled by what is called a Curve. There are two ways to edit the Curve. The most convienient is the Inline Curve Editor that you see in the Effect Editor. For this example, hover your mouse over the top right side of the diagonal line where it meets the edge. There is a dot there indicating the 100 percent point. When you hover over it, it will change to a cross cursor, and you can click and drag it down. Drag it down along the right edge to about half way. Again you will see a tooltip indicating the coordinates of the point. For this example you are looking for something near 100, 50. The 100 is the position in time, and the 50 is the intensity value. The diagonal line will follow your drag motions. Once you release the mouse the effect will render and you will see the the ending intensity of the effect is now lower. There can be many points across the curve to give it infinite shapes. Curves are very powerful for shaping the behaviors of effects. They are common across most of the effects. See the section on Curves for more information.
The color on this effect is more complex than the simple color of the Set Level. It can change color over time much like the Intensity can be varied with the Curve. Set the section on Color Gradients and the Inline Gradient Editor for more information on how it works.
Play Preview
Now that you have added an effect, you want to see what it looks like in the Preview window. If you created the Preview in the earlier part of getting started, you will have another window open that has your scene displayed. Click the Play icon in the sequencer toolbar and the sequence should begin playing. You will see a green caret and a vertical line moving across the Timeline showing the progress as it plays. Once the play position gets to the first effect, you should begin to see your Arch light up in the Preview window. You can visualize the differences in the behaviors of the two effects. Once you get past the two effects, you can click the Stop icon in the toolbar to stop the playback. You can also use the space bar to start and stop playback.
Adding Audio
You will likley want to set your sequence to some music. It is easy to add an Audio track to the sequence to align your effects to. Vixen can play most of the common audio formats. To add an audio track, click Tools -> Audio -> Associate Audio. A dialog will appear to navigate to the location of the audio track. Select the audio track you want to use and click Ok. The sequencer will copy the audio file into the Profile and load it in the sequence. You will see the Waveform of the audio track rendered above the Timeline Ruler. Now when you play your sequence you will hear the audio track play and the play indicator will follow the location in the music track. By default Vixen uses the default audio output device. If you need to switch it to another device you can by clicking the speaker icon in the toolbar. A drop down will present a list of devices to choose from.
Congratulations. You have created your first basic sequence and watched it play. See the section on the Sequencer for more info on how to use it. There are many powerful tools to enable your creative side to build great sequences.
6 - Controller Setup
Overview
Hopefully by now you have made your first sequence and seen the visulaization of it play on a basic prop. You can create entire sequences and a whole show to visualize without ever needing to setup any controllers. But at some point you will want to see your hard work on some real props. At that point you will need to setup some controllers and connect your Props to the controlers. This is done by a process called patching.
Display Setup
The Display Setup screen is where the details of the controllers are managed. A bit of back history is relavent here. In past versions of Vixen, the Display setup is where you would have started. You would create your Props here first instead of in the Preview like the getting started guide demonstrated. You would create all the Props, and then have to go to the Preview and link them together. As time went along we realized that it was more efficient to combine that creation and linking process into a more seemless step. You can still do things the old way and you may see many references or videos showing that older method.
From the main screen, click the Setup Display button to open the window. On the left you will see the the familiar list of your Props in the tree layout. In the middle is information on the patching. The section on the right is where the controllers are configured. For this example we will assume you are using one of the common SACN e1.31 controllers commonly used for pixels. See Streaming ACN for more information on this protocol.
Add Controller
In the right hand column under controllers there is a drop down box to select the type of controller. Choose Streaming ACN (e.131) and click the green plus icon next to it. You will be prompted for a name. Choose something that will help you identify what this controller is used for, Click Ok. The next dialog will ask you for the number of outputs on this controller. This is the channel count you will be using. Each pixel typically uses 3 channels. One for each of the RGB colors. In our case of the ARch, we know we have 25 pixels, so 25 * 3 equals 75 channels needed. You may be using many Props on the same controller, so your channel count will need to reflect your needs. Try not to over allocate beyond what you need to use even if the controller suppports more. You can always come back and adjust the number of channels later.
You now have a controller in the list on the right hand column. You can click the plus in front of it to expand and see the number of channels/outputs. The next step is to configure the universes. Select the controller and click the gear icon at the bottom of the column. You will be presented with the universe confguration screen.
This will need to match your controller setup. In this case we will assume you are using universe 1, our prop starts on channel 1 and we are going to have just 75 channels to match our Arch. Change the 510 in the last column to 75. Click the green plus at the bottom and set the IP Address of the controller. You should see something similar to this.
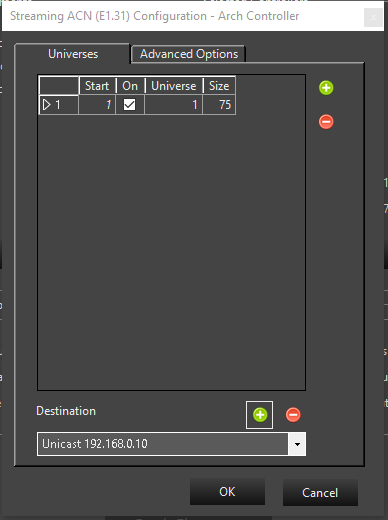
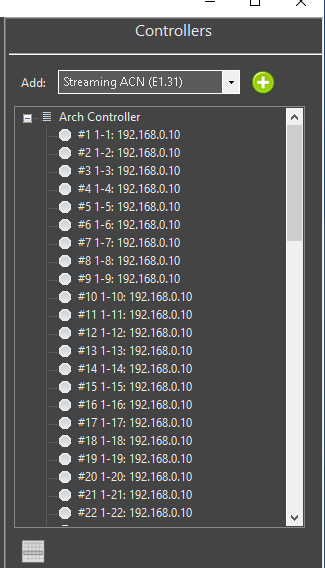
If it looks right, then click Ok. If you now expand the plus in front of the controller you will see the universes mapped to the outputs. The dots will be grey indicated nothing is patched to them.
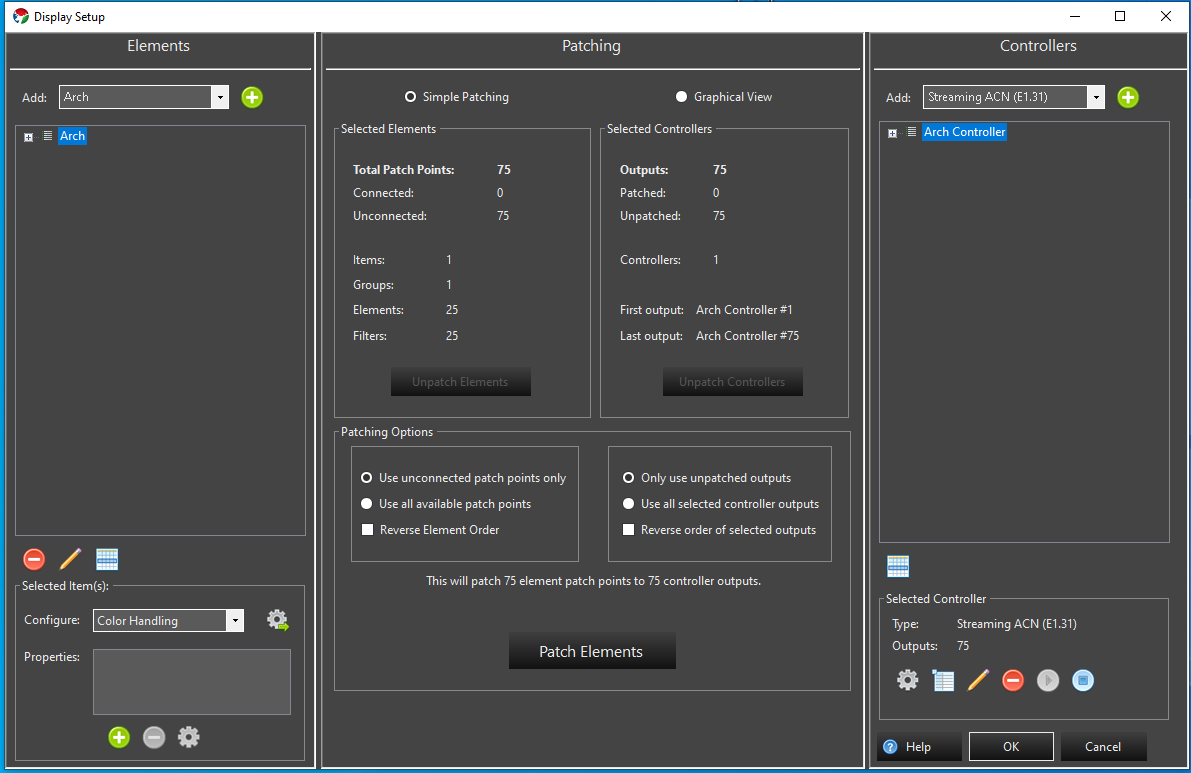
Now I want to patch my Arch to this controller. I select the Arch in the left column and the controller in the right column. In the middle section I now see I have 75 total patch points on the selected elements (Arch Prop) and 75 outputs on the selected controller, so everything matches. The big Patch button is enabled in the bottom of the middle section and it indicates it is going to patch 75 element patch points to 75 controller outputs.
Click the Patch button. It will prompt a dialog indicating the patch details. Now if I expand my Arch, and the controller I see all green dots indicating they are connected.
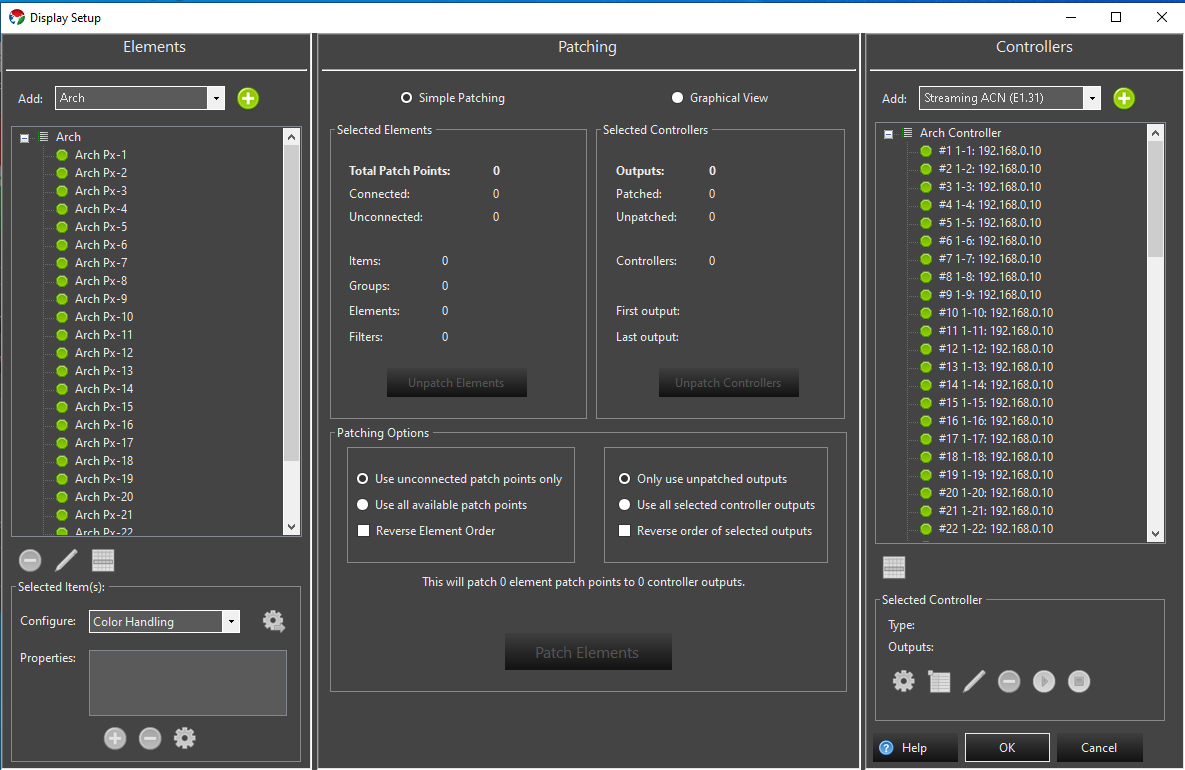
Click Ok on display setup and then you can play your sequence. If all is properly confgured on the controller, you should see lights working when the effects are played.
Another Example
The above was a very basic example. In reality you will have many more Props and a more complex controller setup. See the e682 example for a more complex setup with controller screen shots. Some of the Vixen screns are from older versions without the dark styling, but the concepts are all the same.
Further Reading
See the section on Patching Setup for more in depth details about the patching process and the tools available to help.
7 - Support
See the Community page for information on how to get additional support beyond these pages. There is a robust community of avid Vixen users that are willing to help.