This is the multi-page printable view of this section. Click here to print.
Basics
- 1: Basic Edit Functions
- 2: Editor Shortcut keys
- 3: Playing Sequences
- 4: Timeline
- 5: Effect Editor
- 5.1: Inline Curve Editor
- 5.2: Inline Gradient Editor
- 6: Draw Mode
- 7: Drag and Drop
- 8: Alignment Helpers
- 9: Resize / Draw Indicator
- 10: Snap Points
- 11: Audio
- 12: Preset Libraries
- 13: Marks
1 - Basic Edit Functions
Overview
Editing a sequence is one of the most important aspects of creating your light show. The sequencer is intended to facilitate rapid creation of content and also to feel at home with standard conventions you have used in other applications.
Cut, Copy, and Paste
The Cut, Copy and Paste features of the sequencer follow the well established patterns in the OS world. You can select any effect with the mouse and cut/copy it using the normal Ctrl C, Ctrl V and Ctrl X keyboard shortcuts or the right click mouse conventions. Selected effects will have a white dotted line around them whereas non selected ones will have a solid black outline.
Pasting works like it does in most all other applications. Standard keyboard and context menus are provided. To paste effects that are on the clipboard, select the row and time position in the timeline you want to paste and invoke the paste function. Effects will paste in the time and row spacing they were copied in. For example, if you copy effects from two side by side rows, they will be pasted at the new location in the side by side rows starting with the one you selected to paste to. If there are skip rows when it is copied, those same skips will occur during pasting. You can paste an entire row or rows of data copied from the row selection. They will paste at the entire row level. To copy an entire row, select the element name label and the enture row will be come selected. Use the keyboard shortcuts to copy or cut it. Then select the new row in the same manner and use the Ctrl V shortcut to to paste it. Effects can be copied between two open editors or even two open instances of Vixen.
Copy / Paste with Layers
Layer information will be copied along with the effects if they are located in a layer. The same is true when copying between two sequences if the same layer exists in the target sequence. You must have the layer created in the target location for this to work.
Effect Multi-Selection
Multi select of effects can be done by holding down the CTRL key while selecting the effects you want. You can select multiples in a range on the same row by clicking the first one to elect it and then SHIFT click one further before or after it in the row. All effects in between will be selected. You can click on the element name in the row and this will select the entire row. It will be outlined in blue and all effects will show selected.
Clicking the timeline and dragging the mouse with the left mouse button held will create a rectangular selection lasso that will select all effects inside or touching the lasso. You can also utilize the drag box filter by clicking the drag box icon in the toolbar to choose which effects the drag box will select. This will filter the selections to only those effects matching your criteria.
Additional capabilities for selection are provide by the Draw Mode. See the section on Draw Modes for further details.
Editing Effects
Effects can be edited in many ways. Clicking on any effect will bring up it’s settings in the Effect Editor. You settings can be changed and the effect will render the changes on the fly. If you have multiple effects of the same type selected, all their settings can be edited at the same time. There are also some basic settings that may be the same for multiple types of effects. These can be edited at the same time as well. The Effects section details the settings for each Effect.
Effects can be resized by clicking on the start or the end and dragging them to the new length you desire. Multiple effects can be selected at the same time and resizing them works in unison. See Snap Points for more info on getting effects to align to specific things in the Timeline.
Effects can also be dragged from one element to another by clicking on them and dragging while holding the mouse down. Multiple effects can be selected and dragged at the same time. By holding the Ctrl key down while dragging the effect(s) you can create a copy of them and drag the copy to the new location. Holding the Shift key down locks the dragged effects in the same vertical time so you can move them up or down to another element. See the Timeline section for more details.
Clicking on the left edge of an effect while holding down the Alt key and moving the mouse will cause the effect just left to adjoin with this effect. Continuing to move the mouse while the Alt key is depressed will jointly size both effects. Similarly, clicking on the right side of an effect while holding down the Alt key and moving the mouse right will adjoin the immediate right effect. Continuing to move the mouse while the Alt key is depressed will jointly size both effects. Holding the Alt and Shift keys down together will work similarly, but only Effects at at the same Layer will be affected.
Effect Replacement
There are times when you want to replace one or more effects with an effect of a different type. This can be tedious when you have to delete them and create new. On top of that you likely want them to occupy the same time slot and duration of the original effect. Fortunately there is an easy way to accomplish this.
Existing effects can be replaced with another effect type directly in the editor. Select the effects you want to replace with a different effect. Hold down the Control key and drag the new effect you want anywhere on the timeline. You will be prompted to confirm you want to replace the selected effects with the new effect. Once you agree, all the selected effects will now be replaced with the new effect set to it’s default. All of the effects will still be selected and you can edit them all at once.
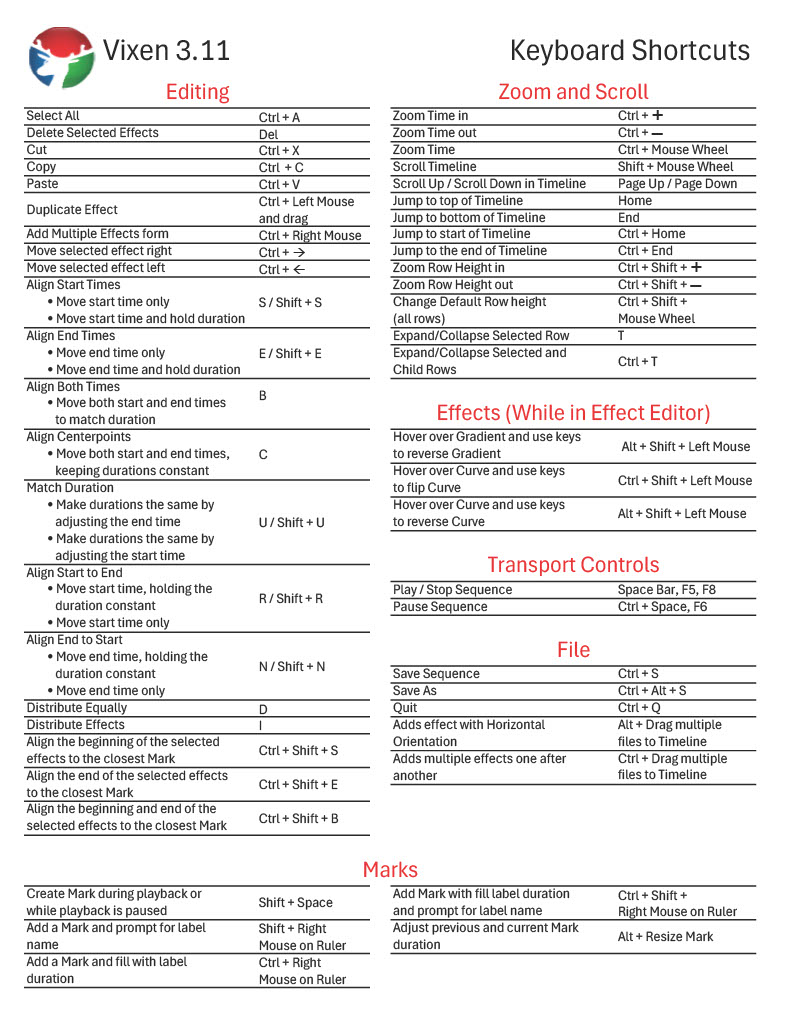
2 - Editor Shortcut keys
| Editing | |
| Select All | Ctrl + A |
| Delete Selected Element | Del |
| Cut | Ctrl + X |
| Copy | Ctrl + C |
| Paste | Ctrl + V |
| Duplicate Effect | Ctrl + Left Mouse and drag |
| Add Multiple Effects form | Ctrl + Right Mouse |
| Move selected effect left | Ctrl + 🡸 |
| Move selected effect right | Ctrl + 🡺 |
Align Start Times
|
S Shift + S |
Align End Times
|
E Shift + E |
Align Both Times
|
B |
| Align Centerpoints | C |
Match Duration
|
U Shift + U |
Align Start to End
|
R Shift + R |
Align End to Start
|
N Shift + N |
| Distribute Equally | D |
| Distribute Effects | I |
| Align the beginning of the selected effects to the closest Mark | Ctrl + Shift + S |
| Align the end of the selected effects to the closest Mark | Ctrl + Shift +E |
| Align the beginning and end of the selected effects to the closest Mark | Ctrl + Shift + B |
| Zoom and Scroll | |
| Zoom Time in | Ctrl + ➕ |
| Zoom Time out | Ctrl + ➖ |
| Zoom Time | Ctrl + Mouse Wheel |
| Scroll Timeline | Shift + Mouse Wheel |
| Scroll up / down in Timeline |
Page Up Page Down |
| Jump to top of Timeline | Home |
| Jump to bottom of Timeline | End |
| Jump to start of Timeline | Ctrl + Home |
| Jump to end of Timeline | Ctrl + End |
| Zoom Row Height In | Ctrl + Shift + ➕ |
| Zoom Row Height Out | Ctrl + Shift + ➖ |
| Change Default Row Height (all rows) | Ctrl + Shift + Mouse Wheel |
| Expand/Collapse Selected Row | T |
| Expand/Collapse Selected and Child Rows | Ctrl + T |
| Effects (While in Effect Editor) | |
| Hover over Gradient and use keys to reverse Gradient | Alt + Shift + Left Mouse |
| Hover over Curve and use keys to flip Curve | Ctrl + Shift + Left Mouse |
| Hover over Curve and use keys to reverse Curve | Alt + Shift + Left Mouse |
| Transport Controls | |
| Play / Stop Sequence |
Space Bar F5 F8 |
| Pause Sequence |
Ctrl + Space F6 |
| File | |
| Save Sequence | Ctrl + S |
| Save As | Ctrl + Alt + S |
| Quit | Ctrl + Q |
| Adds effect with Horizontal Orientation | Alt + Drag multiple files to Timeline |
| Adds multiple effects one after another | Ctrl + Drag multiple files to Timeline |
| Marks | |
| Create Mark during playback or while playback is paused | Shift + Space |
| Add a Mark and prompt for label name | Shift + Right Mouse on Ruler |
| Add a Mark and fill with label duration | Ctrl + Right Mouse on Ruler |
| Add Mark with fill label duration and prompt for label name | Ctrl + Shift + Right Mouse on Ruler |
| Adjust previous and current Mark duration | Alt + Resize Mark |
Click here for a demo on the use of Shortcuts.
Click on the Keyboard Shortcuts card below to open in a separate window, to view or print.
3 - Playing Sequences
Overview
Playing seqeunces is one of the most common activities that will be used. The Sequencer provides many features in order to provide a rich experience.
Play Pause Stop
The toolbar has icons for Play, Pause and Stop. These can be used to control the playback of the sequence in the editor. These options work like most any other editor you may experience them in. The Play button toggles between Play and Pause. The Stop button is always available. In addition to the toolbar buttons, the Spacebar will toggle between Play and Pause and is the shortcut to those buttons.
Playback Start Point
In addition to these basic functions, you can have custom playback points or ranges. Clicking once in the Timeline ruler area will display a single arrow head and give you a play from point.
Clicking a new start point or selecting a new range will cancel the old one. Any playback will now start from this newly selected point or range.
Ctrl and click once in the Timeline ruler will auto play from that point. Original range or single play point will be restored after play finishes.
Playback Ranges
In addition to playing from a selected point, playing a specified range is possible. This allows you to work on a specific section of the sequence without having to think about stopping the playback at the same place.
Clicking and dragging in the Timeline will create a range to play. Playing will then only play this range of the sequence.
Click on |< icon left of play button returns play start marker to beginning. If range is selected range will extend to beginning.
Click on >| icon right of stop button pushes play range to end.
Holding Control while selecting the play range will auto play on mouse release. Original range or single play point will be restored after play finishes when the range is selected using the control key.
Marks in the Mark Bar also support a double click to play the range of the Mark Bar. This can be very useful in sequencing Lip Sync tracks.
Looping
Looping is also possible. By selecting the green loop button on the play bar the sequencer will play in a loop the entire sequence or the selected play range. This also works if you use double click on Mark to choose the range to play when loop is selected.
Delayed Start
Delayed start is possible under Sequence -> Playback -> Play Options.
4 - Timeline
Overview
The Timeline is the heart of the sequence editor. It is divided up from left to right in minutes and seconds. Top to bottom in rows are the Elements you have defined in the Display Setup. These should correspond to the props in your display and may have Groups of props that you have organized. Any groups can be expanded to reveal the sub elements or other groups. The Timeline can be zoomed in or out to show as much or little of the time the sequence covers. There are keyboard and mouse shortcuts to control the zoom and allow panning from left to right and up and down. See the Editor Shortcuts section for more details on these commands.
Time Ruler
The ruler along the top contains the hash marks for the time intervals. These will vary from minutes to seconds to milliseconds as you zoom in and out. You can also click here to place a caret as the starting place or drag and select a range for the sequence when playing. See Playing Sequences for more information on this feature. Marks can be added here to mark beats or other important parts of the sequence and can be used as alignment references. Hovering the mouse near the bottom of the ruler will transition the cursor to a horizontal bar that you can click and drag to resize the height of the ruler. The time numbers will scale in size relative to the height. Marks can be added via the ruler. See Adding Marks.
Mark Bar
Below the ruler is the Mark Bar. This area will only show up if you have Marks that have the Mark Bar enabled. Marks can be edited in this area to change their start time, duration, text and location. This works similar to how effects are managed. See Editing Marks for more details.
Rows
As mentioned above the Timeline consists of rows of the elements organized in an expandable tree. This mirrors the tree created in the Display Setup. Clicking the plus icons in front of a group element will expand that row to reveal its children. Rows can be selected by clicking in the area where the element name is. You can use this to Cut, Copy and Paste entire rows of Effects.
The rows can have a highlight indicator showing if they have any effects on them, or any of their children have effects. Enabling the menu option View -> Highlight Rows With Effects will turn this feature on. The element names will be highlighted in yellow if that row has any effects on it. The plus expander icon will be outlined in yellow if any of the children have effects on them. With the combination of the two, you can quickly see where effects may be hiding.
You can resize the height of any row in the Timeline. In the element name section hover over the bottom border for any element. Then the horizontal cross cursor appears, you can click and drag the row to the height you want. There are also keyboard short cuts increase or decrease all the rows sizes together. They can be found under the menu options in View to zoom the rows in or out. To reset the row heights to the default click the option under View -> Reset Row Height to Default. The height settings are saved when you close the sequence editor and will be restored when returning.
Rows can also be collapsed quickly by clicking the View -> Collapse All Element Groups option. This will return all the rows to the collapsed state. The expanded states of the rows are also saved from session to session.
Effects
Effects can be added to the elements in multiple ways. You can drag the effect from the Effect list docker onto any place in the timeline. They can also be added from the context menu by right clicking in the place you wish to add it and then navigating to the effect and selecting the desired one. Effects are added with a default length of 2 seconds and default settings that are helpful to get you going. More control over how effects are added can be obtained by using the Draw Mode feature. Once an effect is on the timeline it can be edited in the Effect Editor docking widow by selecting it. See the Effect Editor section for details on editing effects.
Effects can be moved around on the timeline by simply clicking on them and dragging it to the desired location. The length can also be changed by dragging on the beginning or end of the effect. A tool tip will appear when resizing to show the start and duration of the effect. The same tool tip will appear when hovering over the effect. Multiple effects can be moved or resized at the same time by multi selecting them. This uses standard select means of Ctrl/Shift click as you would see in any modern windows app. Once you have multiples selected, they can be moved or resized as a group. See the section on Alignment Helpers and the Draw Indicator sections for further ways to manipulate effects in relation to each other.
Effects can also be Cut, Copied and Pasted from one place to another. Normal paradigms apply for this mechanism. Another way to make a quick copy of an effect is to Ctrl click and then drag on the effect. This will clone the selected effect(s) and allow you to quickly drag a copy of it else where. Holding the Shift key while dragging the effect will hold it at the time so you can drag it to another element and not change its position in time.
Clicking on the left edge of an effect while holding down the Alt key and moving the mouse will cause the effect just left to adjoin with this effect. Continuing to move the mouse while the Alt key is depressed will jointly size both effects. Similarly, clicking on the right side of an effect while holding down the Alt key and moving the mouse right will adjoin the immediate right effect. Continuing to move the mouse while the Alt key is depressed will jointly size both effects. Holding the Alt and Shift keys down together will work similarly, but only Effects at at the same Layer will be affected.
Each effect can have an info popup when the mouse is hovered over them. This provides information such as the name of the effect, the start and end time, the duration, and the layer the effect is in. This can be enabled or disabled under View -> Show Effect Info or with Ctrl+I.
Marks
Marks will be shown on the timeline as vertical lines in the color and style of the collection they are part of. These can be very helpful in aligning effects to beats or other important features in a sequence.
Timeline Shuttling
Movement up and down and right and left in the Timeline can be done with a mouse and scroll wheel. The mouse wheel will scroll up and down when hovered over the Timeline. Holding Shift while scrolling the mouse wheel will move left and right.
Holding Ctrl while scrolling will zoom in and out the visible time span. Where the point of zoom occurs can be controlled by the option in the menu View -> Zoom Under Mouse Position. When selected the point of zoom will be where the mouse is. Otherwise it will be the center of the visible Timeline. Ctrl + and Ctrl - will also allow you to zoom with the keyboard.
Persisted Settings
Many of the Timeline settings are saved with each sequence you edit. Thus when you return, the place on the Timeline will be restored along with expanded groups and row sizing to get you back sequencing as quickly as possible.
5 - Effect Editor
The effect editor is a docking pane used to edit the features of the effects. There are various controls that are highly intuitive to control the values of the effects. The docking pane can be docked in any of the normal docking places or can float as a undocked window.
Properties of the effect are divided up into collapsable categories. Most of these categories are consistent across all the effects. This will help you find similar features across the multitude of effects as you become familiar with them.
The label for each property has some hover text that gives a better description of what the property changes or how it may act.
The editing is done in a live mode. All changes take effect once the adjustment settles for a short period of time. The effect will be rendered and the new representation will show in the timeline.
More than one effect can be edited at the same time. Each property will be applied to each effect edited. The effect do not even have to be the same kind. Some properties may not support multiple editing depending on their function, or if all effects do not have that property and will not be shown.
The sliders control items that have ranges.
Check boxes for on off type options.
Combo boxes for items that have specific selections.
Text boxes for other values that need text or have specific values that are beyond the resolution of a slider. The text boxes themselves have a bit of a slider function built in for numeric values. When you hover you mouse just below one the cursor will turn to a cross. At that point you can click and drag left and right below the text box to quickly alter the value up or down.
There are image representations for Colors, Curves and Gradients. When double clicked, these will open the appropriate editor for each type. These also serve as Drag Drop zones to drag that item out to somewhere else in the editor or another one dragged into to be used as the setting. They can be dragged onto other effects in the timeline or into their respective library to add them to the library. These same items can be dragged from the libraries onto the type in the editor to change them. See the drag/drop section for more details. They can even be dragged across two open sequences in two different editors.
In addition to double clicking the Color Gradients or Curve editor images to bring up the large full editors, both can be edited inline directly inline in a similar fashion as they can be edited in the larger editors. Most of the same actions work the same.
Many of these options will change based on selections you make. Options that are not relevant to a specific configuration will be hidden.
Lastly there is an option to turn on the live preview at the top. This will enable previewing of just the selected effects in the preview window if you have it running. This way you can preview the changes to specific effects without having to play the sequence.
5.1 - Inline Curve Editor
Overview
The Inline Curve Editor is a powerful tool that allows many features of the larger Curve editor dialog to be done inline in the effect editor. This improves efficency for the user since they do not have to keep opening and closing a bulky dialog box.

Editing Curves
- To add a node, hold the Control Key and Click the line where you want to add the node.
- To delete a node, hold the Alt Key and Click the node you wish to delete.
- To move a node, simply Click and Drag any node to the position you want. (The full editor provides more precision if needed)
Shortcuts
- To flatten the curve into a horizontal line, hold the shift key and click anywhere in the curve control. Holding shift while dragging will allow you to position that horizontal flat line up and down. This function is intended to replace the functionality of the old simple sliders that have now been replaced with curves.
- To reverse the curve direction, (flip left to right) use Control+Shift while clicking the curve.
- To invert the curve (flip top to bottom), use Alt+Shift while clicking the curve.
Drag and Drop
- Using the curve library, you can drag curves and drop them onto the curve in the effect editor. This works from the full library panel, or the toolbar. The opposite also works. You can drag the curve from the effect editor pane to the preset library or toolbar to add them to the library.
- You can drag a curve from the effect editor onto any other effect or selected effects on the timeline. If the effect has more than one curve, you will be prompted to choose which curve to replace.
- To invoke the full curve editor, simply double click on the black area of the curve control.
- When a curve is linked to a library curve, the line will be gray and a link icon will appear over the control.
Full Gradient Editor
- To invoke the full curve editor, simply double click on the curve in the effect editor.
A linked Curve denoted by the chain link in the upper left corner.

You will not be able to edit the linked curve in the effect editor pane. Double clicking the curve control will allow you to link or unlink library curve. Once it is unlinked, you can edit it in the inline editor or the larger Curve dialog.
5.2 - Inline Gradient Editor
Overview
The Inline Curve Editor is a powerful tool that allows many features of the full Color Gradient editor dialog to be done inline in the effect editor. This improves efficency for the user since they do not have to keep opening and closing a bulky dialog box.

Editing Colors
- To add a color node, simply click in the empty space just below the gradient image.
- To delete a node, hold the Alt Key and Click on the node you want to delete.
- To change the color of a node, Double Click on the node.
- Nodes can be dragged to change the positon of the blend.
- Fine editing of the blend or the points between colors is still done with the full editor.
Drag Drop
Using the gradient library, you can drag colors or gradients from the preset library or toolbar and drop them onto the gradient in the effect editor. The opposite also works to add a gradient to the library. You can also drag the gradient from the effect editor to another effect on the timeline. If the effect on the timeline has multiple gradients, you will be prompted for which gradient to replace.
Shortcuts
Sometimes you may want the reverse of an existing gradient that is being used. You can use Alt+Shift and Click on the gradient in the effect editor and it will reverse the color order.
Full Gradient Editor
- To invoke the full gradient editor, simply double click on the gradient in the effect editor.
Library Gradients
- When a gradient is linked to a library gradient, a link icon will appear over the gradient control and no nodes will be shown.
A linked Color Gradient denoted by the chain link in the upper left corner.

You will not be able to edit the linked gradient in the effect editor pane. Double clicking the gradient control will allow you to link or unlink the library gradient. Once it is unlinked, you can edit it in the inline editor or the Full Gradient Editor.
6 - Draw Mode
Overview
Draw modes in Vixen stem from concepts in the CAD world. Learning these techniques can significantly improve your ability to sequence in a rapid fashion.
Traditionally, effects are added to the sequence by dragging them to the sequence, or adding them from the context menu. In either case, the effect created is 2 seconds in duration, and added one at a time.
The new conceptual Draw Mode changes that. Effects can be drawn to the desired length, which cuts down on or eliminates the need to resize or adjust the effect after it has been created.Multiple effects of the same type can also be created in one step, across elements(channels).
Selection Mode
With the addition of Draw Mode, the primary mouse function of clicking, dragging, and selecting effects has now become known as “Selection Mode.” Two icons on the tool bar indicate which mode is active for use by the left mouse button. When using Draw Mode, the cursor in the sequence will change from the default arrow to a cross as a visual indicator that you are in Draw Mode, this only happens when you are ready to being drawing. (Draw Mode is enabled and an effect has been selected)
The function of the left mouse button is indicated by a blue box around the associated icon. The pencil icon indicates Draw Mode, and the arrow indicates Selection Mode.
Selection mode functions in the exact same way you have been used to sequencing in Vixen 3. With that said, we will focus on Draw Mode for the remainder of this document.
Special Notes
The middle mouse button can be used as an override of Selection Mode.
The Alt key can be used to override Draw Mode while held down.
Draw Mode
Effect Selection
The effect you wish to draw with can be selected at any time, by a single click in the effects pane. Click the effect again to stop using it, or select a new effect to use. While in Draw Mode, if no effect is selected, the left mouse button reverts to Selection Mode, to begin drawing again, simply select an effect, there is no need to change back to Draw Mode, unless you used the Escape key, or clicked the Arrow icon to exit Draw Mode. When an effect is selected, it will have a blue background. For quickly changing the selected effect, you can use the UP/DOWN arrow keys.
Special Notes
While in Draw Mode, you can still drag & drop other effects into the sequence, and continue on drawing with your selected effect.
After Draw Mode is enabled, and and effect has been selected, move to the point you wish to draw the effect at, click and hold the left mouse button and draw the effect to the desired length. You can start drawing from the start or end of the desired effect. A draw box will appear to indicate where the effect(s) will be placed.
The draw box is not a visual representation of the effect being drawn, and is only intended as a visual guide for effect placement. To draw move than one effect at once, draw the box across other elements you wish to place effects on. When the draw box represents the desired location of the effects, release the left mouse button, and the effects are created. The created effects are also immediately selected as a group for quick manipulation.
While in Draw Mode, you can still adjust the length of effects by grabbing the border of the effect at the start or end. However, you cannot click and drag the effect to move it. This is because Vixen allows you to stack effects on top of each other. You can click and drag the effect to move it by using the Alt key to override Draw Mode.
Key Points
Up/Down arrow keys change selected drawing effect.
Escape key explicitly exits Draw Mode, and changes to Selection Mode.
You do NOT have to be in Draw Mode to create your sequence, you may still use Vixen 3 just as you have in the past.
Middle mouse button overrides selection mode, when an effect is selected to draw with.
Pressing and holding the Alt key over rides Draw Mode.
7 - Drag and Drop
Overview
Drag and drop is a integral part of any modern application. The sequencer supports many drag and drop operations to make it easier for the user to sequence.
Colors, Gradients, Curves
Color, Color Gradients, and Curves can be dragged from the library dockers directly onto effects, or onto the appropriate Color/Color Gadient/Curve box in the effect editor. They can also be dragged from the Effect Editor out onto other effects. If you have your libraries in a toolbar view, they can be dragged from there as well. If you are dropping them on the Timeline, they can be dropped on to a group of selected effects. For example, if you have 5 Pulse effects selected, and drop a Color Gradient on one of them, it will be applied to all of the selected ones. If an effect has more than one possible target for the Color, Color Gradient, or Curve you are dropping, you will be given a pop up option to select which attribute to replace. Just click the correct one and it will be applied.
Files
You can Drag files from Windows Explorer and drop them onto a row / location on the timeline. Multiple files and file types can be dragged at the same time. The Sequencer will determine the type of the files and attempt to create the proper effect that can utilize the file in the location the files were dropped. The most common types are video and image files, but a complete list is as follows.
Supported Effects are:
- Picture All standard image types.
- Video All standard video types.
- Glediator .gled file types.
- Shapes .svg file types (Scalable Vector Graphics files).
Tutorial
8 - Alignment Helpers
Overview
Alignment Helpers allow you to quickly align effects in a number of ways.
Unless specifically noted, the reference effect is the effect that you right click on
to access the context menu or selection based if you use the keyboard shortcuts.
To access the Alignment Helpers, you will need to have a minimum of two effects selected,
then right click the effect you wish to use as a reference, then Navigate to the Alignment menu item,
this will give you a sub menu of the alignment helpers available.
Align Start Times
This helper allows you to align the start time of multiple effects in one quick action.
By default, when you align start times, the end time of the effects are not changed, thus increasing, or decreasing the duration of the effect. The shortcut for this is to press the S key while the mouse pointer is over the selected effect to use as the reference.
To prevent the duration from changing, hold the shift key while clicking this helper.
This will move the start time of the selected effects to match the start time of the reference
effect, and will not change the duration of the selected effects.
In the event that one of the selected effects end time is before the start time of the reference
effect, that effect will be moved to match the start time, and the duration will be held.
Align End Times
This helper allows you to align the end time of multiple effects in one quick action.
By default, when you align end times, the start time of the effects are not changed, thus increasing, or decreasing the duration of the effect. The E key is the shortcut while hovering over the reference effect.
To prevent the duration from changing, hold the shift key while clicking this helper.
This will move the start end time of the selected effects to math the end time of the reference
effect, and will not change the duration of the selected effects.
In the event that one of the selected effects start time is after the end time of the reference
effect, that effect will be moved to math the end time, and the duration will be held.
Align Both Times
This helper allows you to quickly align effects, with matching start and end times. Use the B key as a shortcut while hovering over the reference effect.
Align Center Points
This helper aligns the center of all selected effects to the reference effect.
Match Duration
This helper allows you to match the duration of selected effects, to that of the reference effect.
By default, the end time of the effect is changed to match duration.
Hold the shift key while clicking this helper to change the start time to match duration.
Align Start to End
This helper allows you to align the start time of selected effects to the end time of the reference effect.
At this time the duration of the effect is held, there is no modifier key to maintain the effects end time.
Align End to Start
This helper allows you to align the end time of selected effects to the start time of the reference effect.
At this time the duration of the effect is held, there is no modifier key to maintain the effects start time.
Distribute Equally
This helper distributes a number of selected effects over a period of time, determined by the starting time of the top most
selected effect, and the end time of the bottom most selected effect.
This total amout of time is determined by subtracting the starting time from the end time. The result of that calculation
is divided by the number of selected effects which results in the duration to be used for the selected effects.
The effects are then aligned Start to End, in a stair stepped pattern.
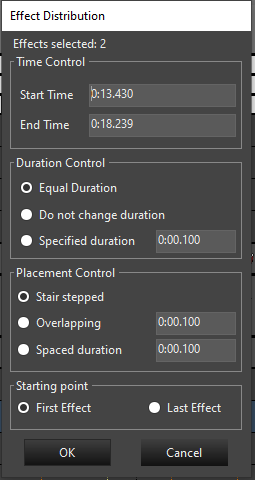
Distribute Effects (Dialog)
This helper is an advanced version of the Distribute Equally helper, you will be presented with a dialog window, which allows you full control over the distribution of the selected effects.
The options for this helper are:
- Time Control
- Start Time
- End Time
- Duration Control
- Equal Duration
- Do Not Change Duration
- Specified Duration
- Placement Control
- Stair Stepped
- Overlapped
- Spaced
- Starting Point
- First
- Last
Mark Alignment
Effects can be aligned to marks using the mark alignment functions.
Align Start to Nearest Mark
To align the start of the effect to a mark, select the effect(s) and then right click and click Alignment-> Align End to Nearest Mark or use the CTRL + SHIFT + S shortcut while hovering over the selected effect.
Align End to Nearest Mark
To align the end of the effect to a mark, select the effect(s) and then right click and click Alignment-> Align End to Nearest Mark or use the CTRL + SHIFT + E shortcut while hovering over the selected effect.
Align Both to Nearest Mark
To align the both ends of the effect to a mark, select the effect(s) and then right click and click Alignment-> Align Both to Nearest Mark or use the CTRL + SHIFT + B shortcut while hovering over the selected effect.
9 - Resize / Draw Indicator
Overview
Moving and aligning effects to a part of a waveform, marks, or other effects is key to creating a sequence. This can be tedius if you are struggling visualize the alignment. In order to better visualize where the effect starts or ends, an indicator is optionaly available to make that easier.
Resize Indicator
The Resize / Draw Indicator option allows you to toggle on or off lines which appear from the top to bottom of the grid at the start or end of a selected effect as an indicator to assist in the movement or resizing of effects.
To enable or disable the indicator lines, enable the option under Edit -> Resize / Draw Indicator in the toolbar menu. You can set the color of the lines in the sub menu of that item. The color options are Blue, Yellow, Green, White, and Red.
When enabled, the indicator line will appear on the resizing end of an effect when you resize that effect. If you are moving an effect, the indicator lines will appear at both ends of the effect.
The indicator lines also appear for the Draw Box when using the Draw Mode feature.
10 - Snap Points
Overview
Snap Points are a common feature in many drawing or editing applications. Vixen provides a very powerful version of this feature to enable snapping effects to things like marks or other effects. There are two items in the editor that support snapping. Those are Marks and Effects.
Configuration
Snap points can be enabled with the Magnet icon in the tool bar. When the Magnet icon is selected, the feature will be enabled. To the right of the Magnet icon is a drop down that will allow you to select the strength multiplier of the snap. This governs how close something needs to be to the other object for it to snap into place. 1 is the weakest and 4 is the strongest.
Snapping to Effects
Effects support snapping to each other. When dragging or resizing an Effect, when it geets close to to another Effect it will jump to or attract to the other Effect. This enables you to easily get two effects back to back without trying to align them precisly. Effects favor being glued to another Effects.
Snapping to Marks
In addition to snapping an Effect to another Effect, they will also attract to Marks. This makes it easy to align an effect to a Mark when you are editing them. There are other Alignment tools for aligning effect to Marks as well. Effects will favor another Effect over a Mark when they are in the same area. You can increase the strength of the Marks in the Mark Docker by increasing their Weight setting.
11 - Audio
Overview
Most sequences will have an audio track that the lights are syncronized to. Vixen supports most formats of audio files and provides many features for incorporating audio into a sequence.
Adding / Removing Audio
Audio can be added or removed from the options under the Tools -> Audio menu in the Sequencer. To add audio, click the Associate Audio menu or the musical note in the icon toolbar. A dialog will appear for you to select your audio file from the file system. Once you add an audio file, it will be copied into the Media folder in the Vixen profile. If the sequence is not the same length as the audio file, you will be prompted to ask if you would like to resize the sequence. If you choose yes, the sequence will be resized to match the audio file. This is generally the desirable state. You can replace the current audio file with another one by using the same Associate Audio menu. You will be prompted to ask if you want to replace the audio.
To remove an audio file, you can select the Remove Audio menu option. The audio that is currently associated will be removed. The length of the sequence will remain the same.
Waveform
Once an audio file is associated, the Timeline will be updated with a waveform showing the general audio shape of the audio. This is similar to what you will see in other audio players or editors. It is based on sampling the audio and mapping that into the time available. Zoomming in and out of the timeline will increase or decrease the detail of the sampling. The waveform can take two shape. Either a full stereo waveform with each channel eminating from the the center, or a single mono form with the merged channels eminating upward. You can change toggle this under the View -> Full Waveform option in the toolbar menu. The vertical space the waveform occupies can be changed by hovering at the bottom of the waveform area until a cross bar cursor appears. Clicking and dragging will allow you to resize the area to the desired height.
Beat / Bar Detection
Marks for audio beats and bars can be automatically detected on an audio track that has been added to the the sequence in the editor, under the menu in the toolbar Tools -> Audio -> Beat/Bar detection. This will bring up a dialog to select the type of marks you want to generate. See Beat / Bar Detection under the section on Marks.
Audio Playback Speed
The speed of the audio will change to follow along with the sequence playback speed. This can be changed by using the - + buttons on either side of the speed guage in the icon toolbar. 100 is normal speed. Numbers lower than 100 are slower, and numbers higher are faster.
Speed / Tempo
Since Version 3.9.
The way in which the audi sounds when played at speed other than 100 can be changed by selecting the Speed / Tempo option in the toolbar under Tools -> Audio. The default is unchecked and will use speed as the playback option. If you select the option, it will use an algorythm to vary the tempo of the audio as the speed changes. Tempo may be useful in Lip Sync operations to better hear the words in an audio track.
12 - Preset Libraries
Overview
Preset libraries offer a helpful way to save off frequently used items like Colors, Color Gradients, and Curves in order to use them over quickly. These items are frequently used in Effects and other areas.
Docker Windows
The editor has docking windows to manage presets for Curves, Colors and Color Gradients. These can be enabled or disabled from the View* menu in the toolbar. The docker windows can be docked into any of the normal places. Here you can create collections of your most used values. They can be dragged from these docker windows directly onto effects, or to the appropriate place in the Effect Editor.
The docker windows have a menu bar that is similar amongst all three.
- Edit The wrench icon can be used to edit a selected item in the library, or you can double click it. The appropriate edit dialog will appear for the item you are editing.
- New The wew icon will launch a dialog asking for a name. It will then launch the appropriate editor with the new item to create.
- Delete The red X icon will delete the selected item.
- Export The folder with the green arrow icon will export the library to a file.
- Import The open folder icon will import a library from a saved file.
Toolbars
The same libraries can be enabled as a toolbar in addition or in place of the docker windows. All the same features are available from the toolbar as in the docker.
13 - Marks
Overview
Marks are a very useful way to label interesting things in a sequence. They are primarily used for timing tracks and marking the beats of a song. They can be added manually, generated by tools in the sequencer, or imported from various 3rd party sources. Marks primarily show up in the Ruler section of the timeline below the audio track if the sequence includes one. But they can also show up in the Marks Bar.
Mark Collections
Mark collections are now entirely managed in the Mark Collection docker. You can add/remove them, adjust their color, set their appearance and their type from the Mark Collection docker. You can import them from various different formats including Audacity, Papagayo, xTiming and other Vixen users amongst many. They also can be exported in Vixen format.
Marks Bar
The Marks Bar can be enabled per Mark Collection in the Mark Collections docker. All marks have a duration, but it may not be relevant for all usages of marks. The Marks Bar provides additional functionality in the form being able to visualize that duration of the Mark. The primary use for this is for Lip Syncing faces. These marks can have text and that can be used to mark the locations of phrases, words, and phonemes.
Adding Marks
Marks are added via the right click functionality in the ruler. Right click on the spot in the ruler you want the mark to start. A default mark will be added to the active collection. The active collection can be set in the Mark Collections docker by checking the box in the Pencil column next to the collection that should be active. Holding the Control Key while right clicking to add a mark will have it fill the time between the two marks you add it between. You can add text at the same time the mark is added by holding the Shift key while right click to add. Adding the Control Key to that additionally will have it fill the gap between two marks.
Editing Marks
Simple Marks can be moved by dragging the Mark indicator in the time ruler to the position your want it. The Mark bar itself allows for editing the marks when the bar for the collection is enabled. You can drag their start and end times or the entire mark in the same way you manage effects in the timeline. Dragging in the middle area of the mark will move the entire mark left or right along the timeline. Dragging the beginning or end of the mark will allow you to move those respective times. You can select multiple marks and then drag them right or left along the timeline as a group by dragging in the middle of one of the marks. Similarly, you can drag the start or end times of all selected ones uniformly by dragging the start or end of one of the marks left or right. While editing marks alignment marks will be projected up through the audio waveform to assist in alignment.
Holding the Alt key and double clicking on a mark will cause it to expand and fill the time between the mark prior to and after it. Right clicking on the mark will invoke a context menu that allows various functions such as Cut/Copy/Paste, Delete, and Edit of the text. Marks can be Cut / Copied along the timeline and can be pasted across collections. The shortcut keys do not work here at the current moment due to conflicts with the same actions on Effects.
Controlling Play
An additional feature allows the the user to play a section of the sequence by double clicking on a Mark in the Mark Bar. When double clicking a mark, the editor will play the sequence over the range of the mark duration in a single pass and stop at the end. If the Loop function of the sequence is enabled, then that duration will loop until the stop button is clicked. This can be very useful in aligning marks to audio especially when doing lip sync. The marks can be moved while it is looping, but the section of the sequence that is playing will not reset until the loop is restarted.
Mark Collection Appearance
Each Mark collection can have some attributes set to distinguish it from the others. This can be customized by the user in the Mark Collection docker by right clicking on the Mark Collection name. Here the color, and line type, and bolding can be set. The Solid Line, Bold, and Color all influence how the lines through the timeline look as well as the color of the mark in the Mark Bar.
Mark Collection Types
There are four types of mark collections.
- Generic This the basic all purpose type and is used for basic timing marks.
- Phrase This collection is used to denote marks used as the Phrases for Lip Sync purposes. Each mark should contain the text of a vocal phrase.
- Word This collection should be used for the broken down words of a Phrase type collection. When using the breakdown function in the Mark Bar on a Phrase type mark, it will break out the words and place them in a Word collection.
- Phoneme This collection is used as the broken down Phonemes for a word.
Mark Collection Linking
The three collection types that pertain to Lip Sync can be linked to each other to make the association. A word collection should be linked to a parent Phrase collection. A Phoneme collection should be linked to a parent Word collection. This guides the breakdown feature in the Marks Bar on where to put the associated breakdown. Under normal workflows this linking would be done automatically. If you create a Phrase collection first and then break that down into words, it will create an appropriate word collection and link it automatically. The user can edit the linking if necessary on each collection. A collection can only be linked to one parent.
Mark Weight
Each Mark collection can be assigned a weight which is used for how strong effects snap to them in the Timeline. This can be set from the Mark Collection Docker by right clicking on the Mark Collection. There is a Weight option on the menu and a sub menu with numerical choices to pick the weight. The higher the number, the stronger the weight. The Mark line in the Timeline will vary depending on the weight so they can be distigushed. See Snap Points for more info.
Mark Offset Time
A collection of Marks can be shifted in time to adjust the whole group if needed. Right click the collection in the Mark Docker and choose the option to Offset Time. A dialog will appear to enter the time in milliseconds to shift the time. Entering a positive number will shift the Marks ahead in time. A negative number will shift the Marks back in time. This only applies to the collection that you right click on. If you want to do more collections, you would need to apply the same to each one.
Mark Tapping
Tapping can be accomplished by having a Mark Collection defined in the Mark Collection docker. Then with the collection you want to use marked as active, you can hold the Shift key and then hit Space where you want marks to be placed while the sequence is playing. Once the marks are added, you can later adjust their positioning within the timeline.
Beat / Bar Detection
Marks for audio beats and bars can be automatically detected on an audio track that has been added to the the sequence in the editor. Under Tools -> Audio -> Beat/Bar detection. This will bring up a dialog to select the type of marks you want to generate. This uses the Queen Mary VAMP plugins that are commonly used in Audacity to detect beats and bars. The defaults on this dialog are generally adequate. You can choose the name of the mark collection prefix you would like to use. It defaults to Beats. You can choose the colors of the marks by double clicking on the color boxes for each option. You can change them later if you need to. In the Clef you can choose the timing of the music. A lot of music is 4/4 so the default may work for most songs. Otherwise you can change it to what the music is. It does not generally do well with tracks that change signatures. Once you click Generate, it will create Mark Collections for all the options that were selected in the editor. See above for editing the generated collections.
Mark Import
Mark collections can be imported from various other sources. The Import menu on the Mark Collections Docker allows you to choose the source for that import. It can be tracks from Audacity, xTiming from XLights, or from the Singing Faces Project.
XLights Singing Faces Project Import
There is a browser under the import menu on the Marks collection docker to browse the available Singing Face tracks available in the project. In many cases that includes information about the audio track that was used to make them. When importing, these will create the Phrases, Words, and Phonemes.
Audacity
Audacity can create a label track that includes the beats (and other things) in a song. Vixen has the capability to import these labels.
Audacity can use various plugins to analyze music and has basic beat detection built in. If you want more advanced beat detection, you can download other plugins for use with Audacity. I have used the Vamp plugins with some success. You can download them here for use in Audacity: http://www.vamp-plugins.org/.