LipSync Image Maps
Overview
When the LipSync effect’s Mapping Type is set to Image Mapping, it renders phonemes by drawing one image per phoneme onto the target as if it were a pixel matrix, instead of relying on individually mapped elements (that’s what the Face Property is for). Those phoneme-to-image sets are called Image Maps, stored in a shared library so they can be reused across sequences and props.
All three related tools live under Tools -> LipSync in the Sequence Editor:
- Edit Image Maps manages the library itself — add, edit, clone, rename, and remove maps.
- Default Image Map picks which map new LipSync effects start with.
- Edit Element Face Mapping is unrelated to Image Maps — it opens the Face Setup wizard for Face Mapping instead. See Face Property for that.
Edit Image Maps
Tools -> LipSync -> Edit Image Maps opens the Image Maps window, a library manager listing every map by name and its Notes. The current default map is shown in bold. Changes here take effect immediately — there’s no Cancel; OK just closes the window.
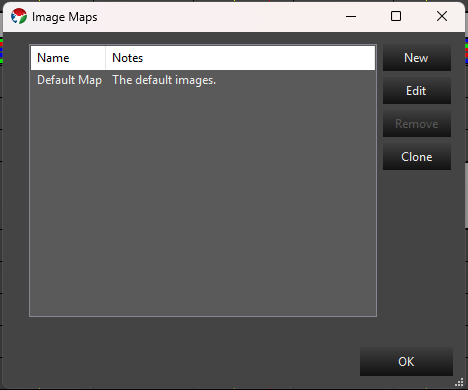
- New Creates a map named
New Map(orNew Map(1),(2), and so on if that name is taken), then immediately opens it in the Image Map Editor described below. Canceling out of that editor discards the new map entirely. - Edit (or double-click a row) Opens the selected map in the Image Map Editor.
- Clone Duplicates the selected map(s), including all of their images, under an auto-generated unique name.
- Remove Deletes the selected map(s) and their image files, after confirming. Any LipSync effect using a removed map reverts to whichever map is set as default. Disabled while only one map remains in the library — you can’t remove the last one.
- To rename a map, select it and click its name again (or press F2) to edit it in place. Renaming moves the map’s image folder to the new name; if a map with that name already exists, the rename doesn’t happen.
Image Map Editor
Opened via New or Edit above, the Image Map window edits one map’s images, one phoneme at a time.
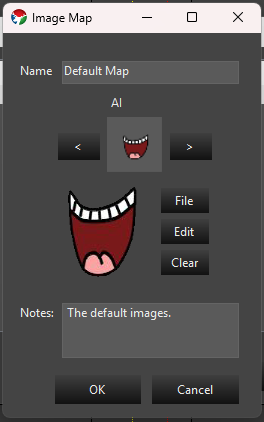
- Name and Notes Editable fields for the map’s library name and a free-text description.
- < / > Step to the previous/next phoneme. The current phoneme’s code and reference icon are shown above the image preview, cycling through all 10 phoneme codes: AI, E, ETC, FV, L, MBP, O, REST, U, WQ.
- File Browse for an image (
.bmp,.jpg, or.png) to assign to the current phoneme. You can also drag and drop image file(s) directly onto the window.- If you select or drop more than one file at once, an Image Mapper dialog opens instead, with a dropdown per phoneme, so you can assign each dropped file to whichever phoneme it belongs to in one pass instead of one at a time. If you name your image files after their phoneme codes (
AI.png,E.png,ETC.png, and so on) and select or drop them all together, they line up with the matching phoneme automatically — just review the dropdowns and press Accept, adjusting any that aren’t right first.
- If you select or drop more than one file at once, an Image Mapper dialog opens instead, with a dropdown per phoneme, so you can assign each dropped file to whichever phoneme it belongs to in one pass instead of one at a time. If you name your image files after their phoneme codes (
- Edit Opens the current phoneme’s image in an external image editor (Windows Paint) for touch-ups, then reloads it once you save and close that program. This requires Windows — it’s the only editor it launches.
- Clear Removes the image assigned to the current phoneme, leaving it blank.
- Double-clicking the image preview does File if the phoneme has no image yet, or Edit if it already has one.
- OK saves all of your image assignments — every phoneme’s image is converted to
.bmpand saved into that map’s library folder — along with the Name and Notes. Cancel discards changes made in this session (but for a brand-new map, canceling removes the whole map, per above).
New maps aren’t blank — they start out pre-loaded with Vixen’s built-in placeholder images for every phoneme, which you then replace with your own as needed.
Default Image Map
Tools -> LipSync -> Default Image Map is a flyout menu listing every map in the library by name, with a checkmark next to the current default. Click a name to make it the default — there’s no separate dialog. New LipSync effects using Image Mapping start out pointing at this map, and it’s also what any effect falls back to if the map it was using gets removed.
Next Steps
Once you have a map you’re happy with, add a LipSync effect, set Mapping Type to Image Mapping, and choose it from the Image Map dropdown.
Feedback
Was this page helpful?
Glad to hear it!
Sorry to hear that. Please tell us how we can improve.